How to Install Vinyl Siding: A Practical Guide for Mid-Missouri Homeowners
Vinyl siding installation comes down to one thing: understanding how the material behaves in Missouri weather. Temperature swings, humidity, and seasonal storms in Columbia, Jefferson City, and surrounding areas all affect how vinyl expands and contracts. Get this wrong and your siding buckles or warps within a few years. Get it right and it lasts decades.
Why Vinyl Siding Works in Mid-Missouri
Vinyl siding holds up well in Missouri’s climate when installed correctly. The material tolerates temperature extremes from sub-zero winters to 100°F summer days, and it resists moisture damage better than wood when the spring rains hit. Proper installation accounts for expansion gaps that let the material move without buckling or warping.
Drive through Columbia’s older neighborhoods and you’ll see homes with original vinyl siding from the 1990s still performing fine. That’s proof: a solid installation lasts decades.
What You’ll Need
Tools:
- Tape measure and level
- Chalk line
- Utility knife and aviation snips
- Hammer and nail set
- Snap-lock punch
- Unlocking tool (zip tool)
- Circular saw with plywood blade (optional, for cutting)
Materials:
- Vinyl siding panels
- Starter strip
- J-channel (for windows, doors, and corners)
- Corner posts (inside and outside)
- Utility trim
- Roofing nails (galvanized or stainless, 1.5 to 2 inches)
- House wrap or felt paper (if replacing exterior sheathing)
Step 1: Prepare the Surface
Start with a clean, flat surface. Remove any old siding that’s rotting or damaged. If you’re installing over existing siding, make sure it’s sound and securely fastened—vinyl won’t hide problems underneath.
Check the sheathing for rot or water damage. Mid-Missouri’s spring storms can reveal leaks that weren’t obvious during dry months. Replace any damaged sheathing and seal gaps around windows and doors with flashing tape.
Install house wrap or building paper if you’re down to the sheathing. This moisture barrier protects your home from wind-driven rain and helps with insulation. Overlap seams by at least 6 inches and tape them securely.
Mark a level line around the house for your starter strip. This line should be at least 1 inch above the top of the foundation or sill plate to allow for drainage and prevent wicking moisture into the framing.
Step 2: Install the Starter Strip and Corner Posts
Snap the starter strip onto your level line. Nail it through the nail slots every 8 to 12 inches, but don’t drive the nails tight—leave about 1/16 inch of space so the strip can move with temperature changes. This floating nail technique applies to all vinyl siding components.
Install corner posts next. Position them plumb and nail through the slots, again leaving room for movement. Overlap the corner posts at the top by about 1/4 inch to prevent water infiltration. Make sure the posts extend down below the starter strip by at least 1/4 inch.
Step 3: Install J-Channel Around Openings
Wrap windows and doors with J-channel. This trim piece catches the ends of siding panels and provides a finished look. Cut the J-channel to length, miter the corners at 45 degrees where pieces meet, and nail it through the slots with the same floating technique.
Install J-channel along the top of the wall under the soffit and along the eaves. Leave a small gap at the ends to allow for expansion.
Step 4: Hang the First Panel
Lock the bottom of the first siding panel into the starter strip. Don’t force it—vinyl should click into place without excessive pressure. Nail the panel through the slots every 8 to 12 inches, centering the nail in the slot. Again, drive the nail head about 1/16 inch away from the siding to allow movement.
Check that the panel is level before moving on. A slight deviation at the bottom compounds as you work your way up the wall.
Step 5: Continue Installing Panels
Lock each subsequent panel into the one below it. Stagger the seams between rows by at least 4 feet so they don’t line up vertically—this creates a more stable wall and looks better.
Keep the panels level as you work. Use a level frequently, especially on longer runs. Mid-Missouri’s older homes sometimes have settling that throws things out of plumb, so don’t rely entirely on existing lines.
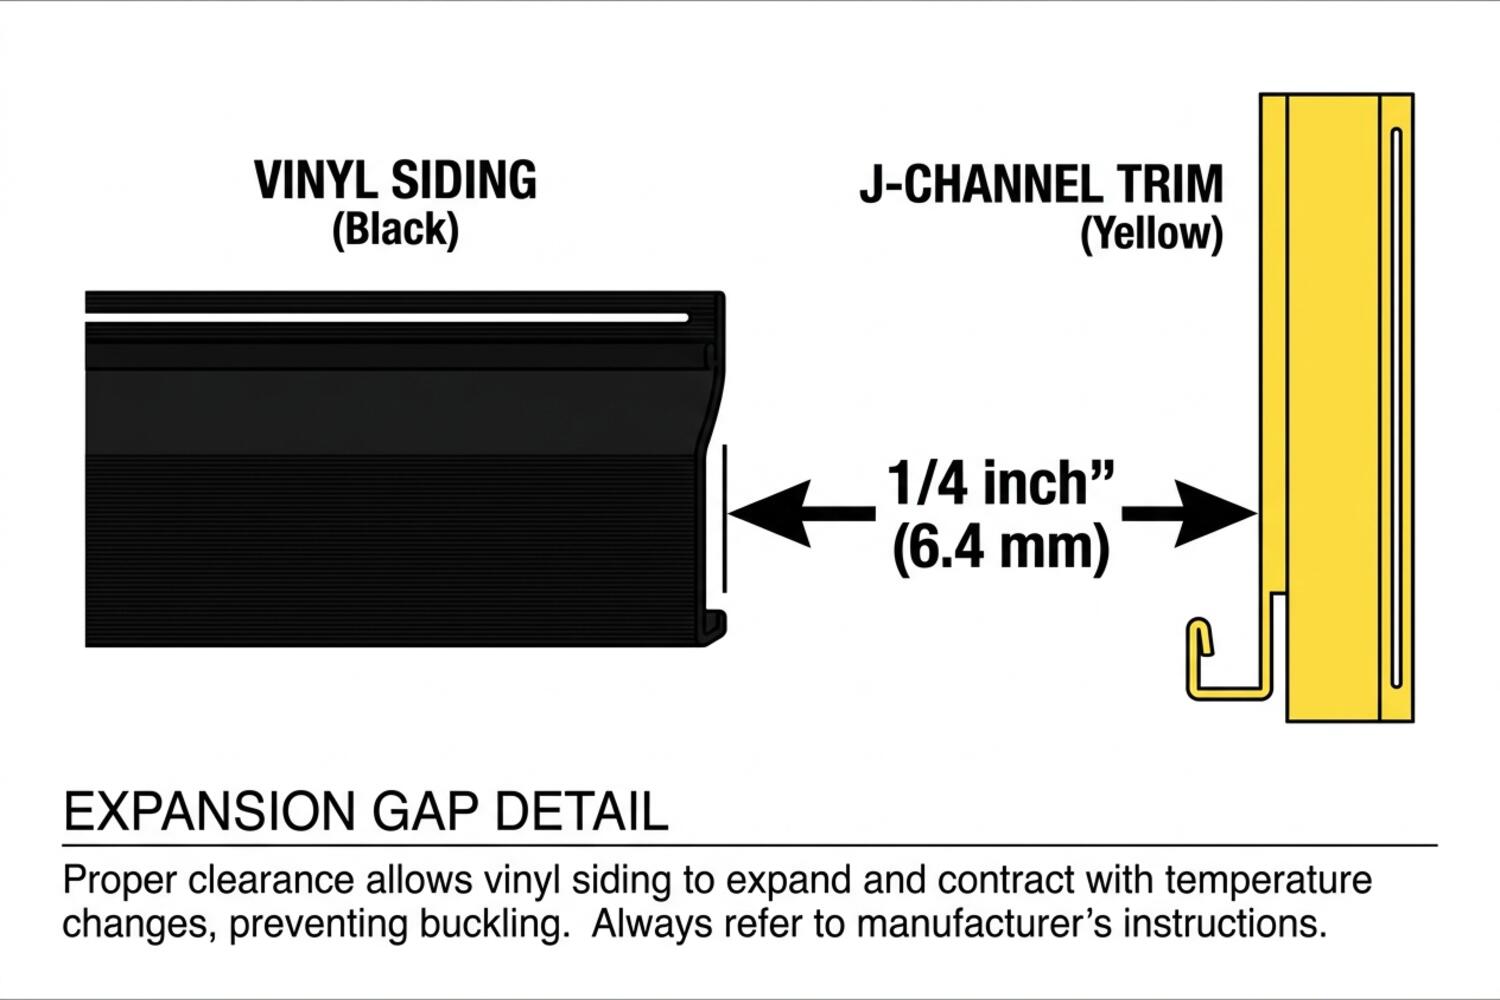
Leave expansion gaps where siding meets J-channel, corner posts, or other trim. These gaps should be about 1/4 inch for a 12-foot panel—vinyl expands significantly in hot weather.
Step 6: Cut and Fit Around Obstacles
Cut siding panels to fit around windows, doors, electrical outlets, and other obstacles. Use tin snips for curved cuts and a utility knife for straight cuts. Score the panel deeply with the knife, then snap it back and forth along the score line to break it clean.
For electrical boxes and other fixtures, use a hole saw or nibbler to cut clean openings. Make sure the cuts are tight but not so tight that the panel can’t expand.
Step 7: Install the Top Course
The final course of siding under the soffit or eaves needs special attention. Install undersill trim or finish trim along the top edge, then snap-lock the top of the siding panel into the trim. The snap-lock punch creates tabs on the cut edge that lock into the trim piece.
If the space between the last full panel and the trim is less than 4 inches, you may need to rip a panel to fit. Use a circular saw with a fine-tooth blade designed for plastic, or score deeply with a utility knife and snap it.
Common Mistakes to Avoid
Nailing too tight causes most failures. Vinyl must move. Drive nails so the head sits about 1/16 inch from the siding. When summer heat hits, tight nails lock the material in place and it buckles.
Ignoring expansion gaps creates the same problem. Every piece of vinyl needs room to move. Leave gaps at corners, around windows, and where panels meet trim. In Missouri’s 100-degree July heat, those gaps close up. Without them, the siding warps.
Not flashing properly lets water get behind the siding where it causes rot. Flash windows, doors, and corners correctly before you start. This step takes time but prevents expensive repairs later.
Uneven starter strip throws everything off. If your first row isn’t level, nothing else will be either. Take time to mark a true level line around the entire house before you start.
Ignoring manufacturer instructions leads to mistakes. Different brands have slightly different requirements. Read the instructions that come with your siding and follow them.
When to Call a Professional
Vinyl siding installation works for experienced DIYers, but it’s labor-intensive. A typical two-story home takes 3 to 5 days to side, even with help. If you’re not comfortable working at heights, don’t have the right tools, or the house has complex features, hire a contractor.
Professional installation includes warranties covering materials and workmanship. Most manufacturers won’t warranty incorrectly installed siding. If you’re considering professional siding installation, get multiple estimates and check references.
Weather Considerations for Mid-Missouri
Plan your siding project for moderate weather. Spring and fall work best in Missouri. Avoid installing vinyl below 40°F—the material becomes brittle and cracks. Hot, humid summer days make vinyl flexible but also more prone to expansion issues.
Watch the forecast. You don’t want siding exposed to rain before you complete a wall section. Mid-Missouri’s spring thunderstorms roll in quickly, so have tarps ready to protect open walls.
Cost Considerations
DIY vinyl siding runs $2 to $4 per square foot for materials, including starter strips, trim, and fasteners. Professional installation costs $5 to $9 per square foot, depending on house complexity and siding quality. A typical 2,000-square-foot ranch home costs $4,000 to $8,000 for materials alone, or $10,000 to $18,000 with professional installation.
Premium siding costs more upfront but lasts longer. Deeper profiles, better color retention, and longer warranties hold their appearance better. Cheap siding fades and becomes brittle within 10 to 15 years in Missouri’s sun.
Maintenance Tips
Vinyl siding needs minimal maintenance compared to wood or fiber cement. Wash it annually with a garden hose and mild detergent to remove dirt and pollen. Use a soft brush or cloth on stubborn spots. Avoid abrasive scrubbers that scratch the surface.
Inspect the siding annually after storm season. Look for loose panels, cracked pieces, or areas where water might be getting behind the siding. Fix issues promptly to prevent moisture damage.
Seal any gaps around windows, doors, and utility penetrations with high-quality exterior caulk. This prevents water intrusion and improves energy efficiency.
FAQ
How long does vinyl siding last in Missouri climate?
Quality vinyl siding lasts 20 to 40 years when installed correctly. Missouri’s temperature extremes and UV exposure are harder on siding than milder climates. Choose a premium product with UV inhibitors to extend lifespan. Proper installation with adequate expansion gaps prevents premature failure from buckling or warping.
Can I install vinyl siding over existing wood siding?
Yes, if the existing siding is sound and securely attached. Remove rotten or damaged sections first. Installing over existing siding adds insulation value and saves demolition time, but it adds thickness to the walls. Make sure window and door trim can accommodate the additional depth. Fix moisture problems before covering them up.
What’s the minimum temperature for installing vinyl siding?
Most manufacturers recommend installing vinyl siding above 40°F. Below this temperature, the material becomes brittle and cracks during cutting or nailing. If you must work in cooler weather, handle the siding carefully and allow it to warm up before installation. Avoid installation in freezing conditions.
How do I repair damaged vinyl siding?
For small cracks or holes, use a vinyl siding repair kit from a home center. Clean the damaged area, apply the patch material according to the kit instructions, and paint to match. For larger damage, replace the entire panel using a zip tool to unlock it from adjacent panels, then install a new piece. Keep extra siding from your original installation for future repairs. Dye lots vary, and matching color later can be difficult.
Should I remove old siding before installing new vinyl?
Removing old siding lets you inspect and repair the sheathing, add insulation, and address water damage or rot. It also ensures a flat surface for the new siding. If the existing siding is in good condition and you’re on a tight budget, installing over it can work—after fixing underlying moisture problems. Most professional installers recommend removal for the best long-term result.
What siding colors work best for Mid-Missouri homes?
Neutral tones like taupe, gray, and cream remain popular across Columbia, Jefferson City, and surrounding areas. Lighter colors resist fading better under Missouri’s summer sun. Earth tones complement our regional landscape. Avoid very dark colors on south-facing walls where sun exposure is highest—dark vinyl absorbs more heat and expands more dramatically.
How do I prevent water damage behind vinyl siding?
Proper flashing around windows, doors, and corners is critical. Install house wrap or felt paper as a moisture barrier behind the siding. Install the siding with required expansion gaps so water drains away rather than getting trapped. Don’t caulk the bottom edge of siding panels—water needs to escape if it gets behind the material. If you’re concerned about existing water damage, storm damage repair services can assess and fix problems before they worsen.
Can vinyl siding withstand Missouri hail and wind?
Quality vinyl siding rated for wind resistance withstands gusts up to 180 mph when properly installed. Hail can crack or dent siding depending on hailstone size and material thickness. After severe storms, inspect your siding for damage and file an insurance claim if necessary. Missouri’s spring storm season makes impact resistance an important consideration when choosing siding.
Next Steps
Whether you’re planning a DIY project or evaluating contractors, understanding the vinyl siding installation process helps you make better decisions. Proper preparation, correct nail placement, and attention to expansion gaps make the difference between siding that lasts decades and siding that fails within a few years.
If you’re considering siding replacement for your Mid-Missouri home, CoMo Premium Exteriors offers free inspections and estimates. We’ll assess your current exterior, explain your options, and give you a straightforward recommendation—no pressure, no gimmicks.
Schedule your free inspection today.
