A damaged exterior door frame is one of those problems that starts small and gets expensive fast. What begins as a sticky latch or a slight draft can turn into water damage, pest entry, and climbing energy bills. If you have noticed these warning signs at your Columbia home, replacing the outside door frame is one of the most practical upgrades you can make.
At CoMo Premium Exteriors, we handle exterior door frame replacements across Boone County and throughout Mid-Missouri. This guide walks you through the process — whether you plan to tackle it yourself or want to know what to expect when a professional handles the job.
Signs Your Outside Door Frame Needs Replacement
Not every door problem means the frame has to go. But when you see multiple issues from this list, replacement is usually the smarter move over patching:
- Visible wood rot or soft spots — press a screwdriver into the frame near the bottom corners. If it sinks in easily, rot has set in. Columbia’s humidity and freeze-thaw cycles accelerate this damage.
- Sagging or misaligned door — if your door drags on the threshold or will not latch without force, the frame has likely shifted or warped.
- Persistent drafts around the door — hold a lit match or lighter near the frame edges on a windy day. If the flame flickers, your frame seals have failed.
- Stripped screw holes — when hinges pull away from the frame and tightening screws no longer holds, the wood is compromised.
- Pest damage — termites and carpenter ants love exterior door frames, especially in older Columbia homes with wood frames that sit close to soil grade.
- Water stains on interior walls near the door opening — moisture is getting past the frame and into your wall cavity.
Tools and Materials You Will Need
If you are going the DIY route, gather everything before you start. There is nothing worse than having your exterior door opening exposed to the elements while you run to the hardware store.

Tools
- Pry bar and flat-edge pry bar
- Hammer and rubber mallet
- Utility knife
- Chisel set
- Handsaw or reciprocating saw
- Utility square and 4-foot level
- Tape measure
- Drill with driver bits
- Caulk gun
Materials
- Pre-hung door frame kit or individual jamb pieces (composite or treated wood)
- Galvanized nails and 3-inch exterior screws
- Cedar or composite shims
- Low-expansion foam insulation
- Exterior-grade silicone caulk
- Flashing tape
- Primer and exterior paint
Step-by-Step: Replacing an Outside Door Frame
Step 1: Remove the Existing Door and Frame
Start by removing the door from its hinges. Pop the hinge pins from the bottom up using a nail set and hammer. Set the door aside on a flat surface so it does not get scratched or warped.
Next, remove the interior and exterior trim (casing) around the frame. Use your flat pry bar and work carefully — you may be able to reuse the trim if it is in good condition. Cut any caulk lines with your utility knife before prying.
Once the trim is off, remove the frame itself. Cut through any nails or screws holding the jambs to the rough opening using a reciprocating saw. Work the frame pieces out one at a time.
Step 2: Inspect and Prepare the Rough Opening
With the old frame out, inspect the rough opening for damage. In Columbia homes, especially those built before the 1990s, this is where you often find hidden moisture damage or insect activity. Replace any damaged studs, jack studs, or header material before going further.
Check the rough opening for square and plumb. Measure at the top, middle, and bottom (width) and at both sides and center (height). Take the largest measurement in each direction — your new frame needs to fit within the smallest dimension while leaving room for shimming.
Step 3: Install Flashing and Weather Barrier
This step is critical for Mid-Missouri weather protection and is the one most DIYers skip. Apply self-adhesive flashing tape to the sill (bottom of the opening), running it up the sides at least 6 inches. This creates a drainage plane that directs any water that gets past the frame back to the exterior.
According to the Missouri building code requirements, proper flashing and weather barrier installation around exterior openings is required for all new construction and replacement projects. Skipping this step voids most manufacturer warranties on door units.
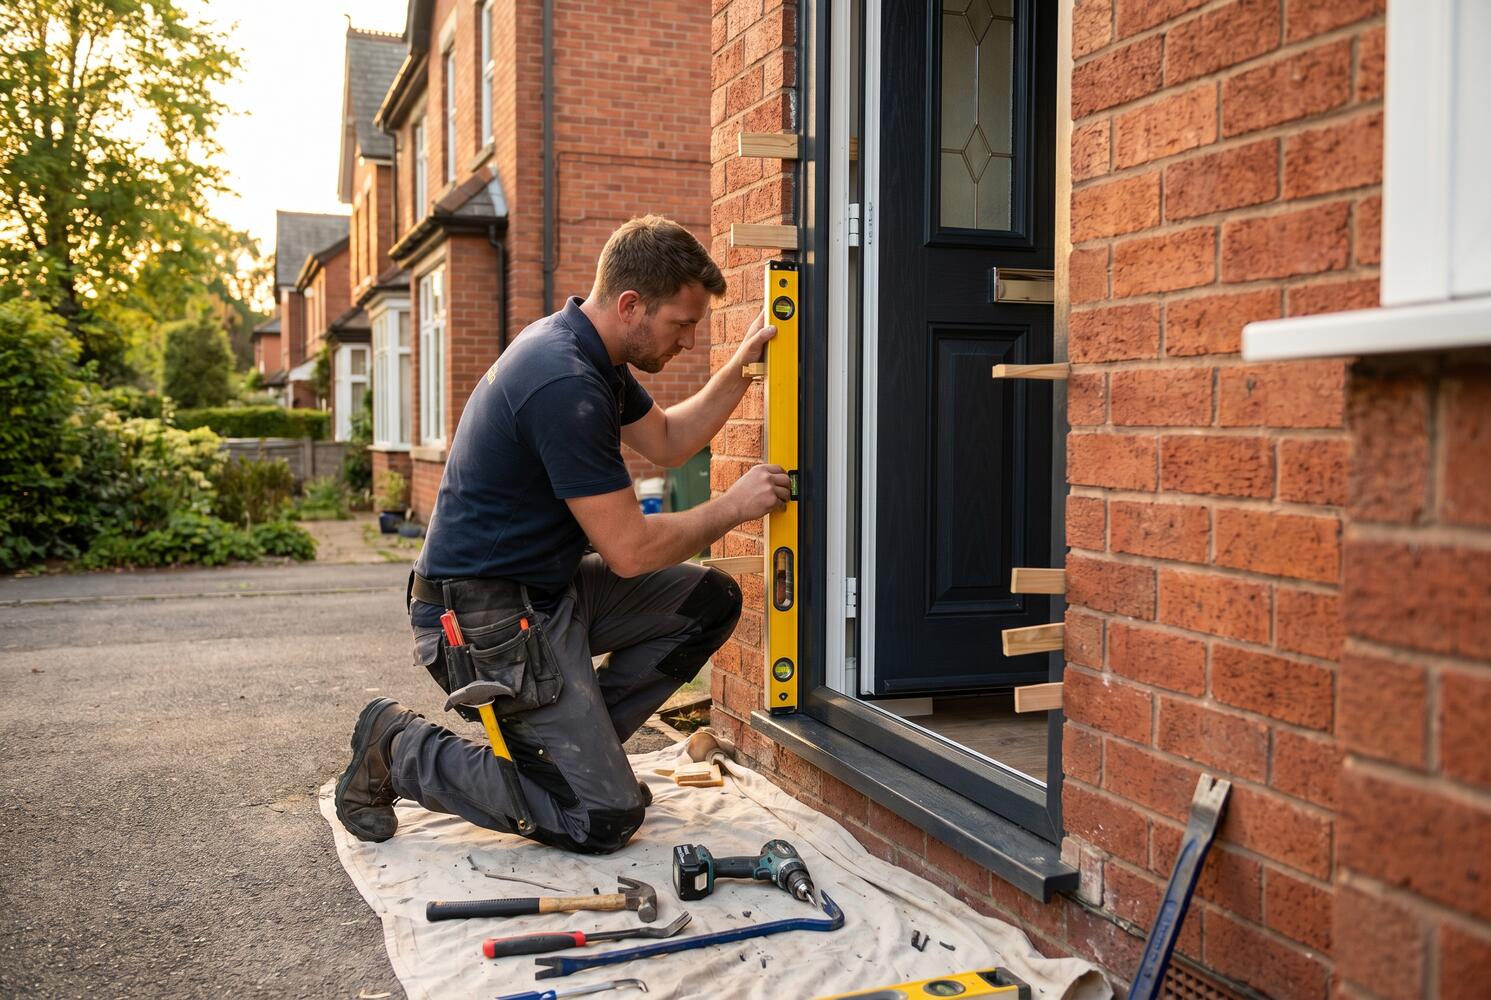
Step 4: Set and Shim the New Frame
Place the new frame assembly into the rough opening. Use shims at the hinge locations, latch location, and every 16 inches along the jambs. Check for plumb and level at every shim point — this is what determines whether your door opens and closes smoothly for years to come.
Secure the frame with 3-inch screws through the shim points. Do not over-tighten — you want the frame snug against the shims without bowing the jambs.
Step 5: Insulate and Seal
Fill the gap between the frame and rough opening with low-expansion foam insulation. Use low-expansion only. Standard expanding foam will bow your jambs inward and make your door stick. Columbia winters with temperatures regularly dropping below 20°F make proper insulation around door frames essential for energy efficiency.
Once the foam has cured, trim the excess with a utility knife and apply exterior-grade silicone caulk around the outside perimeter of the frame where it meets the siding.
Step 6: Rehang the Door and Install Hardware
Rehang your door and test the operation. The door should swing freely without rubbing and latch securely with minimal pressure. Adjust shims if needed. Install your lockset, deadbolt, and any weatherstripping.
Choosing the Right Frame Material for Columbia’s Climate
Material choice matters more than most homeowners realize, especially in Mid-Missouri where frames take a beating from humidity, ice, and temperature swings.
- Composite (fiberglass or PVC) — our top recommendation for Columbia homes. Will not rot, warp, or attract insects. Handles freeze-thaw cycles without cracking. Slightly higher upfront cost but essentially zero maintenance.
- Treated wood — traditional look and easy to work with for DIY projects. Needs regular sealing or painting to prevent moisture damage. Can last 15-20 years with proper maintenance.
- Aluminum-clad wood — wood interior for aesthetics with aluminum exterior for weather protection. Good balance of appearance and durability. Mid-range pricing.
- Vinyl — budget-friendly and moisture-resistant, but can become brittle in extreme cold and may yellow with UV exposure over time.
For homeowners also considering window replacement, choosing matching frame materials across doors and windows creates a more cohesive exterior and often reduces long-term maintenance costs.
Common Mistakes to Avoid
After years of exterior door installation work across Columbia and Mid-Missouri, here are the mistakes we see most often on DIY frame replacements:
- Skipping the flashing — water infiltration behind the frame is the number one cause of premature failure and wall damage.
- Using standard expanding foam — this bows jambs and creates door operation problems within months.
- Not checking for plumb and level — a frame that is even 1/8 inch out of plumb will cause the door to swing open or closed on its own.
- Ignoring the threshold — the sill and threshold connection is the most vulnerable point for water entry. Use a quality adjustable threshold with a compression seal.
- Caulking the bottom of the frame to the sill — this traps water. The bottom should have a weep path to the exterior.
DIY vs Professional Door Frame Replacement
A straightforward frame replacement on a standard-size door in good structural condition is a reasonable weekend DIY project for a handy homeowner. Budget about 4-6 hours if it is your first time.
Consider hiring a professional when:
- The rough opening has structural damage or rot in the framing members
- You are changing the door size (requires header modification)
- The door is on a load-bearing wall and the existing header is undersized
- You want a warranty on the installation
- The project involves matching existing brick mold or custom trim profiles
Professional door frame replacement in the Columbia area typically runs $300-$800 for labor, depending on complexity. For a complete exterior door replacement including frame, expect $1,500-$4,000 installed depending on the door style and material.
If storm damage caused the frame problem, your homeowners insurance may cover the replacement. Storm damage claims often include exterior door frames when the damage resulted from wind, hail, or falling debris. We can help document the damage for your insurance adjuster during a free inspection.
Frequently Asked Questions
What are the signs that my outside door frame needs replacing?
The clearest signs include sagging or sticking doors, stripped screw holes that will not hold hinge screws, visible wood rot (especially at the bottom corners), persistent drafts you can feel around the frame edges, and pest damage from termites or carpenter ants. If you see water stains on the interior wall near the door, the frame seal has likely failed and moisture is getting into the wall cavity.
Can I replace just the door frame without replacing the door?
Yes, in many cases you can reuse the existing door slab and only replace the frame (jambs, threshold, and casing). This works well when the door itself is in good condition but the frame has rot, warping, or damage. You will need to measure your existing door slab carefully and order a frame kit that matches its dimensions. A pre-hung unit (door and frame together) is sometimes easier to install and provides a better factory seal between door and frame.
How much does door frame replacement cost in Columbia MO?
Door frame replacement labor in the Columbia area typically runs $300-$800 depending on complexity. A complete exterior door replacement with frame runs $1,500-$4,000 installed. The final cost depends on the door material, frame type, whether structural repairs are needed behind the frame, and the complexity of the trim work. Composite and fiberglass frames cost more upfront but last significantly longer in Mid-Missouri’s climate.
How long does a door frame replacement take?
A professional door frame replacement on a standard residential entry typically takes 2-4 hours if no structural issues are found. For a DIY homeowner doing it for the first time, budget a full day including cleanup. If the rough opening has hidden water damage or pest damage that needs repair before the new frame goes in, the project can stretch to a full day even for a professional crew.
What is the best door frame material for Missouri weather?
Composite and fiberglass frames perform best in Mid-Missouri’s climate. They will not rot, warp, or attract insects, and they handle the freeze-thaw cycles that Columbia experiences from November through March without degrading. Treated wood is a solid second choice if you stay on top of sealing and painting every few years. Vinyl is the most budget-friendly but can become brittle during extreme cold snaps.
Does homeowners insurance cover door frame replacement?
Insurance typically covers door frame replacement when the damage resulted from a covered peril like storm damage, wind, hail, or falling tree limbs. Sudden damage from a break-in or vandalism is also usually covered. Gradual wear and tear, rot from deferred maintenance, or pest damage that developed over time generally is not covered. Document the damage with photos and contact your insurance agent promptly. CoMo Premium Exteriors can provide a damage assessment and help with documentation for your claim.
How do I ensure the new door frame fits properly?
Measure the rough opening at the top, middle, and bottom for width, and at both sides and center for height. Always use the largest measurement to ensure accuracy, then check with a level to confirm the opening is plumb and square. Leave about 1/4 to 1/2 inch of shimming space on each side. Taking precise measurements before purchasing your frame kit prevents costly returns and rework.
