• (573) 424-9008
  • Get Free Estimate
CoMo Premium Exteriors
  • Home
  • About us
    • Our Team
    • Careers
    • Service Areas
    • Portfolio
    • Our Blog
  • Roofing
    • Roofing Shingles
    • Metal Roofing
    • Slate Roofing
    • Shake Roofing
    • Flat Roofing
    • Concrete Tile Roofing
    • Commercial Roofing
  • Siding
    • Vinyl Siding
    • James Hardie
    • Wood Siding
  • Exteriors
    • Windows
    • Doors
    • Gutters
    • Decks
  • Reviews
  • COVID-19
  • Contact Us
  • Get A Free Estimate
  • Menu Menu
An illustration showing various types of existing wood windows and frames.

Best Ways to Replace Wood Window: A Step-by-Step Guide

Looking to replace wood windows in your home? This guide has everything you need. Learn how to assess your current windows, choose the best replacements, take accurate measurements, and install them properly. Whether you’re tackling the project yourself or hiring a pro, this article covers all essential steps.

Key Takeaways

  • Assess existing wooden windows for signs of damage or rot before deciding to repair or replace.

  • Choose between full frame replacement and pocket windows based on existing frame condition, budget, and aesthetic goals.

  • Accurate measurements and proper installation techniques are crucial for ensuring energy efficiency and long-lasting performance of new windows.

Understanding Your Existing Windows

An illustration showing various types of existing wood windows and frames.

Before starting the replacement process, assess the condition of your existing windows. Wooden window frames, while charming and traditional, are prone to deterioration, especially when exposed to moisture. Signs of rot in wooden windows include softness when pressed, discoloration, and crumbling paint. Regular maintenance, such as repainting every seven years, protects these wood frame from further damage, and considering storm windows can also enhance their durability.

A thorough inspection of your old windows can reveal issues that need addressing before replacement. Check the window frames for any signs of damage or rot, and repair them if necessary. Sometimes, rotten frames can be treated with wood treatments or epoxy fillers if the damage isn’t extensive. These conditions will help you decide whether to repair or replace the entire window frame.

In addition to checking for rot, consider the overall condition of the window, including how well it fits in the frame and whether the hardware functions properly. Warping and cracking due to excessive moisture can also affect the performance of your windows. Consider these factors to make an informed decision about your window replacement project.

Choosing Replacement Windows

A cartoon illustrating the process of choosing replacement windows.

Selecting the appropriate type of replacement windows is a crucial step. Your options generally fall into two categories: full frame replacement windows and insert or pocket windows. The choice between these depends on various factors including the condition of your existing window frames, your budget, and the look you want to achieve.

Vinyl replacement windows are a popular choice due to their energy efficiency, affordability, and modern appearance. They offer significant benefits, including reduced maintenance requirements and costs. However, vinyl windows may not be considered environmentally friendly by some due to the chemicals used in their production. Fortunately, some manufacturers are now using recycled materials to mitigate this issue.

Full frame replacement windows involve removing the entire window and frame, which allows for a thorough inspection of hidden issues. This option is particularly beneficial if your existing frames are damaged or inefficient. On the other hand, pocket windows, also known as insert windows, retain the existing frame, making them a more cost-effective option while preserving the home’s aesthetics.

Consider your home type, climate, and maintenance preferences when deciding between these options. Full frame windows suit older homes with significant frame damage, whereas pocket windows offer a quick, less invasive solution for homes with intact frames.

Full Frame Replacement Windows

Full frame replacement windows provide the advantage of a complete overhaul. This method involves removing the entire window, including the frame, sash, and trim, which allows you to address any hidden issues such as moisture damage or poor insulation. It’s an excellent opportunity to ensure that the new windows will be installed in a sound, stable structure.

This replacement method is ideal when the existing frame is damaged or inefficient. It provides a fresh start, ensuring that the new windows will function optimally without the constraints of the old frame. While full frame replacements can be more expensive and labor-intensive, they often result in better long-term performance and energy efficiency.

Insert or Pocket Windows

Insert or pocket window offer a simpler and more cost-effective replacement option. This method retains the existing window frame, which can preserve the architectural integrity of your home while reducing labor and material costs. Pocket windows can be installed from either the interior or the exterior, offering flexibility in the installation process.

This option works best when existing frames are in good condition and you want to minimize disruption. Pocket windows fit into the existing frame, making the installation quicker and less invasive. However, it’s crucial to ensure that the existing frame is in excellent shape to avoid future issues related to drafts or moisture infiltration.

Measuring for Replacement Windows

An illustration depicting the measurement process for replacement windows.

Accurate measurements are key to a successful window replacement project. Start by determining the width between the side jambs at the widest point. Measure at the top, middle, and bottom of the window, and use the smallest measurement as the official width. For height, measure from the head jamb to the bottom of the sill, recording the shortest of three measurements taken from the left, middle, and right.

Next, measure the depth of the jamb at its deepest section to ensure the new window fits appropriately. The depth measures from the back of the trim to the front and must be at least three and a quarter inches for many replacement windows. To check if the windows are square, measure diagonally from corner to corner and ensure the measurements are within a quarter inch of each other.

Final measurements should be rounded down to the nearest eighth of an inch for ordering replacement windows. Properly measuring the window opening ensures the new windows fit correctly and minimize air leaks. If standard sizes do not fit as per the recorded measurements, custom windows may be necessary.

Accurate measurements guarantee a snug fit and optimal performance for your new windows.

Removing Old Windows

An illustration demonstrating the removal of old windows.

Careful planning and execution are required when removing old windows. Before starting, check for lead paint, especially in older homes, to ensure safety. Testing for lead paint can be done using a home lead test kit or by sending a paint sample to a certified lab. Protect sensitive individuals, such as children and pregnant women, from lead exposure during this process.

Wear appropriate protective gear, including coveralls and respirators, when handling lead paint. Remove any old putty with a putty knife before taking out the glass from a wooden window. The windowpane is held in place after removing the putty with glazier’s points. Use a glass scraper to clean the glass after removal, ensuring it doesn’t break. For best results, remove windows from the outside.

Additionally, remove loose or flaky paint before sanding the surface of a window when restoring it. These steps ensure a safe, clean removal process, paving the way for a successful new window installation.

Preparing the Window Opening

Preparing the window opening is essential before installing new windows. Full-frame replacements are recommended when the existing window frame has significant damage or inefficiencies. Complete removal of the existing frame in full-frame replacements helps identify and resolve underlying moisture or insulation problems.

Before installing new windows, clean the opening to remove dust and debris for a better seal. Use shims to ensure the window opening is level and square before proceeding with the installation of the new window. Measure the diagonals; if they are equal, the opening is square. Level the window opening to ensure the new window sits correctly and operates smoothly.

Apply a waterproof membrane around the rough opening to prevent water infiltration, layering strips for a secure seal. Ensure the rough opening is properly sized by measuring its width and height at several points, adjusting as necessary to fit the new window. These steps ensure a solid foundation for your new windows, promoting longevity and efficiency.

Installing New Windows

An illustration of the installation process for new windows.

Installing new windows involves placing the window within the frame for a snug fit. Ensure the window is level and plumb before securing it in place. An out-of-square frame can lead to leaks, drafts, or difficulty opening and closing the window. Use insulation and sealing materials to ensure a tight seal around the new window, promoting energy efficiency.

Proper installation involves securing the window to prevent any movement post-installation. Double-check that the window operates smoothly and that all components are correctly aligned. These steps are crucial to ensure your new windows perform optimally and provide the desired benefits.

Insulating and Sealing

Effective insulation and sealing maximize energy efficiency. Applying expanding foam around the edges of the window can enhance insulation and help prevent energy loss. Caulk should be used to seal any gaps or cracks around the window frame for optimal energy efficiency. Implementing proper insulation and sealing techniques can lead to significant energy savings.

Proper insulation and sealing improve energy efficiency and enhance overall home comfort. By ensuring there are no gaps or leaks, you can maintain a consistent indoor temperature and reduce your heating and cooling costs.

Finishing Touches

Final touches ensure a professional and polished look for your new windows. Using semi-gloss or high-gloss paint for wood window frames increases durability and ease of cleaning. For optimal protection, it’s recommended to apply at least three coats of paint on wooden windows. Regular maintenance, such as repainting and sealing, can extend their lifespan up to 30 years.

Properly installed interior and exterior trim enhances the appearance and provides additional protection around your new windows. These finishing touches not only improve the look of your windows but also ensure they remain functional and attractive for years to come.

Cost Considerations

Understanding the costs associated with window replacement is vital for budgeting your project. The average price for wooden windows ranges from $371 to $2,955, with an overall home replacement costing between $6,500 and $32,500. Wood windows can be significantly more expensive. In fact, they may cost up to twice as much as vinyl windows. Installation costs can add approximately $50 to the price of the window itself.

Factors affecting replacement window costs include material types, labor, and market availability. Custom window sizes can increase costs by 25% to 75% compared to standard sizes. Investing in professional installation can enhance a home’s resale value, with homeowners potentially recouping up to 73% of installation costs.

Professional vs. DIY Installation

Choosing between professional and DIY window installation significantly impacts costs, efficiency, and long-term satisfaction. Hiring professionals for measurements can be beneficial, especially for types of windows that require specific installation considerations. Homeowners can save significantly on costs by choosing DIY window installation, potentially reducing expenses by up to 50% compared to professional services.

DIY window installation allows homeowners to work at their own pace, accommodating personal schedules. However, improper installation can lead to issues such as leaks and reduced energy efficiency, sometimes requiring costly professional corrections. Completing a window installation can take significantly longer for DIYers, ranging from days to weeks, compared to a few hours for professionals.

Safety risks are heightened during DIY window installations, including falls and injuries from handling large glass panes without proper equipment. Unlike professional installations, DIY projects often void manufacturer warranties, leading to potential complications if issues arise post-installation. Complex window installations, such as those requiring adjustments to structural supports, typically necessitate professional expertise to ensure safety and integrity.

Summary

Replacing wood windows can dramatically improve the energy efficiency, appearance, and value of your home. By understanding your existing windows, choosing the right type of replacements, measuring accurately, and deciding whether to hire a professional or attempt a DIY installation, you can ensure a successful project.

Whether you opt for full frame replacements or pocket windows, the key is to follow the steps carefully and pay attention to details. Proper insulation and sealing, along with finishing touches, will ensure your new windows provide comfort and efficiency for years to come.

Frequently Asked Questions

How do I know if my wooden windows need replacing?

If you notice signs of rot, warping, or difficulty in operation, it’s time to consider replacing your wooden windows. Addressing these issues promptly can enhance your home’s energy efficiency and aesthetics.

What is the difference between full frame and pocket window replacements?

The key difference is that full frame replacements remove the entire window and its frame, providing a fresh install, while pocket window replacements use the existing frame, making them a more cost-effective and less invasive option.

How do I measure for replacement windows?

To ensure a proper fit for replacement windows, measure the width and height at several points, using the smallest measurements. Additionally, confirm the window depth and check for squareness by measuring diagonally across the opening.

What are the cost differences between wood and vinyl windows?

Wood windows can be significantly more expensive than vinyl windows, often costing up to twice as much, with prices ranging from $371 to $2,955 before installation. Choosing between them depends on your budget and aesthetic preferences.

Should I hire a professional or do a DIY installation?

Hiring a professional is advisable for proper installation and warranty protection, while DIY may save money but poses risks of errors and potential warranty issues.


An illustration highlighting the benefits of storm windows for energy efficiency in old houses.

The Ultimate Guide to Installing New Windows in an Old House

Installing new windows in an old house? This guide covers everything you need to know—from assessing your existing windows to choosing replacements that fit and maintain your home’s charm while considering the importance of installing new windows old house.

Key Takeaways

  • Assess the condition of your old windows to decide if repairs or replacements are necessary for energy efficiency and comfort.

  • Choose the right type and material of replacement windows to enhance your home’s aesthetic while improving energy efficiency.

  • Proper measurement and installation, including sealing and insulating, are crucial for ensuring new windows fit well and perform optimally.

Assessing Your Old Windows

A detailed illustration showing various types of old window frames that need assessment.

Before starting the window replacement process, assess the condition of your current windows. This will help determine whether you need to repair or replace them. Windows that are over 20 years old typically require a thorough inspection to check for drafts, leaks, and other signs of inefficiency. Evaluating your old windows helps you make informed decisions, saving time and money while boosting energy efficiency and structural integrity.

Common problems in old windows, such as drafts and visible deterioration, can significantly impact your home’s comfort and energy bills. Spotting these issues early contributes to a more efficient and comfortable living space.

Identifying Common Problems in Old Windows

Old windows often suffer from a range of issues that compromise their functionality and efficiency. Visible deterioration in window frames, such as cracks or decay, is a clear signal that replacement is needed. Additionally, drafts and leaks are common problems that indicate your windows are no longer providing adequate insulation. Resolving these problems maintains energy efficiency and comfort in your home.

Neglected window maintenance can lead to significant problems, including increased energy bills and decreased indoor comfort. Recognizing these common problems allows you to take steps to enhance your windows and overall efficiency.

Deciding Between Repair and Replacement

Whether to repair or replace old windows depends on factors like cost, energy efficiency, and the condition of the window frames. High-grade wood components in your window frames might indicate that repairs are a viable option. However, if the frames are significantly damaged, replacement might be the better choice.

Custom window replacements can fit perfectly into existing window frames, minimizing the need for extensive wall alterations and ensuring a seamless look. On the other hand, installing stock windows in old frames can lead to mismatched designs and poor fit, potentially reducing your home’s value.

New windows can cut down drafts and boost energy efficiency, making your home more comfortable and economical with new construction windows.

Choosing the Right Replacement Windows

An illustration of a selection of replacement windows suitable for old houses.

Replacing old windows aims to enhance your home’s appeal, reduce energy costs, and improve natural light. Replacing old windows can transform your living space, making it brighter and more efficient. However, choosing the right type and material for your replacement windows is crucial to achieving these benefits.

Working with qualified window companies ensures you select the best window solutions for your old house. These experts can provide guidance, competitive pricing, and advice on the best options for your home.

Types of Replacement Windows

There are several types of replacement windows to consider, each with its own set of benefits. Full-frame replacement windows are ideal when the old window frame, sill, or jambs are rotted. These windows involve replacing the entire window, providing a fresh start and ensuring a perfect fit.

Insert windows, also known as pocket windows, are designed to fit into the existing frame without the need for full replacement. This option is less invasive and can be more cost-effective, making it a popular choice for many homeowners.

Materials for Replacement Windows

The material of your replacement windows plays a significant role in their performance and aesthetic appeal. Wood is a traditional material that offers excellent insulation and can be restored to maintain historical integrity, but it requires regular maintenance to prevent rot and decay.

Vinyl replacement windows, on the other hand, are low-maintenance and energy-efficient, but they may lack the charm of natural materials. Aluminum windows are durable and resistant to the elements, but they may conduct heat, resulting in lower energy efficiency compared to wood and vinyl options.

Choosing the right material depends on your priorities, whether it’s maintaining historical accuracy, reducing maintenance, or enhancing energy efficiency.

Measuring for New Windows

An illustration depicting the measuring process for installing new windows in an old house.

Accurately measuring the existing window frame ensures the new window fits properly. This step is critical, as incorrect measurements can lead to poorly fitting windows and extra costs. Inspecting the framing around the opening is also necessary to identify any necessary repairs before installing a new window.

Ensuring the rough opening is level and square is vital for proper window installation. This will help avoid issues down the line and ensure that your new windows perform as expected.

Tools You Will Need

To measure accurately, you’ll need a tape measure for precision and a level to check the window is straight horizontally and vertically.

These tools ensure that your new windows fit perfectly and function properly.

Step-by-Step Measuring Guide

When measuring for new windows, take multiple measurements to account for any irregularities in the opening. Measure the width of the window frame at the top, middle, and bottom to ensure a consistent fit. Similarly, measure the height from left to right and center to account for any variations.

Subtract a small amount from your measurements to allow for installation adjustments. This will help ensure that the new window fits snugly and can be installed without issues.

Preparing for Installation

Before installation, proper preparation is key. Remove the old windows and ensure the opening is clean and ready for installation. A strong pry bar can help remove old window panes and frames without damaging the surrounding structure. Prepping the window opening includes cleaning the rough opening to ensure a proper fit for the new window.

Window installation often requires a fair amount of carpentry skills and home remodeling experience. Ensuring the area is debris-free and ready for the new window is vital for successful installation.

Removing Old Windows

Proper removal of old window frames prevents damage to the surrounding structure. This step is particularly important in older homes, where the structural integrity of the walls is crucial. Additionally, old windows in homes built before 1978 may contain lead paint, requiring special precautions to ensure safe removal.

Carefully removing old windows smooths the installation process and helps avoid potential issues.

Prepping the Window Opening

Cleaning the rough opening ensures a proper fit for the new window. This involves removing any debris, old caulk, or paint that could interfere with the installation. Making sure the opening is level and square helps the new window fit perfectly and function as intended.

Taking these steps will help ensure a smooth installation process and long-lasting performance of your new windows.

Installing New Windows

A step-by-step illustration of the process of installing new windows in an old house.

Installing new windows involves several steps, including inserting, sealing, and insulating the new window. Following detailed instructions ensures a successful installation. A quality power drill is essential for securing new windows into place. Additionally, using a durable caulking gun with sealant will help seal gaps around the new windows, enhancing their efficiency and durability.

Carefully following the installation steps ensures your new windows are installed correctly and perform as expected.

Inserting the New Window

Lift the new window and place it into the prepared rough opening. Use a level to check that the window is even horizontally and vertically (plumb). Fasten the window frame to the structure with screws or brackets, ensuring it remains steady. Check the fit of the window and make any necessary adjustments to ensure it sits perfectly in place.

These steps will help ensure that your new window is securely window installed and functions properly.

Sealing and Insulating

Apply elastomeric caulk to the inner face of the casings and the sill before installing the window. Fill gaps around the window with minimally-expanding foam or caulk to complete the installation. Ensure weatherstripping at movable joints for proper storm window installation to enhance energy efficiency.

These steps will help ensure that your new windows are well-sealed and insulated, providing maximum energy efficiency and comfort.

Installing Interior Trim

Before installing interior trim, ensure the wall surface is clean and any old paint or debris is removed. Check that the window is properly aligned and secure to avoid issues with trim installation.

Start the trim installation by measuring and cutting pieces to fit the window frame accurately. Use a nail gun or finishing nails to attach the trimmed pieces securely to the wall around the window.

After installation, fill nail holes with wood putty and sand down for a smooth finish before painting or staining. This will give your new windows a polished and professional look.

Enhancing Energy Efficiency with Storm Windows

An illustration highlighting the benefits of storm windows for energy efficiency in old houses.

Adding storm windows significantly enhances your home’s energy efficiency. Storm windows effectively seal drafts that affect old windows, enhancing indoor comfort. They can also reflect outside heat in summer and retain heat indoors in winter, providing year-round benefits.

Updating windows in an old house preserves its aesthetic appeal and improves energy efficiency. Carefully selecting and installing storm windows leads to a more comfortable and cost-effective home.

Benefits of Storm Windows

High-quality storm windows can reduce cooling costs by more than 30%. Low-E storm windows are designed to reflect infrared heat, significantly improving energy efficiency. Retrofitting historic windows with modern features improves energy efficiency while keeping the original character intact.

These benefits make storm windows an excellent investment for homeowners looking to improve energy efficiency and comfort.

Installing Storm Windows

Installing storm windows typically takes 20-30 minutes per window. Installing storm windows over new or existing windows helps enhance energy efficiency and protect the underlying windows. Properly installed storm windows effectively improve thermal efficiency without compromising aesthetics.

These steps will help you get the most out of your storm windows, ensuring they provide maximum benefits.

Maintaining the Charm of Your Old House

Upgrading windows while maintaining your old house’s charm preserves its historical significance and enhances energy efficiency. Newer storm windows can improve comfort by reducing drafts and cutting down outside noise. Thoughtful window upgrades contribute significantly to both the charm of the home and the comfort of its occupants.

Choosing designs and materials that reflect the original style ensures your home retains its unique character while benefiting from modern window technology.

Matching Styles and Designs

Selecting window designs that align with your home’s architectural style enhances its aesthetic integrity. Window styles should reflect the architectural design of the home to enhance its visual appeal.

By carefully selecting window designs, you can maintain the historical charm of your home while enjoying the benefits of modern windows.

Preserving Historical Features

When selecting new windows, choose designs that closely mimic the original styles to maintain architectural integrity. Harmonizing window designs with exterior architectural elements creates a coordinated and appealing appearance.

Preserving historical features maintains the charm of your old house and respects its unique story and design. By paying attention to these details, you ensure that your home remains a testament to its historical roots while benefiting from modern advancements in window technology.

Summary

Replacing windows in an old house is a journey that starts with assessing the condition of your current windows and deciding on the best course of action. Whether you choose to repair or replace, selecting the right type and material for your new windows is crucial to maintaining both functionality and aesthetics. Accurate measurements and proper preparation ensure a smooth installation process, while thoughtful choices in design and materials help preserve the historical charm of your home.

In conclusion, updating your old windows can significantly enhance your home’s energy efficiency, comfort, and value. By following this guide, you can make informed decisions that balance modern benefits with historical integrity. Embrace the opportunity to revitalize your old house, making it a comfortable and beautiful place to live for years to come.

Frequently Asked Questions

How do I decide between repairing and replacing my old windows?

Deciding between repairing and replacing your old windows comes down to cost, energy efficiency, and the condition of the frames. If they’re significantly damaged, replacement might be the better way to go, while well-maintained frames can likely be repaired.

What types of replacement windows are available?

You’ve got options with replacement windows! The main types to consider are sash kits, insert replacements, and full-frame units, each offering unique benefits based on your existing frames.

What materials should I consider for replacement windows?

Consider wood for great insulation, vinyl for low maintenance, and aluminum for durability. Each material has its advantages, so choose based on your needs!

How do I measure my windows accurately?

To measure your windows accurately, grab a tape measure and check the width and height at different points to account for any irregularities. Just make sure the rough opening is level and square for the best fit!

What are the benefits of installing storm windows?

Installing storm windows can significantly reduce cooling costs and enhance energy efficiency by sealing drafts and retaining heat. It’s a smart choice for improving your home’s comfort year-round.


Different types of windows in apartments

Top Benefits of Upgrading Windows in Apartments

Looking to upgrade windows in apartments? New windows can significantly cut energy costs, improve comfort, and reduce noise. Discover how the right windows can transform your apartment living experience, and get tips for choosing the best styles and materials.

Key Takeaways

  • Upgrading to energy-efficient windows improves insulation, reduces energy bills, and enhances comfort while decreasing outside noise.

  • Popular window styles like double-hung, casement, and sliding offer unique functionality and aesthetic benefits, suitable for various apartment needs.

  • Selecting the right materials, including vinyl, aluminum, and wood, is crucial for balancing cost, durability, and energy efficiency in window replacements.

Why Upgrading Windows in Apartments Matters

A modern apartment complex showcasing energy efficient windows.

Upgrading to energy-efficient windows can significantly reduce your energy bills while improving insulation in your apartment. Imagine walking into a living space where the temperature is just right, regardless of the season, and knowing that this comfort doesn’t come with skyrocketing energy costs. Energy-efficient windows are designed to keep the heat in during the winter and out during the summer, making your home more comfortable year-round.

Beyond the financial and comfort benefits, new windows can drastically decrease outside noise, creating a peaceful indoor environment. This is particularly important in bustling urban areas where street noise can be a constant disturbance. Modern windows are designed to block out noise, giving you a quieter, more serene living space.

Investing in modern windows also enhances the value of your property, making it more attractive to potential buyers or renters. A well-maintained apartment with updated features can command higher rent or a better sale price, allowing you to make more money. Prospective tenants or buyers often look for properties with energy-efficient and aesthetically pleasing windows, knowing they will save on energy bills and enjoy a quieter living environment.

Moreover, the aesthetic appeal of new windows can transform the look and feel of your apartment. Different styles of apartment windows can make spaces feel larger and more inviting. Whether you’re going for a modern look or a more traditional style, the right windows can complement your interior design and improve the overall ambiance of your home.

Popular Window Styles for Apartments

Various popular window styles displayed in an apartment setting.

Choosing the right window style for your apartment is crucial, as it affects both the functionality and the aesthetic appeal of your living space. The most favored window styles for apartments include double-hung, casement, and sliding windows, each offering distinct benefits suited to various needs.

High-quality windows can also improve the overall aesthetic appeal of an apartment building. We’ll delve into these popular window styles and see why they might be the perfect fit for your apartment.

Double-Hung Windows

Double-hung windows are known for their traditional look, featuring two sashes that slide vertically. This design allows for versatile ventilation, as you can open either the top or bottom sash, or both, to create a balanced airflow. This feature is particularly useful in apartments where air circulation might be limited, providing a practical solution for better indoor air quality.

Double-hung windows are also easy to clean, as both sashes can be tilted inward. This straightforward maintenance is particularly useful in high-rise apartments where exterior cleaning is challenging. Their classic appearance complements various architectural styles, enhancing both charm and functionality.

Casement Windows

Casement windows open outward, offering optimal airflow and a modern look while sealing tightly against the frame. Their hinge design promotes excellent ventilation, making them ideal for rooms needing fresh air circulation, such as kitchens or bathrooms.

Their sleek design complements modern interiors and provides unobstructed views, making your living area feel more open and connected to the outside.

Sliding Windows

Sliding windows are favored for their space-saving design and horizontal operation, making them easy to use and ideal for apartments with limited space. They maximize available area and create seamless transitions between indoor and outdoor spaces, perfect for balconies or patios.

Their ease of use and low maintenance make sliding windows a practical option for busy tenants. Their modern look and functionality enhance the overall appeal of your living space, combining practicality with style.

Choosing the Right Materials for Apartment Windows

Different types of windows in apartments

Selecting the right materials for apartment windows is crucial for balancing energy efficiency, aesthetics, and durability. Different materials, such as vinyl, aluminum, and wood, each provide unique benefits and drawbacks impacting their suitability for apartment settings.

We’ll explore the pros and cons of these materials to help you make an informed decision based on your needs and preferences.

Vinyl Windows

Vinyl windows are cost-effective and require minimal upkeep. Their resistance to warping and fading ensures long-term durability and aesthetic maintenance, making them a popular choice for budget-conscious homeowners.

Double-pane vinyl windows feature two layers of glass with an insulating gas in between, offering substantial efficiency. This design maintains comfortable indoor temperatures and reduces energy bills.

Aluminum Windows

Aluminum windows are lightweight and strong, offering excellent durability. Their strength allows them to withstand various weather conditions and impacts, making them reliable for apartment buildings. However, aluminum windows tend to have lower energy efficiency due to their high thermal conductivity.

Despite lower energy efficiency, aluminum windows are often chosen for their sleek, contemporary look. They require minimal maintenance and can last many years, making them a practical choice for apartment owners.

Wood Windows

Although wood windows can be more expensive upfront, their durability can make them a worthwhile investment over time. They provide excellent natural insulation and aesthetic charm but require regular maintenance to prevent issues like rot.

Wood windows provide excellent insulation and aesthetic appeal but are generally more expensive and require more upkeep. Their classic look can enhance your apartment’s value and appearance, appealing to those willing to invest in long-term benefits.

Energy-Efficient Features to Consider

Illustration of energy-efficient features in apartment windows.

Upgrading to energy-efficient windows can lead to significant reductions in energy bills for residents. These windows contribute to better indoor air quality by minimizing drafts and humidity levels. Evaluating energy efficiency ratings of windows should be part of the selection process, as it impacts cost savings, insulation, and temperature control.

Energy-efficient windows offer cost savings, improved insulation, and better temperature control, making them a smart investment for any apartment window.

Double-Pane or Triple-Pane Glass

Double-pane and triple-pane glass offer better insulation than single-pane glass, significantly reducing heat transfer. These windows maintain comfortable indoor temperatures year-round, increasing energy efficiency and reducing energy costs.

Low-E coatings on these windows further enhance insulation by reflecting heat back into the building during winter, contributing to overall energy efficiency.

Low-E Coating

Low-E coatings reduce heat exchange, enhancing overall energy efficiency. They reflect infrared and ultraviolet light without compromising visible light, improving temperature regulation.

Weatherstripping

Effective weatherstripping prevents air leaks, significantly improving a window’s energy performance and maintaining energy efficiency.

This simple yet effective feature can greatly enhance the overall insulation and energy savings of your apartment complex.

Cost Considerations for Replacing Apartment Windows

A breakdown of cost considerations for replacing apartment windows.

Several factors, including window style, size, and location, significantly influence the cost of window replacement. Larger windows generally incur higher costs due to the increased amount of materials and labor required. Custom window shapes often result in a higher replacement cost because of the added complexity in manufacturing and fitting.

The location of the property can affect window replacement costs because of regional differences in labor rates and material prices. Replacing windows with vinyl frames is considered cost-effective but may lack the aesthetic appeal of wood frames, which are more expensive.

The average cost to replace a window typically ranges from $200 to $1,200, with an average around $600, making it important to consider windows cost when planning your budget.

How to Choose a Reliable Window Installer

Hiring an experienced window installer minimizes risks associated with new installations. Select a company that specializes in window installations to ensure expertise. Inquire about the installation crew to verify their skill level and experience. A minimum of 10 years of experience is recommended for window installers.

Customer reviews are a valuable resource. Positive reviews from previous customers can help ensure reliability. Ensure the installer provides a lengthy warranty, which protects your investment in new windows. Be cautious of unusually low quotes, as they might indicate compromised service quality.

Summary

Upgrading windows in apartments offers numerous benefits, from energy savings and noise reduction to enhanced property value and aesthetic appeal. By choosing the right window styles and materials, and considering energy-efficient features, you can significantly improve the comfort and functionality of your living space.

Investing in high-quality windows and hiring a reliable installer ensures that your new windows perform optimally and last for years. Remember, the upfront costs are often outweighed by the long-term savings and improved quality of life. Take the step to upgrade your apartment windows today, and experience the difference it makes.

Frequently Asked Questions

Why should I upgrade my apartment windows?

Upgrading your apartment windows is essential for reducing energy bills and decreasing outside noise, which enhances comfort and livability. Additionally, it can boost your property value and improve the overall aesthetic of your home.

What are the most popular window styles for apartments?

Double-hung, casement, and sliding windows are the most popular styles for apartments, each providing unique advantages suitable for various preferences and needs.

What materials are best for apartment windows?

Vinyl, aluminum, and wood are the best materials for apartment windows, each offering distinct advantages that can cater to your specific needs. Choose according to your priorities, such as maintenance demands, aesthetics, and insulation properties.

What energy-efficient features should I consider for new windows?

For energy-efficient windows, prioritize double or triple-pane glass, Low-E coatings, and effective weatherstripping. These features significantly reduce heat transfer and improve insulation.

How can I choose a reliable window installer?

To choose a reliable window installer, focus on their experience and customer reviews, and make sure they provide a comprehensive warranty for their services. This not only guarantees quality but also reflects their commitment to customer satisfaction.


A creative depiction of HardieShingle siding on a charming cottage.

Top James Hardie Siding Styles to Elevate Your Home’s Exterior

Thinking about upgrading your home’s exterior? James Hardie siding styles offer durable and attractive options, whether you’re after a classic look or a modern edge. In this guide, we’ll dive into the most popular styles, including HardiePlank Lap Siding and HardiePanel Vertical Siding, to help you choose the perfect fit for your home.

Key Takeaways

  • James Hardie offers a wide range of siding options tailored to various architectural styles and personal preferences, with over 700 colors for customization.

  • HardiePlank Lap Siding and HardiePanel Vertical Siding are among the most popular styles, providing versatility and aesthetic appeal suitable for diverse home designs.

  • James Hardie siding is non-combustible, durable, and low maintenance, enhancing curb appeal and potentially increasing property value while resisting harsh weather and pests.

Exploring James Hardie Siding Styles

An illustration showcasing different James Hardie siding styles.

James Hardie provides a remarkable selection of siding options. Each option is tailored to accommodate different architectural styles, personal preferences, and climate conditions. Whether you’re looking to achieve a modern, sleek look or prefer a more traditional, rustic charm, James Hardie siding has you covered. With over 700 different colors and shades, the customization possibilities are virtually endless.

Choosing the right siding style is a pivotal decision that can significantly enhance your home’s exterior. The right siding not only boosts curb appeal but also adds to the overall personality of your home. Just as a well-chosen outfit can transform a person’s appearance, the right siding can do wonders for your home’s aesthetic.

This guide covers some of the most popular and versatile siding styles that James Hardie offers. From the timeless appeal of HardiePlank Lap Siding to the modern sophistication of HardiePanel Vertical Siding, each style can uniquely elevate your home’s exterior.

HardiePlank Lap Siding

HardiePlank Lap Siding is a favorite among homeowners and for good reason. Its horizontal installation and classic aesthetic make it a timeless choice suitable for various architectural styles. Composed of a robust blend of cement, sand, and cellulose fibers, HardiePlank offers durability that surpasses many other siding materials.

Homeowners can personalize their home’s appearance with HardiePlank, which comes in various colors and finishes. Whether you prefer the natural wood look of Select Cedarmill or the sleek finish of Smooth, there’s an option to suit your taste.

Costing between $12 and $25 per square foot, HardiePlank Lap Siding fits various budgets. Its versatility and widespread appeal make it a popular choice, enhancing homes with a stunning, timeless aesthetic.

Traditional Lap Siding

Traditional Lap Siding is characterized by its overlapping horizontal boards, creating a classic look that has stood the test of time. This style enhances the exterior of any home, providing a clean and elegant appearance that never goes out of fashion.

Beaded Cedarmill and Smooth

Beaded siding features horizontal boards with a small strip, or bead, between each board, adding a subtle yet distinctive detail to the siding. Beaded Smooth siding offers a contemporary look with its clean, smooth finish, ideal for modern homes seeking simplicity and elegance.

On the other hand, Beaded Cedarmill provides a more natural, wood-like appearance that enhances the rustic charm of a home. The cedar mill finish offers a texture that mimics the grain of real wood, providing an authentic look without the maintenance issues associated with natural wood.

Custom ColonialTM

Custom Colonial™ is James Hardie’s take on the traditional Dutch lap siding style. This siding features larger horizontal boards with inverted segments, enhancing the classic Dutch lap look.

Custom Colonial™ offers flexibility with smooth and wood-like finishes, catering to homeowners seeking a traditional yet stylish exterior. Design consultants can help tailor this siding to fit your home’s unique architectural style.

HardiePanel Vertical Siding

An artistic representation of a home featuring HardiePanel vertical siding.

HardiePanel Vertical Siding stands out with its vertical orientation, creating a dramatic and eye-catching appearance for any home. This style is particularly effective in highlighting architectural features, such as second-story windows, making them more prominent and visually appealing.

The vertical siding comes in textures that mimic wood and stucco, offering both minimalistic and rustic aesthetics. Ideal for modern and farmhouse-style homes, it provides design versatility. Priced between $11 and $18 per square foot, it is a competitive option for those seeking both style and affordability.

HardiePanel Vertical Siding also works well as an accent to add depth and style to home exteriors, making it a versatile addition to any siding project.

Stucco Finish

The Stucco finish of HardiePanel Vertical Siding combines durability with a traditional aesthetic, mimicking traditional stucco siding. Known for withstanding harsh weather conditions, it is a practical choice for many homeowners.

Its textured look adds a unique charm to the home, combining visual appeal with the robust qualities of fiber cement siding.

Sierra 8

Sierra 8 siding style offers versatility with both smooth and Cedarmill finishes, catering to various architectural designs. The Cedarmill finish, in particular, enhances the home’s dimensions by providing a textured, wood-like appearance that adds depth and character.

This siding style is ideal for homeowners looking to achieve a rustic, natural look without the maintenance issues associated with real wood siding during siding installation.

HardieShingle Siding

A creative depiction of HardieShingle siding on a charming cottage.

HardieShingle Siding combines the appearance of cedar with the robust qualities of hardie fiber cement, offering the best of both worlds. It’s commonly used as accents in gables or other sections of the home, adding a touch of elegance and historical charm.

Finishes include a cedar mill option, providing a natural wood-like texture that enhances your home’s aesthetic appeal. HardieShingle Siding styles include straight edge panels, staggered edge panels, and scalloped shingles, each offering unique visual interest.

Straight Edge Panels

The characteristic feature of straight edge panel shingles is their small shingle boards cut at varying widths but the same length, providing a clean, classic look that enhances a home’s exterior.

Staggered Edge Panels

Staggered edge panels create a visually dynamic facade, appealing to homeowners seeking a unique look for their home. Their rustic, non-linear pattern gives a sense of depth and movement to the exterior, making your home stand out. Choosing staggered edge panels can elevate your home’s exterior by introducing varied textures and visual interest.

Half Round Shingles

Half round shingles provide a distinctive siding option for those seeking unique aesthetics. Featuring a unique curved design, these shingles add character to buildings, making them suitable for classic architecture.

Their historical charm and eye-catching design make half round shingles a perfect choice for homeowners looking to preserve or enhance the traditional look of their homes.

HardieTrim Boards

HardieTrim Boards add essential finishing touches that enhance the aesthetics of windows, doors, and fascia. Available in 4/4 trim boards, 5/4 trim boards, and batten boards, these trims come in rustic and smooth finishes to match your desired look.

Smooth HardieTrim boards offer a sleek, modern appearance, while rustic finishes mimic natural wood, adding a traditional touch to your home’s exterior. These trim boards enhance visual appeal and provide durability with low maintenance.

4/4 Trim Boards

4/4 trim boards are ¾ inch thick and are available in both smooth and rustic finishes, allowing homeowners to choose the one that best suits their design preferences.

5/4 Trim Boards

5/4 trim boards are thicker, at 1 inch, and can also be finished in a rustic style, providing a traditional aesthetic that enhances the overall look of your home.

Batten Boards

Batten boards are designed specifically to work in conjunction with vertical siding, achieving a distinctive board-and-batten appearance that adds character and depth to your home’s exterior.

HardieSoffit Panels

HardieSoffit Panels cover roof eaves and porch ceilings, offering protection and aesthetic enhancement. Available in seven different styles, homeowners can choose the one that best complements their home’s architecture.

HardieSoffit panels protect the under-eave areas of your roof from weather damage while enhancing your home’s overall look. They are essential for any siding project, ensuring both functionality and beauty.

Non-Vented Soffit

Non-vented soffit panels mimic wood texture and resist rotting, offering a seamless look that blends well with any home exterior. Designed to closely resemble wood, these panels resist decay, making them a durable choice for homeowners.

An alternate smooth finish for non-vented soffit panels adds a touch of sophistication to your home’s exterior.

Vented Soffit

Vented soffit panels improve attic ventilation and meet building codes, enhancing your home’s overall functionality. The VentedPlus™ soffit features dash-shaped ventilation holes to enhance airflow and comes in Cedarmill® or smooth finishes.

These panels offer aesthetic appeal and practical benefits, ensuring your home remains well-ventilated and structurally sound.

Beaded Porch Panel

Beaded porch panels, designed for exterior porch ceilings, offer a refined and elegant appearance that elevates outdoor aesthetics. The smooth finish adds a touch of sophistication, making your porch more inviting and stylish.

Besides their beauty, beaded porch panels protect against the elements while maintaining structural integrity, ensuring your porch remains durable and attractive.

Benefits of Choosing James Hardie Siding

An infographic highlighting the benefits of choosing James Hardie siding.

James Hardie siding offers numerous benefits beyond aesthetics. Its non-combustible nature means it won’t ignite when exposed to fire—a crucial safety feature. Known for long-lasting durability, this siding resists warping, cracking, and shrinking over time.

Engineered to withstand harsh weather conditions, including wind, water, and hail, James Hardie siding is a reliable choice for various climates. It also resists pests like termites and woodpeckers, ensuring your siding remains intact and looking great for years. Minimal maintenance, involving periodic washing with a hose, adds to its appeal for busy homeowners.

Beyond practical benefits, James Hardie siding enhances curb appeal, potentially increasing property value. Offering a wide range of design options, it allows homeowners to achieve various aesthetic styles. Recognized for quality and reliability, James Hardie siding has received the Good Housekeeping Seal of Approval, making it a trusted choice.

How to Choose the Right James Hardie Siding Style for Your Home

An illustration of a homeowner choosing the right James Hardie siding style.

Choosing the right James Hardie siding style involves considering your home’s architecture, personal style, and the surrounding neighborhood. Hardie siding’s versatility complements various architectural styles, from modern to traditional. Observing different hardie siding styles in the neighborhood can offer practical insights into what might work best for your own home.

Customization is a key advantage of James Hardie siding. A wide array of colors and textures allows you to tailor the siding to reflect your personal style. Platforms like Pinterest can provide inspiration, showcasing styles and combinations you might not have considered.

Consulting with design experts can simplify the decision-making process. Design consultants at Elite Home Exteriors, for example, can provide tailored guidance based on your preferences and home style. A James Hardie preferred contractor can also help determine the best siding style to enhance your home’s architecture.

Summary

In summary, James Hardie offers a diverse range of siding options, each designed to enhance the beauty and durability of your home. From the classic appeal of HardiePlank Lap Siding to the distinctive charm of HardieShingle Siding, there is a style to suit every architectural preference and personal taste. The benefits of choosing James Hardie siding are clear—its durability, low maintenance, and aesthetic versatility make it a top choice for homeowners looking to elevate their home’s exterior.

By understanding the different styles and consulting with professionals, you can make an informed decision that will not only enhance your home’s curb appeal but also provide lasting value. Embrace the opportunity to transform your home with James Hardie siding and enjoy the peace of mind that comes with choosing a trusted and reliable product.

Frequently Asked Questions

What makes James Hardie siding a better option than vinyl siding?

James Hardie siding is superior to vinyl siding due to its fiber cement composition, which ensures enhanced durability, fire resistance, and lower maintenance requirements. Additionally, it offers a more authentic wood-like appearance with a broader selection of colors and textures.

How long does James Hardie siding last?

James Hardie siding can last up to 50 years with proper installation and maintenance, making it one of the most durable siding options available. Its resistance to weather, pests, and fire further enhances its longevity.

Can I customize the color and texture of James Hardie siding?

Yes, James Hardie siding can be customized with over 700 colors and various textures, including smooth, cedar mill, and stucco, to fit your personal style and home architecture. This extensive range ensures you can achieve your desired aesthetic.

Is James Hardie siding suitable for all climates?

James Hardie siding is suitable for all climates due to its engineering that withstands extreme weather conditions. Its robust construction ensures durability and aesthetics, making it a reliable choice for any environment.

How often do I need to maintain James Hardie siding?

Regular maintenance of James Hardie siding is minimal, typically involving periodic washing with a hose to maintain its appearance. This ease of maintenance is a significant advantage for homeowners.


A person using a sharp utility knife to remove an old window frame, showcasing the process of removing a double hung window.

How to Easily Replace Double Hung Window

How to install double hung windows and unsure where to start? Our step-by-step guide makes it easy to replace double hung window. You’ll learn how to measure accurately, remove the old window, install the new one, and ensure a perfect fit. Let’s get started!

Key Takeaways

  • Precise measurements are essential for a successful double-hung window replacement, including necessary adjustments for a snug fit.

  • Thoroughly inspect and prepare the window opening for structural integrity before installing the new window, addressing any damage or debris.

  • After installation, ensure the window operates smoothly and is properly sealed to enhance energy efficiency and prevent air leaks.

Accurate Measurements

Replacing windows requires accurate measurements to ensure a successful window replacement project. Begin by using a metal tape measure to determine the width between the side jambs and the height between the top jamb and the sill. This precision ensures that your new window fits snugly and operates smoothly.

When measuring, always use the smallest dimensions to guarantee a proper fit for your new double-hung window. Subtract half an inch from these smallest dimensions to allow for slight adjustments during installation. This prevents any fitting issues once the window is in place.

For homes with brick walls, subtract a quarter-inch from the shortest exterior measurement, while for other wall types, subtract three-eighths of an inch to accommodate window trim. Ensure the depth of the jambs is between 3 ½ and 4 inches when measuring for double-hung windows. These adjustments ensure a perfect fit, streamlining the installation process.

Choose the Right Replacement Option

When it comes to replacing double-hung windows, selecting the right replacement option is crucial for a successful project. One of the first decisions you’ll need to make is whether to install a full-frame replacement window or an insert window. Full-frame replacement windows involve replacing the entire window frame, which is ideal if the existing frame is damaged or you want to change the window size. On the other hand, insert windows, also known as pocket replacement windows, replace only the window sash, making them a popular choice for their ease of installation and cost-effectiveness.

Another important consideration is the material of the replacement window. Vinyl replacement windows are a top choice due to their durability, low maintenance, and energy efficiency. Brands like Andersen Silverline offer high-quality vinyl replacement windows that can enhance your home’s performance and aesthetics.

Additionally, it’s essential to choose a replacement window that matches the size and style of your existing window. Double-hung windows come in various sizes and styles, so ensure your new window aligns with the dimensions and design of your current setup. This attention to detail will help maintain the architectural integrity of your home while providing the benefits of modern window technology.

Removing the Old Window

A person using a sharp utility knife to remove an old window frame, showcasing the process of removing a double hung window.

Before starting the removal process, test for lead paint if your house was built before 1978. Safety first! Use a stiff putty knife or a utility knife to carefully remove the interior stops. These stops will be reused, so handle them with care and set them aside safely.

Next, remove all hardware, including the crank mechanism and sash cords. Carefully handle the lower sash to avoid damage. After removing the window sash and hardware, keep the stops handy for later use.

The old window frame might be tricky to remove, especially if it’s been in place for many years. Use a utility knife to cut through any old paint or caulking that might be sealing the window in place. Carefully break the paint seal along the interior stops to avoid damaging them. Gently pry the window frame from the opening using a stiff putty knife and a pry bar, ensuring you don’t damage the surrounding wall or trim.

With the old window removed, inspect the opening for any signs of damage. This guarantees a solid foundation and perfect fit for your new window.

Preparing the Opening

Illustration of preparing the opening of window replacement

With the old window out, prepare the opening for the replacement windows installation. Review the measurements and ensure the structural soundness of the frame, carefully extracting the window casing to avoid damage, as it may be reused during the installation of a new window. A visual inspection will help you spot any signs of water damage, warping, or loose components.

Common areas to check for rot include the windowsills and lower sections of the exterior trim. If you find any damage, address it before proceeding. Clean the opening of any loose debris to ensure a proper seal and fit for the new window.

In some cases, brace the wall structure to support the new window installation. This maintains the wall’s integrity and ensures smooth operation of the new window.

Installing the New Double Hung Window

An illustration of a new double hung window being installed in a window opening, highlighting the installation process.

Check the rough opening for squareness and level before you install double hung windows. Set the window on the sill and tilt it into place against the blind stop. Ensure the window opening is slightly larger than the new window unit to allow for adjustments.

Use wood shims to level the window and secure it within the opening. Measure diagonally across the window and adjust the shims until the opposite corner measurements match. This step ensures the window is square and will operate correctly.

If the window is not positioned correctly, adjust it by removing and repositioning the screws. Be cautious when tightening the screws, as overtightening could warp the vinyl jamb. Proper alignment and securing of the window ensure its longevity and functionality.

With the entire window set and level, check the operation of both the upper and lower sashes. Ensure they slide smoothly and align correctly with the side jambs. This final check ensures that the window is properly installed and ready for the next steps.

Installing Double-Hung Sash Kits

If you’re looking to replace just the sash in an existing double-hung window, installing a double-hung sash kit is an excellent option. These kits typically include two new wood window sashes, two vinyl jamb liners, and all the necessary installation hardware. The process is straightforward and can be completed with a few basic tools.

Start by removing the old sash and cutting the sash cords. Carefully take out the parting stop and discard it. Next, attach the jamb liner clips to the jamb and snap the vinyl jamb liners over the metal clips. This step ensures the new sashes will slide smoothly. Add the top parting stop and position the sash lifts according to the manufacturer’s instructions.

Finally, install the new sash by placing it into the jamb liners and ensuring it is properly aligned and secured. Check that the sash operates smoothly and make any necessary adjustments. This method of replacing the sash can breathe new life into your existing double-hung window without the need for a full replacement.

Securing and Insulating

A person securing and insulating a newly installed window, focusing on the finishing touches of window installation.

Install screws in the premade holes using a screw gun to secure the new double-hung window. Use the new securing screws that came with the window unit to ensure a proper fit. After leveling the window, tighten all installation screws to avoid alignment issues.

Proper insulation is key to the window’s performance and energy efficiency. Use low expansion foam insulation around the window to fill any gaps and prevent drafts. Proper insulation ensures your home remains comfortable and energy-efficient, reducing heating and cooling costs.

Apply insulation evenly and ensure it does not over-expand, which could warp the window frame. This maintains the structural integrity and proper operation of the new window.

Reinstalling Stops and Finishing Touches

Illustration of window frame preparation

With the window insert securely in place, reinstall the wood interior stops on the sides and top of the window using 4d finish nails. These stops will hold the window sash in place and complete the installation.

To seal any gaps around the window frame, use a silicone-based caulk. This caulk provides a durable, weather-resistant seal that prevents air leaks and enhances the window’s energy efficiency.

Apply trim molding around the window frame for a polished look and additional sealing. This finishing touch not only improves the aesthetics of the window but also ensures a tight seal against air and water infiltration.

Window Frame Considerations

When replacing a double-hung window, it’s essential to assess the condition of the existing window frame. The frame should be structurally sound and free of rot or damage. If you find any issues, it may be necessary to replace the entire window frame to ensure a secure and long-lasting installation.

Consider the material of the window frame as well. Common materials include wood, vinyl, and aluminum. Vinyl window frames are particularly popular due to their durability, low maintenance, and energy efficiency. They can withstand various weather conditions and require minimal upkeep, making them a practical choice for many homeowners.

Proper sealing and insulation are also critical to prevent air leaks and moisture damage. Use high-quality caulk and weatherstripping to seal any gaps around the new window. This step not only enhances energy efficiency but also protects your home from potential water damage.

By carefully evaluating the condition of the existing frame and choosing the right materials and sealing techniques, you can ensure a successful and energy-efficient window replacement project.

Testing and Adjusting

Test both the upper and lower sashes to confirm they operate smoothly after installation. Check that the window is level and square by measuring diagonals and ensuring the sashes are parallel with the sill and top jamb.

Tighten the screws and check that the sashes slide easily and align correctly as the final step. This ensures that the window functions as intended and provides the expected benefits of improved energy efficiency and aesthetics.

Summary

Replacing double-hung windows may seem complex, but by following these steps, you can achieve professional results. Accurate measurements, careful removal of the old window, thorough preparation of the opening, precise installation, and proper securing and insulation are all crucial stages.

We hope this guide has provided you with the confidence and knowledge to tackle your window replacement project. Remember, the effort you invest today will pay off in improved energy efficiency and the enhanced beauty of your home.

Frequently Asked Questions

How do I measure for a double-hung window replacement?

To measure for a double-hung window replacement, use a metal tape measure to find the width between the side jambs and the height from the top jamb to the sill. Subtract ½ inch from the smallest dimensions to ensure a proper fit.

What should I do if my house was built before 1978?

It is crucial to test for lead paint before proceeding with any renovations in homes built before 1978 to ensure safety. Always prioritize safety measures during such renovations.

How do I ensure the new window is level and square?

To ensure the new window is level and square, utilize wood shims for leveling and check the diagonal measurements; they should match at the opposite corners. This method will help you achieve a properly aligned installation.

What insulation should I use around the new window?

For improved energy efficiency, it is recommended to use low expansion foam insulation to fill gaps around the new window. This ensures a proper seal and enhances overall insulation performance.

How do I finish the installation?

To finish the installation, reinstall the wood interior stops with 4d finish nails, seal any gaps using silicone-based caulk, and apply trim molding for both aesthetic appeal and additional sealing. This will ensure a polished and complete look to your installation.


An illustration showing various types of old house windows.

Best Windows for Old House: A Simple Replacement Guide

Wondering how to find the best Windows for Old House? This guide covers how to evaluate your current windows, the benefits of new ones, and how to choose replacements that match your home’s unique style.

Key Takeaways

  • Old windows, particularly those over 20 years or in poor condition, often need replacement for improved insulation and energy efficiency.

  • Replacing old windows enhances home comfort, energy savings, aesthetic appeal, and can increase property value.

  • Selecting the right replacement windows involves evaluating style, material, installation methods, and ensuring proper measurement for optimal performance.

Evaluating Your Old House Windows

An illustration showing various types of old house windows.

Assessing your old house windows helps determine if they need replacement. Windows over 50 years old or even more than 20 years old often require replacement due to wear and inefficiency. Cracks, warping, and drafts signal that windows are past their prime and need attention. These issues not only affect appearance but also significantly impact insulation and home comfort.

Single-pane windows, typical in older homes, lack proper insulation, contributing to drafts and higher energy costs. Assessing their performance is crucial, even if they seem in good condition, to ensure they meet modern standards. Upgrading to double pane windows can significantly improve energy efficiency.

Environmental factors and regular maintenance significantly affect window lifespan. Neglecting maintenance can lead to drafts and leaks, compromising efficiency. Thus, evaluate both the physical condition and maintenance history of your windows.

Benefits of Replacing Old Windows

A cartoon showing the benefits of replacing old windows with modern ones.

Replacing old windows offers numerous benefits, including improved energy efficiency. Windows installed two decades ago likely fall short of today’s energy standards, leading to higher costs. Modern replacement windows, such as double or triple-pane windows, provide better insulation, significantly lowering energy costs and improving home comfort.

New windows not only boost energy efficiency but also enhance your home’s aesthetic appeal. They fit seamlessly into your vision, whether modern or historical, and improve functionality with smoother operation and better security features.

Replacing old windows can increase property value and curb appeal, making your home more attractive to buyers. This investment pays off through energy savings, comfort, and added long-term value.

Should You Repair or Replace Old Windows?

Deciding whether to repair or replace old windows can be challenging. Repairing is often more economical for minor issues, preserving the original windows’ beauty and craftsmanship. However, significant damage or irreparable issues may necessitate replacement.

New windows can be a substantial investment due to labor, manufacturing, installation, and finishing costs. Therefore, carefully evaluate the condition of your existing windows. Factors such as leakiness, the condition of the window frames, and regulatory requirements for historic homes are critical in deciding whether to repair or replace.

Repairing old windows can be a temporary solution, but consider long-term performance and energy efficiency. If you need to replace windows that are significantly damaged or non-compliant with current codes, replacement may ensure your home’s comfort and safety.

Choosing the Right Replacement Windows for Old Houses

An illustration of selecting the right replacement windows for an old house.

Choosing the right replacement windows for old houses involves considering style, performance, and material. Select windows that complement your home’s architectural style. For instance, colonial-style homes typically benefit from 6-over-6 casements or double-hung windows, while classic cottage homes should feature double-hung sash windows with multiple lights.

Options for replacing windows old windows include full-frame, insert replacement, and sash replacement kits. Understanding window components and types helps make an informed decision balancing aesthetics, performance, and cost.

Custom Made Windows

Custom-made windows often accommodate unique, non-standard window openings in old houses. Designed to match the original architecture, they ensure historical accuracy and maintain your home’s charm. Custom windows provide a perfect fit, eliminating gaps, reducing leaks, and enhancing the overall aesthetics of your house.

Choosing custom-made windows preserves your home’s historical integrity while incorporating modern technology, blending old-world charm with contemporary functionality.

Energy Efficient Windows

Energy-efficient windows are essential for any replacement project. With two or three panes, low air infiltration rates, and low-E coatings, they significantly boost energy efficiency. Using low-E coated windows can result in a 30% to 50% reduction in energy loss, substantially lowering your utility bills.

Choosing energy-efficient windows goes beyond saving money; they create a more comfortable living environment by maintaining indoor temperatures, reducing drafts, and boosting home value for energy-conscious buyers.

Material Options for Window Frames

The material of window frames is crucial when selecting replacement windows. Common materials include wood, vinyl, aluminum, fiberglass, and composites. Historically, wood has been popular in older homes for its traditional look and workability.

Vinyl replacement windows offer durability and low maintenance but must be compatible with historical regulations before installation. Fiberglass frames, though durable and low-maintenance, can be more expensive and may lack the vintage look desired in older homes.

Composite frames, made from wood fibers and thermoplastic, need no maintenance and are similarly priced to wood. Aluminum frames, while economical, retain heat and are prone to condensation, affecting energy efficiency.

Consider maintenance needs and aesthetic preferences when selecting replacement windows to ensure they match your home’s style.

Installation Considerations for Replacement Windows

Proper installation is crucial for the performance and longevity of replacement windows. Though the process can be disruptive, the outcome justifies the temporary inconvenience. Installing an average-sized window on the ground floor takes about 4–6 hours, with disruption varying based on the size and number of windows replaced.

Inspect weatherstripping for wear to ensure airtight seals and prevent drafts. Regularly check for cracks or damage to glass and frames to catch minor issues early. Professional inspections can catch potential issues that might be overlooked during regular maintenance.

Measuring for New Windows

Accurate measurements are crucial when ordering replacement windows to ensure a proper fit. Measuring the dimensions of the existing window frame is a key step before installation. Measure height and width at multiple points to account for any irregularities.

Accurate measurements ensure a perfect fit, reducing gaps and leaks, and are essential for optimal performance and longevity of your replacement windows.

Full Frame vs. Insert Replacement Windows

Choosing between full-frame and insert replacement windows is crucial. Full-frame replacements are used when frames, sills, and jambs are rotted or misaligned. Full-frame replacement windows offer a complete rebuild of the window opening, addressing any underlying issues.

Replacement windows are suitable if existing window frames are in good condition. Choose between full-frame and insert replacement window options based on frame condition and damage extent. This choice affects the overall cost and duration of the project.

Hiring a Professional vs. DIY Installation

Hiring a professional ensures correct installation for energy efficiency and longevity. Professional installation is often covered under a manufacturer’s warranty, providing peace of mind and protecting your investment. DIY installation risks mistakes that could void warranties or reduce window efficiency.

If measuring and installing windows yourself isn’t appealing, hire a window company or carpenter. This ensures the job is done correctly, saving time and avoiding potential headaches.

Enhancing Old Windows with Storm Windows

An illustration of enhancing old windows with storm windows.

Adding storm windows to old windows significantly boosts energy efficiency, leading to reduced heating and cooling costs. Storm windows also enhance indoor comfort by reducing external noise, creating a quieter living environment.

Modern storm windows integrate well with existing architecture and can be designed for permanent installation. They provide effective insulation while preserving the original windows, adding value to the home and maintaining historical integrity.

Costs Associated with Replacing Old House Windows

A cartoon depicting the costs associated with replacing old house windows.

Replacing old house windows is a significant investment, with costs typically ranging from $450 to $1,400 per unit, including labor. Homeowners spend an average of $750 per window on replacements. Labor expenses account for about 15% of the total cost.

Emergency window replacements often incur additional fees due to urgency. Replacing all windows in a home can cost between $18,000 and $20,000 for 25 windows, depending on size, style, and material.

Historic homes may have specific style requirements that increase replacement costs. Low-emissivity coatings or argon gas fills can also raise window costs. Budget for these potential additional costs when planning a window replacement project.

Maintaining Your New Windows

New windows are easier to operate and maintain, reducing frustration from older, stuck windows. Modern windows offer enhanced durability and longevity, often outlasting older models. Routine cleaning with mild soap and a soft cloth maintains the appearance and functionality of windows.

Lubricate moving parts annually to ensure smooth operation and prevent sticking. Clear weep holes to avoid water damage and mold growth. Periodically tighten hardware to enhance security and maintain window functionality.

Summary

In summary, replacing old house windows can provide numerous benefits, including improved energy efficiency, enhanced aesthetics, and increased property value. Evaluating your windows, choosing the right replacement options, and considering proper installation methods are crucial steps in this process.

By taking the time to assess your windows and make informed decisions, you can ensure that your home remains comfortable, energy-efficient, and beautiful for years to come. Don’t hesitate to reach out to professionals for guidance and assistance in your window replacement journey.

Frequently Asked Questions

How do I know if my old windows need to be replaced?

Your old windows likely need replacement if you notice visible signs of wear such as cracks, warping, drafts, or leaks. Additionally, windows that are over 20 years old are generally good candidates for replacement.

What are the benefits of replacing old windows?

Replacing old windows can notably reduce energy costs while simultaneously boosting home security and enhancing curb appeal, ultimately increasing your property’s value.

Should I repair or replace my old windows?

If your windows have minor issues, repairing them can be cost-effective; however, significant damage or inefficiency suggests that replacement is the better option. Always consider the condition of the frames and any relevant historical regulations in your decision.

What types of replacement windows are available for old houses?

Replacement windows for old houses include full-frame replacements, insert replacements, and sash replacement kits, with custom-made options available to ensure historical accuracy. Choosing the right type will help preserve the character of your home while enhancing energy efficiency.

How much does it cost to replace old house windows?

Replacing old house windows typically costs between $450 and $1,400 per unit, including labor, with variations depending on size, style, and materials. It’s essential to consider these factors when budgeting for your project.


Find Your Ideal Low-Maintenance Outdoor Space

Top Composite Deck Choices: Find Your Ideal Low-Maintenance Outdoor Space

Imagine creating a beautiful outdoor space that requires minimal maintenance and lasts for decades. A composite deck offers homeowners the opportunity to do just that. With superior durability and performance compared to traditional wood, composite decking is an investment that pays off in the long run. In this guide, we’ll explore the world of composite decks and help you find your ideal low-maintenance outdoor space.

Key Takeaways

  • Composite decking offers superior performance, durability and low maintenance compared to traditional wood options.
  • Choose from capped or uncapped composite boards for your outdoor space based on slip resistance needs and research materials used, color options, price etc. when selecting a brand.
  • Composite decking is environmentally friendly with minimal upkeep requirements resulting in long term savings of time & money.

Understanding Composite Decking

Composite decking boards in a variety of colors and styles

Composite materials have become increasingly popular in outdoor decking because of their superior performance and durability compared to traditional wood options. Some advantages of composite decking include:

  • Enduring the elements and resisting moisture
  • Low maintenance requirements
  • Resistance to fading, staining, and scratching
  • Long lifespan
  • Environmentally friendly, as many composite decking materials are made from recycled materials

These benefits make composite decking a preferred choice over traditional lumber, including pressure treated lumber and pressure-treated wood.

With so many benefits to composite decking, it’s no wonder homeowners are making the switch. But what exactly goes into these materials, and what advantages do they provide?

Composite Decking Materials

Composite decking is crafted from a blend of wood fibers and plastic polymers, resulting in a durable and low-maintenance product. The wood particles included can range from sawdust to wood chips and wood fiber pieces. Meanwhile, the plastic component is often derived from recycled sources, contributing to the material’s sustainability and performance. With a variety of composite decking products available, homeowners can find the perfect solution for their outdoor living spaces.

One key feature of composite decking is the protective capping, which is a layer on top of the composite material that offers superior moisture and weathering protection, ensuring that your deck endures for many years. This cap also protects the boards from UV rays and erosion, keeping your deck looking fresh and vibrant for the life of the product.

Advantages of Composite Decking

When compared to traditional wood decking, composite decking offers several benefits that make it an attractive choice. For starters, composite decks are resistant to rotting and warping, ensuring a longer lifespan and less maintenance. Additionally, composite materials are more resistant to insects and moisture than traditional wood, making them a safer option for your family and the environment.

Aesthetically, composite decking offers a more uniform look and a variety of patterns that can be chosen to suit your personal style. With a wide range of colors and finishes available, composite decking allows homeowners to create a beautiful outdoor space that complements their home and landscape.

Types of Composite Deck Boards

Comparison of capped and uncapped composite deck boards

Understanding the two primary varieties of composite deck boards, capped and uncapped, is necessary when selecting composite decking. Knowing the differences between these two types will help you make an informed decision on which option is best suited for your needs and preferences.

Capped Composite Decking

Capped composite decking is a type of decking material that features a traditional composite wood/plastic core with a durable polymer protective shell. This protective shell offers several benefits, including:

  • Increased durability
  • Prevention of fading, staining, scratching, and mold growth
  • Low-maintenance requirements
  • Long-lasting performance

Overall, capped composite decking is a great option for those looking for a durable and low-maintenance decking material.

Capped composite decking materials consist of a blend of wood and plastic, with the wood particles commonly sourced from sawmills and woodworking operations. The plastic element is typically derived from recycled sources, further contributing to the sustainable nature of capped composite decking.

Uncapped Composite Decking

Uncapped composite decking is a type of composite decking without a protective cap on the surface. As the first-generation version of composite decking, it may be more susceptible to fading, staining, and other forms of damage when compared to capped composite decking. However, uncapped decking may have a higher slip resistance, making it a viable option for areas around pools or hot tubs.

The materials used in uncapped composite decking typically consist of a blend of wood fiber and plastic. Though uncapped composite decking has its benefits, it may have some drawbacks such as lower resistance to moisture, stains, and UV compared to capped composite decking. It is essential to weigh these factors when considering uncapped composite decking for your outdoor space.

Leading Composite Decking Brands

Choosing the right composite decking brand from the numerous options in the market can be quite a challenge. Some of the most sought-after composite decking brands are:

  • Trex
  • TimberTech
  • Fiberon
  • Cali Bamboo
  • CertainTeed

Each of these brands offers unique features and benefits that cater to different preferences and requirements.

Brand Features and Benefits

Many top composite decking brands, such as Trex, TimberTech, and Fiberon, offer a range of decking options, including fiberon decking, ensuring that there’s a perfect match for every homeowner’s style and budget. These brands boast unbeatable performance, low maintenance requirements, outstanding value, and highly attractive aesthetics, making them the top choices for composite decking.

Each brand offers distinct features that cater to different needs. For example, TimberTech decks can be heat-bent into elegant, curved shapes, offering a range of unexpected design possibilities. Additionally, TimberTech’s decking materials are designed to replicate the look of natural wood while remaining cooler under the sun, making them an excellent choice for hotter climates.

Choosing the Right Brand for Your Needs

Consider factors like the materials used, durability, color options, and price to choose the right composite decking brand for your specific needs. It’s also important to research consumer reports and evaluations of different brands to assess their performance and durability in your particular climate.

Consulting with experts and professionals in the decking industry can also provide valuable insight on which brand to choose. Ultimately, selecting the right brand comes down to personal preferences and requirements, and it’s essential to compare brands and gather as much information as possible before making a decision.

Composite Decking Colors and Styles

Wood-look composite decking samples

Composite decking offers a wide variety of colors and styles to choose from, allowing homeowners to customize their outdoor space to their liking. Some popular composite decking colors include warm and natural browns, shades of gray, and various tones of tan. The choice of color can greatly impact the overall aesthetics of your deck, so it’s important to consider how the color will complement the surrounding environment.

Wood-Look Composites

Wood-look composite decks are designed to replicate the appearance of real wood, featuring a wood-effect finish that emulates the knots and texture of natural wood. These decks are composed of a combination of wood fibers and recycled plastic, providing the aesthetic of wood with the strength and low-maintenance benefits of composite materials.

Popular brands for wood-look composite decking products include:

  • TimberTech
  • Cali Bamboo
  • DuraLife
  • CertainTeed
  • Trex

These brands offer a range of colors, textures, and styles that resemble the beauty of natural wood while providing the durability and performance benefits of composite materials.

Unique and Trendy Designs

Composite decking allows homeowners to create unique and trendy designs that stand out from traditional wood decking. Some examples of distinctive and fashionable patterns employed in composite decking include deck board arrangements such as decking line. To get a better idea of these designs, consider requesting a decking sample:

  • Simple single-width patterns
  • Picture frame deck patterns
  • Vibrant pinstripe boards
  • Dynamic diagonal designs
  • Intricate inlays

In addition to the wide range of patterns available, composite decking can also be customized and shaped for unique designs. By exploring different deck patterns and finishes, homeowners can create one-of-a-kind outdoor spaces that showcase their personal style and elevate the overall aesthetic of their home.

Installation and Maintenance of Composite Decks

Installation process of composite decking

Ensuring the longevity and performance of your composite deck requires proper installation and maintenance. Although composite decking requires less maintenance than traditional wood decking, it’s still important to follow the recommended installation process and perform routine upkeep to keep your deck looking its best.

Installation Process

The installation process for composite decking typically includes several key steps such as protecting the frame from rot, fastening start clips, and attaching the decking boards. With the right power tools and basic DIY carpentry skills, homeowners can learn how to install composite decking independently, or they can choose to hire a professional installer for an additional cost.

The average timeframe for composite decking installation depends on the size and complexity of the project, with most installations taking several days to a week to complete. For more detailed instructions and advice, consult comprehensive step-by-step guides and videos available online.

Minimal Maintenance Requirements

Minimal maintenance requirement compared to traditional wood decking is one of the key benefits of composite decking. To maintain a composite deck, homeowners should sweep away debris regularly and clean the deck with a mild soap, water, and brush every 3-6 months to eliminate dirt and soil.

While composite decking is more resistant to moisture and stains than traditional wood, it’s still important to perform regular maintenance to ensure the longevity and beauty of your deck. By following these simple steps, homeowners can keep their composite deck looking pristine and ready for outdoor entertaining.

Cost Considerations for Composite Decking

Considering both the initial investment and the long-term value of the product is important when thinking about composite decking. Although composite decking may have a higher upfront cost compared to traditional wood decking, the reduced maintenance requirements and longer lifespan make it a worthwhile investment in the long run.

Initial Investment

Depending on the brand and type of material used, the initial investment for composite decking typically ranges from $15 to $36 per square foot. While this may seem more expensive than traditional wood decking, which ranges from $4 to $25 per square foot, the durability and low maintenance of composite decking often make it a more cost-effective option in the long run.

It’s essential to consider the following factors when calculating the initial investment for a deck:

  • Size and design of the deck
  • Type and quality of materials used
  • Labor and permits required
  • Complexity of the deck corners and picture framing

By comparing these factors, homeowners can make an informed decision about the most suitable composite decking option for their budget and needs.

Long-Term Savings

Due to its reduced maintenance costs compared to traditional wood decking, composite decking offers long-term savings. Some benefits of composite decking include:

  • Longer lifespan
  • Minimal upkeep required
  • Cost-effective
  • Time-efficient option for homeowners

The average lifespan of a composite deck can range from 10 to 30 years, depending on the type of composite material used and the maintenance carried out. With proper installation and maintenance, some composite decks may even last a lifetime. This extended lifespan of composite decking decreases the need for replacement and reduces the overall environmental impact.

Environmental Impact of Composite Decking

Sustainable composite decking materials

For many homeowners, the environmental impact of composite decking is an important consideration. Compared to traditional wood decking, which has been linked to deforestation in fragile ecosystems, composite decking is a more sustainable choice.

Often made from a blend of wood particles and recycled plastic, composite decking materials contribute to the product’s sustainability. By choosing composite decking or PVC decking, homeowners can enjoy the beauty of a natural wood look while minimizing the environmental impact associated with traditional wood decking and recycled wood.

Summary

In conclusion, composite decking offers a wide range of benefits for homeowners seeking a low-maintenance, durable, and sustainable outdoor space. With various styles, colors, and brands to choose from, there’s a perfect composite deck for every home and budget. By understanding the materials, installation process, maintenance requirements, and cost considerations, homeowners can make an informed decision and enjoy a beautiful, long-lasting outdoor space for years to come.

Frequently Asked Questions

How much does a 20 x20 composite deck cost?

A 20’x20′ composite deck typically costs between $16,000 and $32,000 to build, including substructure.

Is composite decking worth the money?

Composite decking offers greater durability and low maintenance compared to wood, making it a worthwhile investment for many homeowners.
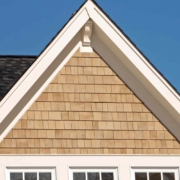
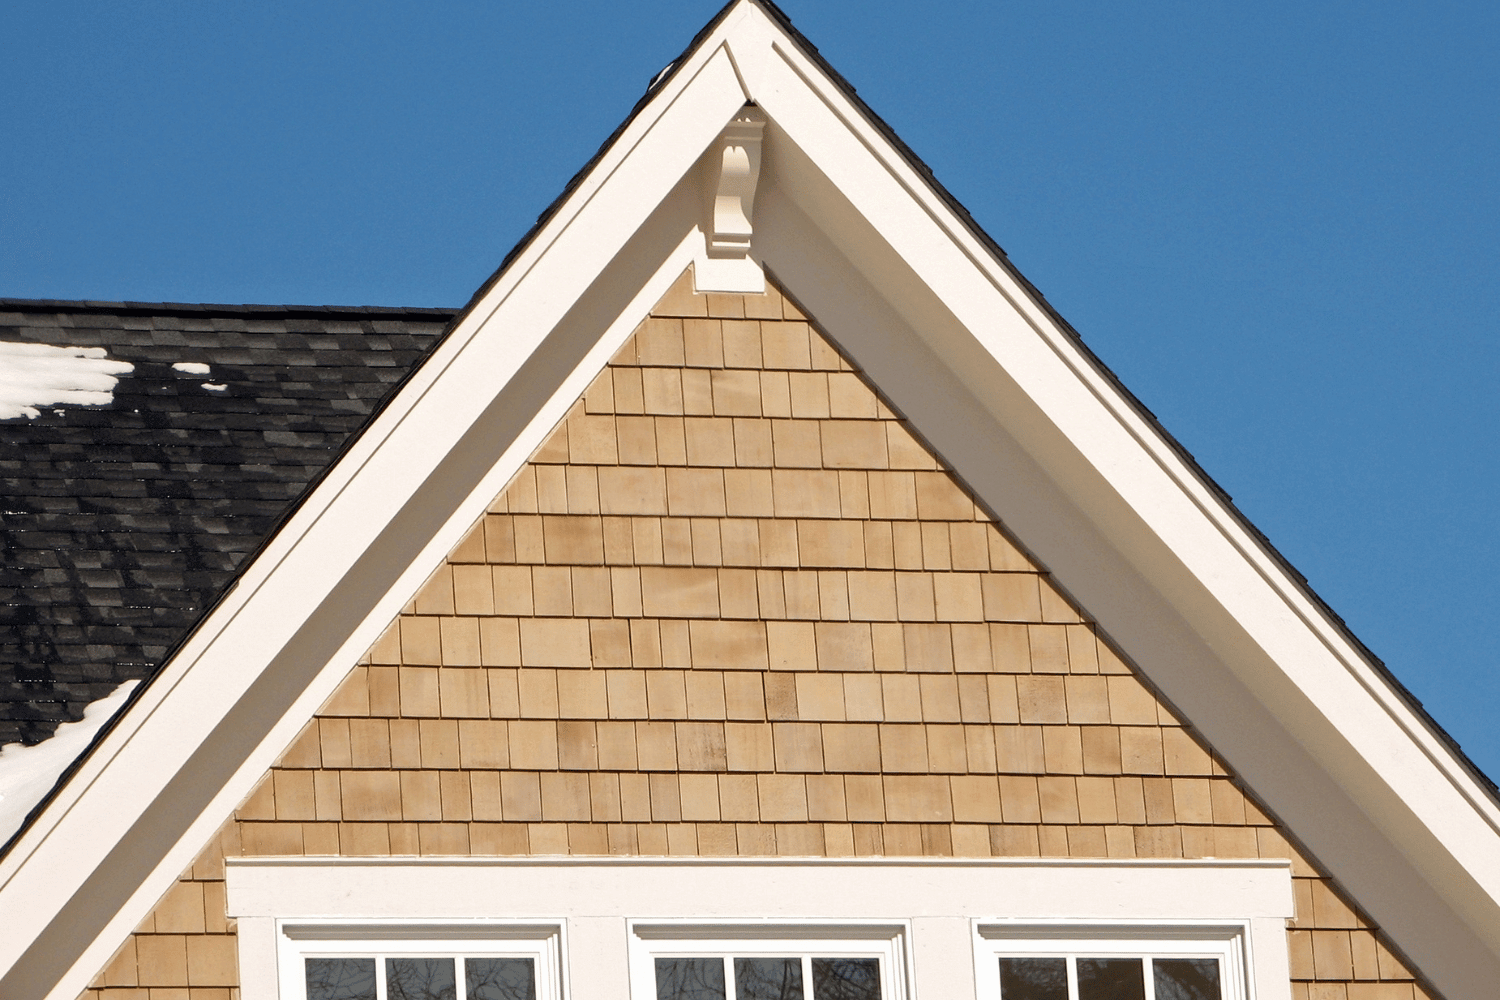
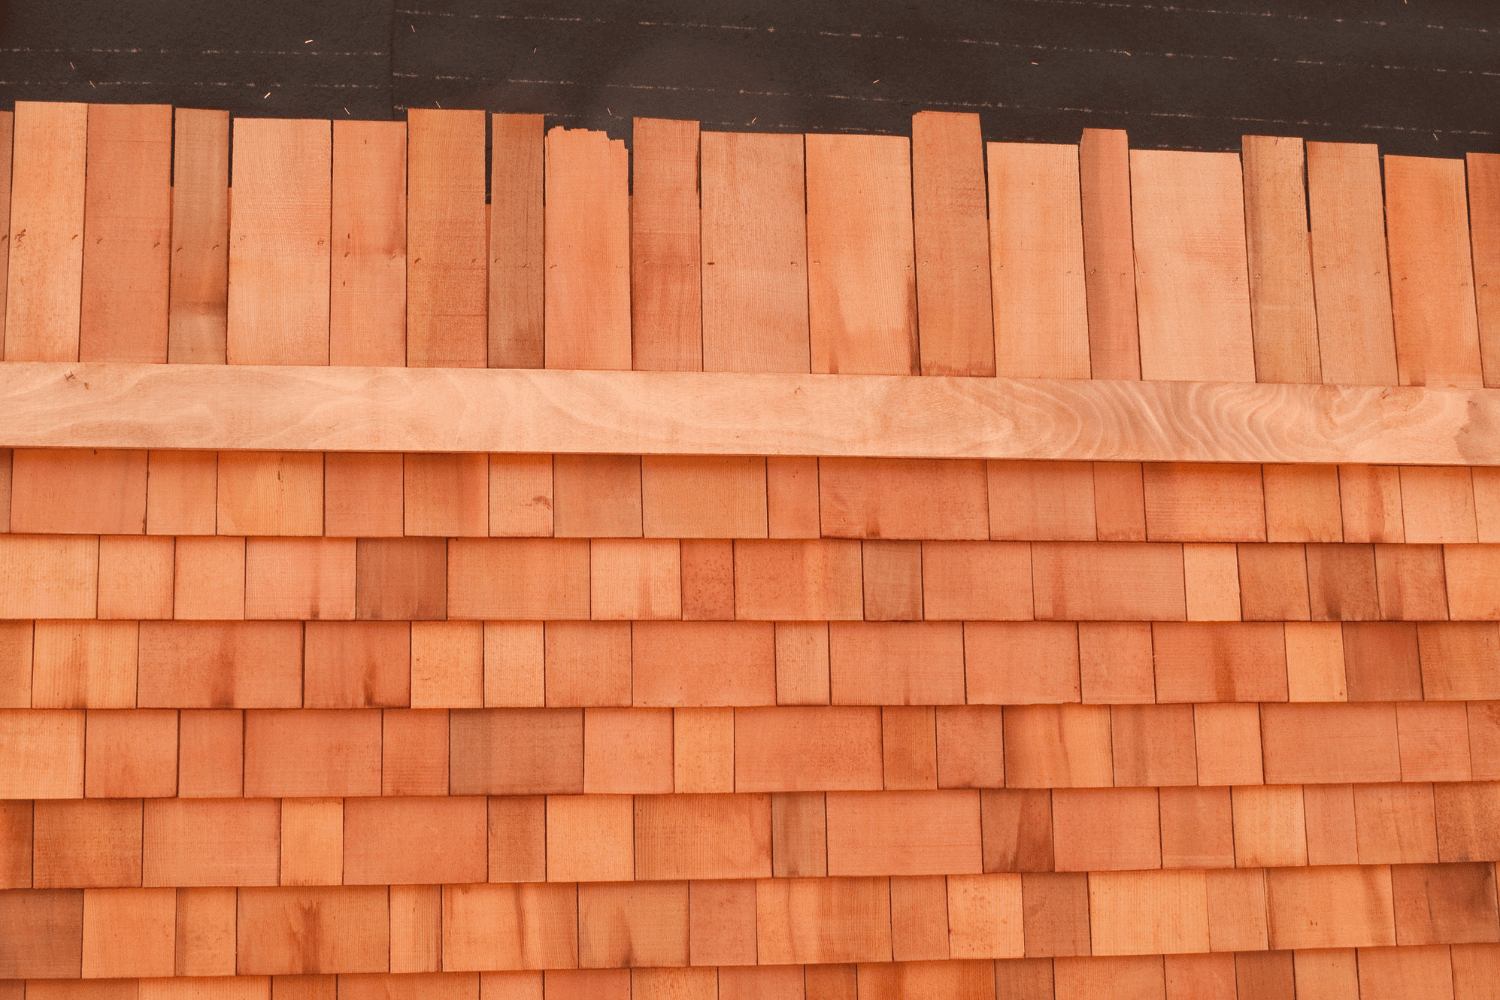
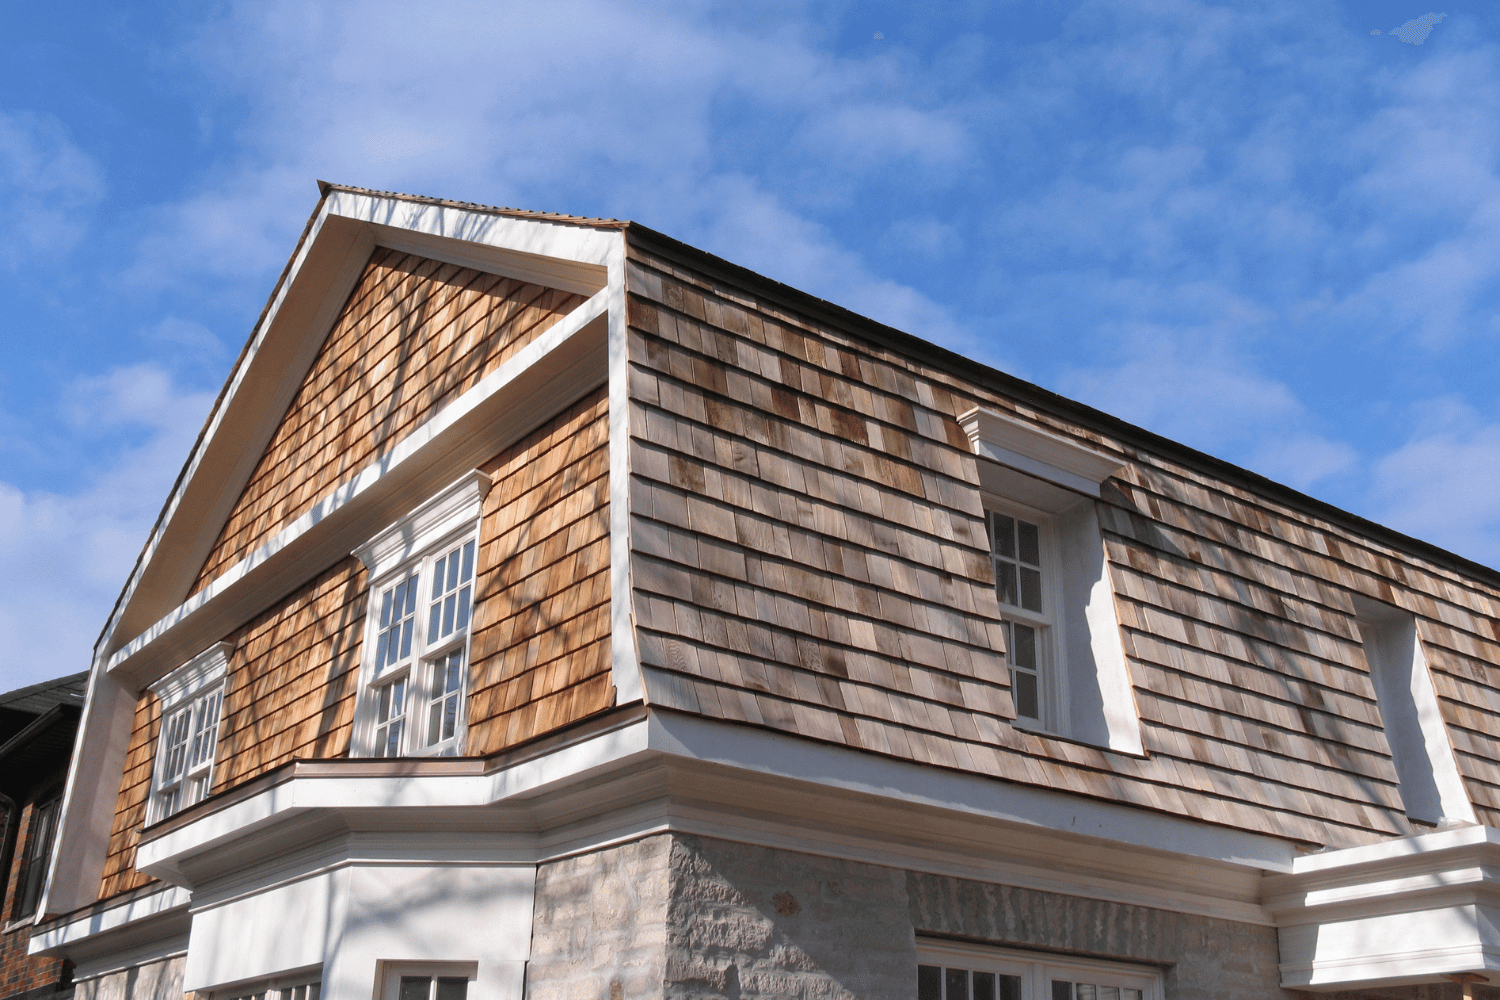
 Its range of benefits, such as fade, scratch, and insect resistance, should be considered when weighing up the costs.

Which is better Trex or composite decking?

Trex decking material is one of the strongest and longest lasting decking materials on the market, and is highly resistant to fading, staining, scratching and mildew. It’s also easily maintained, only requiring an occasional cleaning with soap and water, making it a superior choice compared to traditional composite decking.

What are the common problems with composite decking?

Common problems with composite decking include improper framing, mold and mildew, inability to be repainted, lack of real wood look and increased cost.

What is the average lifespan of a composite deck?

The average lifespan of a composite deck is 10 to 30 years, depending on the material and maintenance.

Deciding on Decking A Straightforward Comparison of Composite Deck vs Wood

Deciding on Decking: A Straightforward Comparison of Composite Deck vs Wood

Are you planning to build a deck and wondering which material to choose? The decision between composite and wood decking can be challenging, as both materials offer unique benefits and drawbacks. In this blog post, we’ll guide you through the composite deck vs wood debate, discussing their differences, durability and maintenance, cost factors, aesthetic appeal, and environmental impact. By the end, you’ll have a better understanding of the options available to help you make the best choice for your outdoor living space.

Key Takeaways

  • Comparing composite and wood decking requires understanding material type, cost, maintenance needs and environmental impact.
  • Composite is more durable with minimal maintenance while wood has a shorter lifespan but offers natural aesthetics.
  • Cost considerations vary. Initial costs are higher for composite but long term savings may be realized due to reduced upkeep requirements.

Understanding Composite and Wood Decking

Composite and wood decking materials comparison

Composite and wood decking materials differ in their composition and properties, influencing factors such as the composite decking cost and maintenance. Composite deck boards are made of wood fibers, plastic, and other materials, offering minimal upkeep and enhanced durability compared to natural wood decking. On the other hand, wood decking materials encompass various types of natural wood, each with unique characteristics and maintenance needs.

Before we discuss the specifics of each material, remember to consider four key elements while choosing between composite and wood deck materials:

  1. Material type
  2. Cost
  3. Upkeep
  4. Environmental impact

Now, we’ll detail the specifics of composite and wood decking materials.

Composite Decking Materials

Composite decking is composed of wood fibers, plastic, and other materials, providing low-maintenance and long-lasting options When considering composite decking pricing, it’s important to note the balance of initial investment against long-term savings. There are various composite decking materials available, such as wood plastic composite (WPC) and PVC decking. The benefits of composite decking include increased strength and stability, waterproofing, and the ability to replicate wood effects with color and texture. However, drawbacks include reduced weather-resistance compared to other non-wood decking materials and a lower environmental friendliness. Yet, many homeowners find the composite decking estimate to be beneficial for budgeting their projects.

Maintenance for composite decking is minimal, requiring only an annual soap-and-water cleaning. Following the manufacturer’s fastening instructions is necessary, as the warranty often depends on using the recommended fasteners.

Wood Decking Materials

In the United States, popular wood species for decking include redwood, cedar, and pressure-treated wood. Other options, such as Cumaru, offer superior resistance to decay and a beautiful golden and warm reddish-brown hue, making it a cost-effective and attractive choice. However, wood decking can lose its warm tone and become a dull gray if not properly maintained.

Some wood decking materials, like Mahogany and Ipe, have raised concerns due to their high cost and potential negative environmental impacts, including logging and shipping practices. Pressure-treated lumber, on the other hand, is more cost-effective compared to other wood species.

Durability and Maintenance

Composite decking durability

Composite and wood decking exhibit distinct differences in durability and maintenance. Here are some key points to consider:

  • Composite decking is generally more durable and requires less upkeep than wood decking, making it an attractive option for those evaluating composite deck price and long-term value.
  • Wood decking can last between 10 to 20 years with proper care.
  • Composite decking can last up to 25 to 30 years.

Environmental factors like water and insect damage, coupled with the material’s increased fragility, mean wood decking requires more maintenance. In contrast, composite decking requires very little maintenance, making it more cost-effective in the long run.

Composite Decking Durability

Composite decking is more resistant to UV and water damage than traditional wooden materials, making it a much more durable product. This protects it from fading, splitting, and splintering, giving homeowners added peace of mind. The durability of composite decking depends on its quality, with high-grade composite decking being more resilient to damage from external sources, such as pests, abrasion, warping, splintering, discoloration, and ultraviolet radiation.

Renowned for its durability and weather-resistant shells, composite decking can last for decades. The improved durability appeals to many homeowners seeking a low-maintenance decking solution.

Wood Decking Durability

Wood decking, when properly maintained, can be enduring, with a lifespan of 15 years or longer. However, it requires more maintenance than composite decking. The durability of wood decking depends on factors such as:

  • Maintenance
  • Moisture
  • Exposure to the elements
  • Type of wood employed

Wood decking mandates annual maintenance, including cleaning, staining, and sealing to protect it from environmental factors and maintain its appearance. Choosing the right wood species and performing regular upkeep can significantly impact the longevity and durability of a wood deck.

Cost Considerations

Comparing initial costs of composite and wood decking

While deciding between composite and wood decking, cost plays a pivotal role. Composite decking generally has a higher initial cost than wood decking but offers long-term savings. Wood decking, although cheaper upfront, may lead to significant long-term maintenance expenses.

Over a 10-year period, taking into account the initial investment and long-term maintenance costs, composite decking is estimated to be over a thousand dollars cheaper than pressure-treated pine. This cost difference can be a deciding factor for many homeowners when choosing between composite and wood decking materials.

Initial Costs

Composite decking is more expensive upfront than wood decking due to its increased manufacturing time and premium status for its durability and minimal maintenance requirements. Prices for composite decking range from $15 to $36 per square foot, while wood decking costs between $4 and $25 per square foot.

Considering reliable sources for purchasing composite decking materials is necessary, as prices may vary. Some sources to consider are:

  • TimberTech
  • CALI Bamboo
  • DuraLife by Barrette Outdoor Living
  • CertainTeed

When calculating the initial costs, also consider the tools necessary for installation, as these can add to the overall expenses.

Long-Term Costs

While wood decking may have lower initial costs, long-term maintenance expenses can add up. The annual maintenance costs for wood decking can vary from $5,620 to $12,500 over a 10-year period, depending on exposure to harsh weather and sun.

In comparison, composite decking generally requires minimal maintenance, with occasional cleaning being the main requirement. This can lead to cost savings over time, making composite decking a more economical choice for homeowners who prioritize long-term value and reduced maintenance costs.

Aesthetic Appeal

Aesthetic appeal of composite and wood decking

When comparing composite decking vs wood decking, they differ in aesthetic appeal. Composite decking offers a variety of colors and textures that often mimic natural wood. Wood decking offers an authentic, natural look preferred by some homeowners. The selection of color, grain pattern, size, and shape allows for creative design options with both materials. This range of choices makes designs truly unique.

Ultimately, the choice between composite and wood decking in terms of aesthetics will depend on individual preferences and the desired look for the outdoor living space. We’ll now inspect the aesthetic options of both materials.

Composite Decking Appearance

Composite decking, made from composite materials, offers a variety of colors and textures, often mimicking the appearance of natural wood. Leading composite decking brands like Trex and TimberTech provide high-quality options.. Advanced manufacturing techniques enable composite decking to replicate the look and feel of real wood grains, using color pigments, texture patterns, and embossing to simulate the natural variations and textures found in wood. With composite decks, homeowners can enjoy the beauty of natural wood without the maintenance hassles.

Top-rated brands for composite decking with wood-like appearances include:

  • TimberTech
  • CALI Bamboo
  • DuraLife by Barrette Outdoor Living
  • CertainTeed
  • Trex
  • Envision Outdoor Living
  • MoistureShield
  • Lumberock

The wide range of color and texture options allows homeowners to enjoy the aesthetic appeal of wood decking without the maintenance and durability issues associated with it.

Wood Decking Appearance

Wood decking provides an authentic, natural aesthetic that some homeowners appreciate. Popular wood species for decking, such as cedar, redwood, and ipe, offer unique grain patterns and textures, providing a warm and cozy atmosphere for outdoor spaces. Real wood decking can be customized with various stains and finishes to enhance its appearance, making wood decks a popular choice.

When considering wood decking, it’s essential to select the right type of wood for both durability and visual appeal. Some sustainable and visually appealing wood choices for decking include:

  • Cedar
  • Tropical hardwoods
  • Southern cypress
  • Black locust
  • Reclaimed hardwoods

Environmental Impact

Environmental impact of decking materials

Many homeowners consider the environmental impact of composite and wood decking materials significant. Composite decking is generally more environmentally friendly, as it uses recycled materials and requires less maintenance. However, the sustainability of wood decking depends on the type of wood used and the chemicals necessary for upkeep.

Both materials come with their environmental implications. Therefore, one must weigh the pros and cons of each material based on personal preferences and priorities. We’ll now examine further the environmental impact of composite and wood decking materials.

Composite Decking Sustainability

Composite decking can be more eco-friendly due to the use of recycled materials in its production process. Some of these materials include:

  • Natural hardwood powder
  • Synthetic thermoplastics
  • Sawdust
  • Wood chips
  • Wood fiber pieces

This makes composite decking a more sustainable option in comparison to traditional wood decking. For example, Trex composite decking is composed of 95 percent recycled and reclaimed materials.

While there are currently no recognized eco-standards for composite decking, the growing market for sustainable decking options and increased consumer demand for eco-friendly products might drive the development of such standards in the future.

Wood Decking Sustainability

The sustainability of wood decking depends on the type of wood used and the chemicals required for maintenance. Some more sustainable options include:

  • Redwood
  • Western red cedar
  • Nootka cypress
  • Pine
  • Douglas fir
  • Bamboo

On the other hand, pressure-treated wood, which typically contains toxins and requires chemical cleaners, stains, and sealers for maintenance, is frequently used for decking but is less eco-friendly.

If wood decking is under consideration, choosing sustainable wood options and adhering to responsible maintenance practices to minimize environmental impact is necessary. The Forestry Stewardship Council (FSC) provides certification for sustainable production, ensuring responsible practices in the harvesting of wood for decking.

Installation and Customization

Comparison of installation and customization options for composite and wood decking is significant in deciding the best option for your outdoor living space. Installing composite decking is typically simpler and offers more uniform board sizes, though customization options may be limited.

Wood decking may be more difficult to install but provides more customization possibilities. Understanding the installation process and customization options for both materials will help you make an informed decision about which decking material is best suited for your needs and preferences.

Composite Decking Installation

Composite decking installation is generally easier and offers more uniform board sizes, but may have limited customization options. Homeowners considering composite deck boards will find that they offer consistent quality and ease of installation. Typically, installing composite decking takes about 1 to 2 weeks, depending on the deck’s size and complexity. The tools necessary for composite decking installation include:

  • Chalk line
  • Circular saw
  • Corded drill
  • Drill/driver (cordless)
  • Miter saw
  • Power plane

Potential challenges associated with composite decking installation may include:

  • Insufficient expansion gaps
  • Heat retention
  • Scratching
  • Production errors
  • Improper screws
  • Wide joist spacing
  • Weak deck framing
  • Inadequate ventilation

Adhering to the manufacturer’s instructions during the installation process is necessary for a successful and durable composite deck.

Wood Decking Installation

Wood decking installation can be more challenging, with a typical duration ranging from one to four weeks. The tools necessary for wood decking installation include:

  • Circular saw
  • Hand saw
  • Chalk line
  • Tape measure
  • Carpenter’s level
  • Power drill
  • Appropriate hardware

A jigsaw may be necessary for more intricate areas, such as the deck’s staircase railing.

Common challenges during wood decking installation include:

  • Wood rot
  • Insect infestation
  • Water damage
  • Warping and gaps
  • General wear and tear

Choosing the right wood species and performing regular maintenance will significantly impact the longevity and durability of a wood deck.

Summary

In conclusion, both composite and wood decking materials offer unique benefits and drawbacks, with factors such as durability, maintenance, cost, aesthetics, and environmental impact playing significant roles in the decision-making process. Composite decking provides low-maintenance, durability, and a variety of colors and textures, while wood decking offers an authentic, natural look with greater customization possibilities. Ultimately, the choice between composite and wood decking will depend on individual preferences, priorities, and the desired outcome for your outdoor living space.

Frequently Asked Questions

Are composite decks better than wood?

Composite decks are generally more durable and require less maintenance than wood decks, making them a cost-effective, long-term option. They are also less susceptible to fading and water damage, as well as eco-friendly, requiring fewer chemicals and sealers over time.

What are the disadvantages of composite decking?

Wood composite decking lacks strength, gets hot in the sun, can contract and expand leading to damage, and is susceptible to mold. Alternatives such as PVC may be a better option for some homeowners.

Should I replace my wood deck with composite?

Composite decking is more cost-effective to install than a full replacement and can actually add value to your home. It is also more resistant to moisture, insects, and splintering, and can last longer than wood boards with less maintenance required. Consider replacing your wood deck with composite to save time and money in the long run.

What is the life expectancy of composite decking?

The lifespan of modern composite decks can range from 30-50 years, depending on installation and care.

What are the initial costs associated with composite and wood decking?

Composite decking has a higher initial cost compared to wood decking, which usually has lower upfront costs.

Top Trends In Replacement Windows For 2024

Top Trends in Replacement of Windows for Energy Efficiency & Style in 2024

Are you considering upgrading your home’s windows to improve energy efficiency and enhance style? Then you’re in the right place! This comprehensive guide will walk you through the essentials of window replacement, including understanding the basics of the replacement of windows, selecting the right materials, decoding energy efficiency factors, and choosing popular window styles. By the end of this guide, you’ll be well-equipped to make informed decisions and boost your home’s value with stylish, energy-efficient windows.

Key Takeaways

  • Understand the basics of window replacement and recognize when it’s time to replace windows.
  • Consider material, energy efficiency, cost, and other factors when selecting new windows.
  • Explore financing options & government/utility incentives for energy efficient upgrades to enhance home value & aesthetics.

Understanding Window Replacement Basics

Illustration of different window styles

Window replacement can provide a range of advantages, such as:

  • Increased soundproofing
  • Improved insulation
  • Enhanced comfort
  • Upgraded aesthetic

Energy-efficient replacement windows can also help reduce energy consumption and lower utility bills. When it comes to choosing the best replacement windows, there are various types of windows available, such as vinyl, wood, and fiberglass, each offering unique benefits and drawbacks.

Understanding your options can guide you to make the most suitable choice for your home.

Recognizing When to Replace Windows

Recognizing the right time to replace your windows is key to maintaining your home’s comfort and efficiency. Generally, it’s recommended to replace windows every 15 to 20 years. Some signs that it’s time for window replacement include:

  • Drafts
  • Condensation
  • Difficulty opening and closing
  • Visible damage
  • High energy bills

Before making a decision, consider factors such as window type, size, shape, material, energy efficiency, and cost.

The Step-by-Step Window Replacement Process

The window replacement process involves several steps, from selecting the right materials to installing replacement windows, ensuring proper installation. First, set a budget for the project and identify the windows to be replaced.

Next, choose the most suitable window type for your needs and evaluate the energy efficiency of the materials by looking for the NFRC label and Energy Star label.

Finally, hire a qualified installer to guarantee proper installation and review the warranty offered for the replacement materials.

Selecting the Right Material for Your New Windows

Illustration comparing wood, vinyl, and fiberglass windows

As you select the appropriate material for your new windows, there are several options to consider, such as:

  • Wood frames
  • Vinyl frames
  • Fiberglass frames
  • Composite frames

Each material has its own set of advantages and disadvantages, which should be weighed carefully before making a decision.

As we proceed, we will detail each material, providing you with the information you need to make the best choice for your home.

Wood vs. Vinyl vs. Fiberglass Windows

Wood frame windows offer a classic look and allow for the interior to be painted or stained, providing customization options. However, wood windows require more upkeep than other materials and can be more expensive.

Vinyl windows, on the other hand, are a cost-effective solution and require minimal maintenance. However, they may not be as resilient as wood or fiberglass windows and can be susceptible to warping and discoloration over time, which is why some homeowners consider vinyl replacement windows.

Fiberglass windows provide an aesthetic similar to that of a solid wood window, while offering a more reliable structural foundation. They come in three standard colors and feature even coloring on both the interior and exterior surfaces. Although fiberglass windows can be more costly than vinyl windows, they offer excellent insulation, weather resistance, and energy efficiency.

Aluminum and Composite Windows: Pros and Cons

Aluminum and composite windows are other options worth considering for your home. Aluminum windows are lightweight and durable, but they may not be as energy efficient as other materials.

Composite windows, made from a blend of materials like particleboard or laminated strand lumber combined with resin or fiberglass, boast strength and durability. However, they also require more upkeep and may be more expensive than other options.

Decoding Energy Efficiency in Window Replacements

Photo of a home with energy efficient windows

Energy efficiency is a significant factor to consider during window replacement, as it can contribute to energy savings and reduced utility bills. As we proceed, we will discuss the significance of Energy Star certified windows along with technologies that make windows energy-efficient, helping you better understand the benefits and make informed decisions for your home.

Energy Star Certified Windows and Their Benefits

Energy Star certified windows have been evaluated, certified, and validated according to the protocols established by the National Fenestration Rating Council (NFRC) and are regarded as the industry’s highest rating for highly efficient energy-efficient windows. These windows can provide extended energy savings through the reduction of heat loss, as well as features like low-e coatings, argon gas, and double- or triple-pane glass.

Technologies Behind Energy Efficient Windows

Several technologies contribute to the energy efficiency of windows, such as:

  • Low-e coatings, which reduce heat transfer and help maintain comfortable indoor temperatures
  • Argon gas, which is often used to fill the space between double- or triple-pane glass, providing additional insulation
  • Double- or triple-pane glass, which creates a barrier against heat transfer and improves insulation

These technologies help reduce energy consumption for heating and cooling.

Argon gas, denser than air, is added to the glass unit in double- or triple-paned windows to reduce heat transfer and improve energy efficiency.

Popular Window Styles and Their Features

Illustration showcasing popular window styles

There are several popular window styles to consider for your home, each with its own unique features and benefits. We will proceed by discussing the versatility of double-hung windows and the benefits of casement and awning windows to maximize ventilation and natural light. Understanding these popular styles can help you make the best decision for your home’s aesthetics and functionality.

Double Hung Windows and Their Versatility

Double-hung windows are incredibly versatile, offering increased ventilation and flexibility in opening and closing both the top and bottom windows. This design allows for an excellent flow of fresh air and improved airflow compared to single-hung windows.

Their practicality and adaptability make double-hung windows a popular choice for various home styles.

Casement and Awning Windows: Maximizing Ventilation

Casement and awning windows offer optimal ventilation and natural light, as they open outwardly to the fullest extent, allowing for the most sunlight to enter the space. Casement windows provide precise control in terms of air direction and intensity, allowing for superior airflow in a room.

Awning windows can be securely left open during the night for improved air circulation and ventilation.

The Cost Factor: Estimating Your Investment in Replacement Windows

Photo of a window replacement cost breakdown

Accurate cost estimation is a key aspect to consider when planning a window replacement project. Factors that affect the cost of window replacement include the window’s location, the size of the home, and the time of year. We will now provide a breakdown of window replacement costs, including materials, labor, and additional expenses, as well as tips for getting accurate estimates.

Replacement Windows Cost Breakdown

Window replacement costs can vary greatly depending on the type of window, the size of the window, and the labor costs associated with the installation. On average, replacement windows cost around $700 per window, including materials and labor. However, the cost can range from $234 to $1,387 per window, depending on the window type and other factors that may influence the price.

In addition to the cost of the windows themselves, other expenses may include:

  • Delivery
  • Disposal of the old windows
  • Potential modifications to the framing
  • Repairs that may be necessary
  • Permits
  • Access to the windows for installation

The labor cost makes up an average of 15% of the total window replacement. It can range from $100 to $400 per window.

How to Get Accurate Estimates for Window Replacement

To ensure accurate estimates for window replacement, we recommend following these steps:

  1. Utilize a cost calculator like the one provided by Modernize and take into account factors such as window size, type, materials, and labor.
  2. Accurately measure the window and subtract 1/4 inch from each measurement.
  3. Look for labels like NFRC and Energy Star to ensure energy efficiency.
  4. Finally, seek out a reputable installer and evaluate the warranties offered.

Obtaining precise estimates from window replacement professionals is key to determining the accurate costs for your project. Potential risks in DIY window installation may include:

  • Inaccurate measurements of the window opening
  • Failure to adhere to the manufacturer’s instructions
  • Gaps around the replacement windows
  • Incorrect window size ordering
  • Inadequate flashing adherence
  • Lack of sealing of the nailing fins

Professional Installation vs. DIY: Making the Smart Choice

Though DIY window installation may appear appealing, one must consider the potential risks and challenges involved. Hiring a certified installer, such as CoMo Premium Exteriors, ensures the quality of the work and could avert potential issues in the future.

We will now discuss the risks associated with DIY window installation and the benefits of hiring certified installers.

The Risks of DIY Window Installation

DIY window installation may seem cost-effective, but it comes with several potential risks and challenges. Here are some of the potential issues you may encounter:

  1. Errors in the installation process can lead to property damage.
  2. Errors in the installation process can lead to severe personal injury.
  3. Choosing the wrong window for your needs can result in poor performance and energy inefficiency.
  4. Improper installation can result in drafts, leaks, and other issues.
  5. The installation process may take longer than necessary, particularly for those without prior experience.

Considering these risks, it may be worth hiring a professional for your window installation needs.

The Value of Certified Installers

Certified installers possess the expertise and understanding to guarantee that the window replacement project is carried out correctly and securely. They are also familiar with the most recent technologies and techniques, which can facilitate the project being completed expeditiously and with the best quality outcomes. CoMo Premium Exteriors employs knowledgeable installers who are authorized for the chosen brand and provides a 5 Year Workmanship Warranty.

Hiring a certified installer offers several benefits for your window replacement project:

  • Ensures a successful installation
  • Helps avoid the risks associated with DIY installation
  • Provides peace of mind knowing your windows are being installed correctly

The investment in a professional installation service is well worth it for these reasons.

Enhancing Home Value with Stylish Window Upgrades

Upgrading your home’s windows can not only improve energy efficiency but also enhance your home’s overall aesthetic appeal and boost its value. Selecting the right window design and style is vital to achieving the desired look and feel for your home.

We will now discuss the influence of window design on home aesthetics, and provide tips for selecting windows that enhance your home’s architecture.

The Impact of Window Design on Home Aesthetics

Window design can significantly contribute to a home’s curb appeal. Replacing windows can give the home a modern and refreshed appearance, while also complementing the home’s architecture and adding visual appeal to the exterior.

Choosing the right window design can truly transform your home and elevate its overall look.

Choosing Windows That Complement Your Home’s Architecture

Selecting windows that complement your home’s architecture is essential to creating a harmonious visual aesthetic. For example, suitable windows for a Craftsman home include:

  • Double-hung windows
  • Casement windows
  • Rectangular windows
  • Square windows

By taking into account your home’s architectural style and choosing windows that enhance its features, you can create a stunning, cohesive look that increases your home’s value and appeal.

Financing and Incentives for New Windows

Window replacement can be a significant investment, but there are financing options and incentives available to help make the process more affordable.

We will now explore a variety of financing options for window replacement projects and discuss government and utility incentives for energy-efficient windows.

Exploring Window Replacement Financing Options

When considering financing options for window replacement, you may wish to explore:

  • Personal loans
  • Home equity loans
  • Home equity lines of credit (HELOC)
  • Credit cards

Many window manufacturers and installers offer financing options for people who want to replace their windows. These options make it easier to afford window replacement.

A home equity loan is a viable option to finance a window replacement project. It allows you to borrow money based on the equity in your home with a low-interest rate and is repaid over time. Be sure to research and compare the terms and interest rates of different financing options to determine the best fit for your needs.

Government and Utility Incentives for Energy Efficient Windows

There are government and utility incentives available to help offset the cost of energy-efficient window upgrades. Federal income tax credits are available through 2032, providing up to $3,200 annually to lower the cost of energy-efficient home upgrades. Various utility companies also offer rebates or incentives for energy-efficient windows, which are often provided through energy incentive programs offered by utilities, local governments, and state agencies.

Summary

In conclusion, upgrading your home’s windows can significantly improve energy efficiency, enhance style, and boost its value. By understanding window replacement basics, selecting the right materials, decoding energy efficiency factors, and choosing popular window styles, you can make informed decisions for your home. Don’t hesitate to invest in stylish, energy-efficient windows that will transform your living space and provide lasting benefits for years to come.

Frequently Asked Questions

Is it cheaper to replace all windows at once?

Replacing all windows at once is usually the more cost effective option, as many window replacement companies offer bulk pricing on both materials and labor. This means you will pay more upfront, but it could save you money in the long run.

What are some signs that indicate the need for window replacement?

Drafts, condensation, difficulty opening and closing, visible damage, and high energy bills are signs that replacement windows may be needed.

What factors should be taken into account prior to making a decision to replace windows?

When making a decision to replace windows, type, size, shape, material, energy efficiency, and cost should be taken into account.

What are the benefits of Energy Star certified windows?

Energy Star certified windows provide substantial energy savings by reducing heat loss and featuring low-e coatings, argon gas, and double- or triple-pane glass.

What financing options are available for window replacement?

Financing options for window replacement include personal loans, home equity loans, HELOCs, and credit cards.

The Ultimate Guide to Replace Windows Styles, Costs, and Installation Tips

The Ultimate Guide to Replace Windows: Styles, Costs, and Installation Tips

Replacing windows in your home is more than just a cosmetic upgrade; it’s an investment in the comfort, energy efficiency, and overall value of your property. This comprehensive guide will walk you through the essential aspects of window replacement, from understanding the need to replace windows to selecting the right materials and style to suit your needs. Let’s jump right in!

Key Takeaways

  • Window replacement can provide numerous benefits to a home, but it is important to consider factors such as material, style and energy efficiency.
  • When choosing a window brand for your home, compare the offerings of top brands in terms of features, ratings and customization options.
  • Strategies to reduce costs include retrofit installation, bulk discounts and scheduling during off peak season.

Understanding the Need for Window Replacement

A wooden window frame with cracked paint and signs of aging

Window replacement may become necessary for various reasons, such as age, damage, or lack of energy efficiency in existing windows. To avoid further problems and save money over time, it’s necessary to identify the signs of window deterioration. Fogging, frame deterioration, and air infiltration in the interior are some indicators that suggest it’s time to replace your windows.

Installing replacement windows brings multiple benefits to your home. These include increased acoustic insulation, reduced air leakage, improved comfort, and an enhanced exterior aesthetic. When it comes to window replacement, you’ll encounter two main types: typical replacement windows and new-construction windows. The former is designed to fit within the existing window frame, while the latter necessitates the removal of the entire old window, including the frame, sill, and trim.

Keep in mind that all windows are not made the same. Different window styles, materials, and energy efficiency ratings can significantly impact the performance and longevity of your new windows. Doing a comprehensive study and understanding your specific needs will help you make a well-considered decision about replacing your windows.

Choosing the Right Window Style

A variety of window styles including double-hung, casement, and bay windows

Window styles vary, and the right choice for your home will depend on factors such as aesthetics, functionality, and energy efficiency. Some popular window styles include:

  • Double-hung windows
  • Casement windows
  • Sliding windows
  • Bay windows

Double-hung windows are a common choice, offering versatility and ease of maintenance.

When selecting a window style, consider factors like energy efficiency, available styles and features, and the cost of the windows. For example, double-hung windows should effectively block out cold air or water, especially if you live in an area prone to chilly and windy or rainy weather.

Top window brands such as Andersen, Marvin, and Pella offer a range of window styles and customization options, including composite windows. Andersen windows, for example, feature various construction materials like wood, clad, vinyl, and composite, along with low-E and argon-filled glass for enhanced energy efficiency. By comparing various brands and what they offer, you’ll be able to find the right match for your home and budget.

Window Frame Material Options

A comparison of window frame materials including wood, vinyl, and aluminum

The window frame material plays a significant role in the overall performance, durability, and maintenance requirements of your windows. Common window frame materials include:

  • Wood
  • Vinyl
  • Aluminum
  • Composite

Each material has its own set of advantages and disadvantages.

Wood window frames offer a classic and customizable aesthetic, often favored in luxury and historic dwellings. Window materials other than these require less upkeep. However, they have their own set of limitations..

Vinyl window frames are cost-effective, long-lasting, and relatively easy to clean. However, they may not offer the same level of aesthetic appeal as wooden frames.

Aluminum window frames may not be as energy-efficient as other materials, especially if an insulated barrier is not present within the frame.

On the other hand, fiberglass window frames are highly insulating, weather-resistant, low-maintenance, and fairly energy-efficient while offering the ability to mimic other materials’ appearance.

Glazing and Energy Efficiency Choices

A cross-section of a double-pane energy-efficient window

Besides the style and frame material of the window, glazing options significantly influence the insulation and energy efficiency of your windows. Double or triple-pane windows, as well as energy-efficient coatings, can significantly improve insulation and reduce energy costs.

Double-pane windows are a popular choice, with costs ranging from $450 to $1,000 per window. They offer better insulation than single-pane windows, which cost between $150 and $400 per window. Some window brands, such as Atrium, offer advanced glazing options like low-emissivity (low-E), argon-filled, and triple-pane glass.

When selecting energy-efficient windows, look for the Energy Star certification label. The Environmental Protection Agency administers the Energy Star program. It estimates that with the installation of Energy Star certified windows, the average homeowner can reduce their home energy bills by 12 to 13 percent.

Professional vs. DIY Installation

Although installing windows yourself might seem like a way to save money, it is usually better to hire a professional installer because of the complex nature of the task, warranties, and assured results. Professional window installers ensure that the window is securely sealed to avoid air leakage and drafts.

To find a certified window installer, you can ask for referrals from friends and neighbors, consult window manufacturers, or check with home improvement stores like The Home Depot and Lowe’s. It’s important to get estimates from several window companies to compare costs and services before deciding.

Some window installation companies, like CoMo Premium Exteriors, offer the following services:

  • Free estimates
  • Expert support and guidance throughout the installation process
  • Professional installation services for windows and doors
  • Experienced installers ensuring a smooth and efficient window replacement process.

Factors Affecting Window Replacement Costs

Knowing what factors influence window replacement costs can help you plan your budget and make well-considered decisions. Factors that influence window replacement costs include:

  • Window type
  • Material
  • Labor
  • Location
  • Additional services like disposal and structural repairs.

Window frame materials can significantly impact the window replacement cost. For example, wood windows can range from $250 to $800, while vinyl windows can cost between $80 and $500. Aluminum windows can be more expensive, with prices ranging from $400 to $1,300.

The style and features of the windows also contribute to the overall cost. Custom windows, for instance, may come with a higher price tag than standard window styles. Windows that are energy-efficient may have a higher initial cost. However, they could potentially save you money on energy bills in the long term.

Top Window Brands to Consider

Finding the right window brand for your home is essential for ensuring quality and longevity. Some of the top window brands in the market are:

  • Renewal by Andersen
  • Champion
  • Window Nation
  • Universal Windows Direct
  • Pella
  • Marvin
  • Harvey
  • Simonton Windows
  • The Home Depot

These brands were selected based on their product offerings, warranties, years of experience, and customer reputation.

Different window brands offer various features, such as:

  • Energy efficiency
  • Durability
  • Customizable options
  • Suitability for specific environments like coastal homes
  • Specialized warranty coverage
  • Cutting-edge window designs

It’s important to study and compare these leading window brands to find the perfect fit for your needs and budget. Consider factors like:

  • Energy efficiency ratings
  • Materials
  • Styles
  • Customization options

when making your decision.

Tips for Reducing Window Replacement Costs

There are several ways to reduce window replacement costs without compromising on quality. One option is retrofit installation, where new windows are installed within the existing window frame, providing an efficient and cost-effective replacement method.

Another tip is to inquire about bulk discounts when purchasing multiple windows. Some companies offer wholesale pricing for bulk purchases, which could result in significant savings. Comparing prices between different suppliers or manufacturers can also help you find the best deal.

Scheduling your window replacement during the off-peak season, such as winter, may also help you save money. Discounts or promotions may be available during these times, and window installers may be more readily available for your project.

Preparing Your Home for Window Replacement

Appropriate preparation is necessary for a seamless window replacement process. Start by clearing the area around your windows, removing any obstacles that could hinder the installers’ access to the windows. Take down curtains, drapes, blinds, and other window treatments following the manufacturer’s instructions.

Ensure that the window installers have unobstructed access to the designated areas in your home. If you’re planning other upgrades or renovations, it’s a good idea to complete them before replacing the windows to reduce disruption.

Summary

In conclusion, window replacement is an important investment in your home’s comfort, energy efficiency, and overall value. By carefully considering factors like window style, frame material, glazing options, and installation methods, you can make an informed decision that meets your needs and budget. Don’t forget to research and compare top window brands and follow our tips for reducing window replacement costs. Now you’re well-equipped to embark on this home improvement project with confidence!

Frequently Asked Questions

Is it cheaper to replace all windows at once?

It can be cheaper to replace all windows at once due to bulk pricing offers from window replacement companies. This can result in significant cost savings over the years, compared to replacing a few windows at a time.

Does replacing windows increase home value?

Replacing windows can be a costly project, but it pays off by adding an average of $13,766 in value to your home, approximately 69% of the project cost.

What are the benefits of installing energy-efficient windows?

Installing energy-efficient windows can help reduce energy costs, improve insulation, and increase comfort in your home.

What factors should I consider when choosing a window style for my home?

When choosing a window style for your home, take into account aesthetics, functionality, and energy efficiency to ensure the best result.

How do I find a certified window installer?

Finding a certified window installer can be achieved through referrals from trusted sources such as friends, neighbors or reputable manufacturers and stores.

Page 3 of 9‹12345›»

Services

Roofing
Roofing
Shingles
Shake Roofing
Slate Roofing
Metal Roofing
Flat Roofing
Commercial
Roofing
Concrete Tile
Roofing
Vinyl Siding
James Hardie
Siding
Exteriors
Wood / LP
Siding
Doors
Windows
Deck Building
Gutter
Installation
Siding

Latest Blog Posts

  • roof inspection
    What Are The Signs That I Need a Roof Inspection?
  • roofing contractor in columbia mo
    Benefits of Choosing Polymer Composite Roofing Shingles in Mid-Missouri
  • A person preparing for window replacement with tools and materials laid out.
    Changing a Window: Expert Tips for a Smooth Replacement
Popular
  • CoMo Premium Exteriors Blog local contractor
    Columbia, MO’s Trusted Local Contractor for Quality...in: Roofing
  • What is James Hardie Siding?
    James Hardie Maintenancein: Siding
  • Shingles vs Metal Roofing
    Shingles vs Metal Roofingin: Roofing
Recent
  • roof inspection
    What Are The Signs That I Need a Roof Inspection?in: Roofing
  • roofing contractor in columbia mo
    Benefits of Choosing Polymer Composite Roofing Shingles...in: Roofing
  • A person preparing for window replacement with tools and materials laid out.
    Changing a Window: Expert Tips for a Smooth Replacementin: Exteriors, Windows

Our Locations

Columbia Jeff City Moberly Boonville

Services

  • Roofing
  • Decks
  • Siding
  • Windows
  • Gutters

Damage Repair

  • Storm Damage
  • Hail Damage

Company

  • About Us
  • Service Area
  • Portfolio
  • Careers

Help Center

  • Our Blog
  • Roofing Types
  • Roofing Questions
  • Warranties

Special Offers

  • Financing Options
  • Free Inspection

We’re Proud to Serve These Mid-Missouri Areas

Columbia MO
Moberly MO
Mexico MO
Lake Ozark MO
Centralia MO
Booneville MO
Fayette MO
Jefferson City MO
Fulton MO
Hallsville MO
Ashland MO

como logo transparent

CoMo Premium Exteriors

We are the #1 roofing contractor in Lake of the Ozarks Columbia, Missouri Moberly, Missouri Jefferson City, Missouri Boonville, Missouri Mid-Missouri

Business Hours

24-7 Every Day

Columbia
3504 Interstate 70 Dr SE
Columbia, MO 65201

(573) 424-9008

Boonville
411 Main Street,
Boonville, MO 65233

(660) 219-9700

Moberly
1112 N Morley St,
Moberly, MO 65270

(660) 455-4398

Jefferson City
200 E Cedar Way,
Jefferson City, MO 65101

(573) 639-7663

Lake Ozark
2140 Bagnell Dam Blvd. #104,
Lake Ozark, MO 65049

(573) 969-2104

CoMo Premium Exteriors © 2024 All Rights Reserved. Proudly serving Columbia MO and all of Mid Missouri | Privacy Policy
Roofer SEO Provided by Robben Media

Scroll to top