Downspout Extensions: How Far Should Water Drain From Your Foundation?
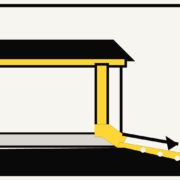
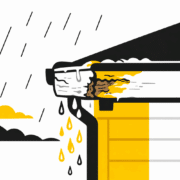
A gutter system is only as useful as the place where it releases the water. When a downspout ends beside the foundation, roof runoff can collect near basement walls, crawl spaces, landscaping, sidewalks, and patios. A downspout extension gives that water a controlled path away from the house.
Mid-Missouri storms can deliver a large amount of water in a short period. The right extension is not simply the longest piece that fits. It must work with the grade, soil, walkways, landscaping, and the rest of the gutter system.
There Is No Universal Downspout Distance
Moving water several feet away from the foundation is a practical starting point, but there is no single distance that works for every home. An extension has done its job only when the discharge point is lower than the area beside the house and the water continues moving away instead of flowing back. EPA’s Downspout-Redirection Guidance also warns that the destination must be chosen to avoid property damage, unsafe conditions, and other drainage problems.
A short extension may work on a clearly sloped yard. A longer run may be needed where the ground is flat, clay-heavy soil drains slowly, or a walkway blocks the natural route. The discharge also should not create a wet spot for a neighbor, wash out a planting bed, or send water across a sidewalk where it can freeze.
Follow the Entire Water Path
Start at the roof edge and follow the path to the final discharge point. Check whether the gutter is pitched correctly, whether the outlet is open, whether the downspout is firmly connected, and whether each elbow is clear. Then look at the extension and the ground beyond it.
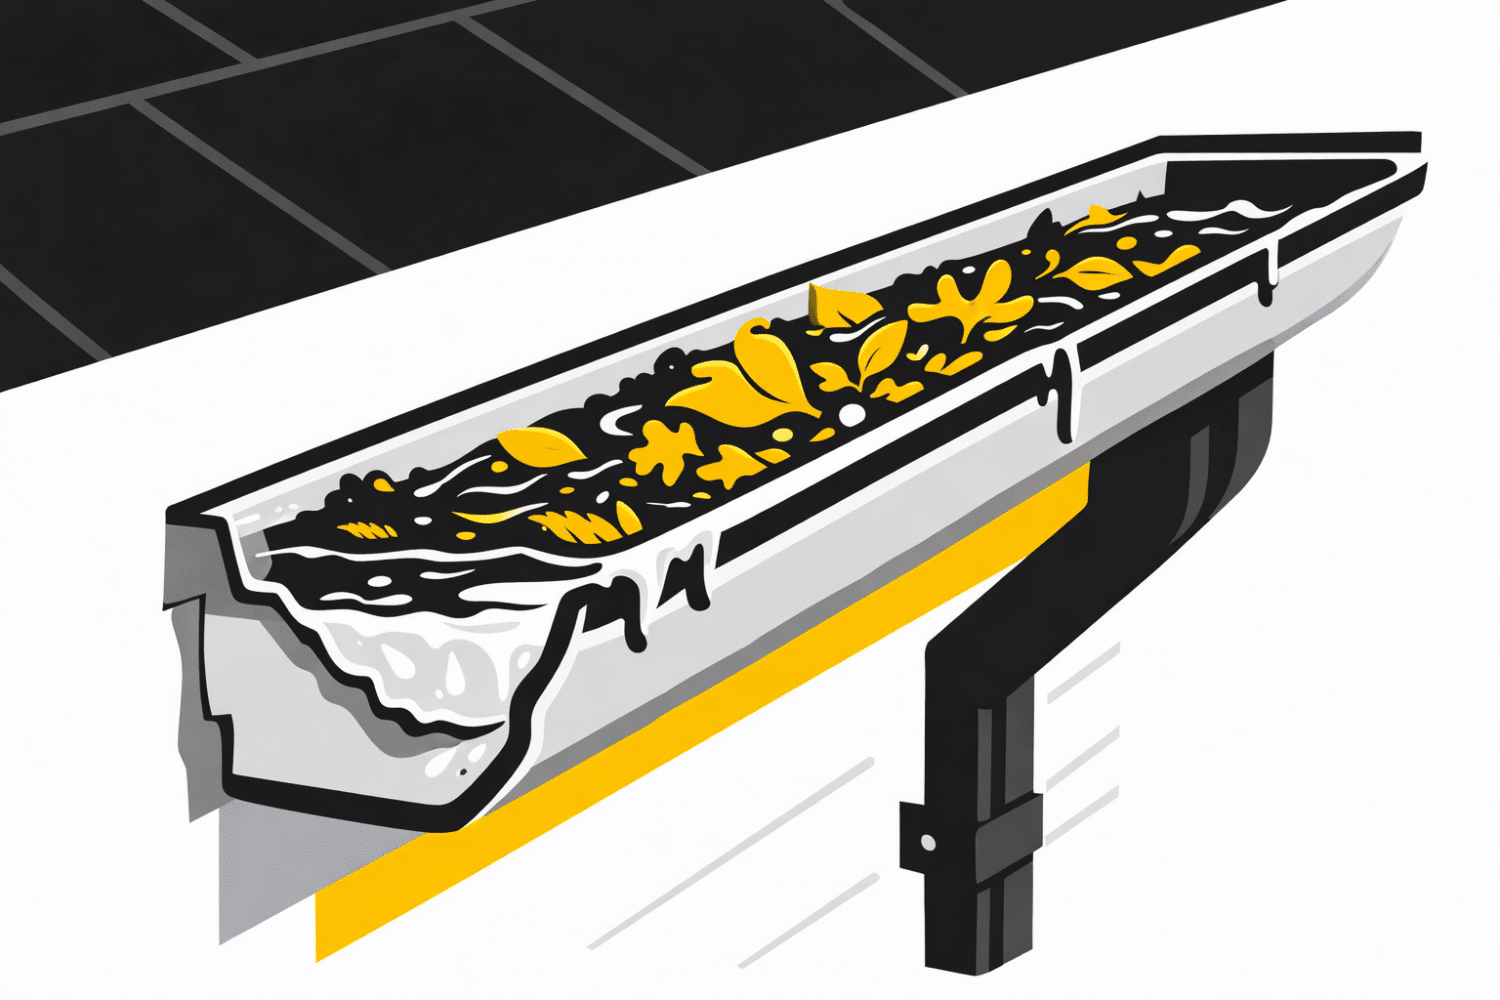
If the gutter overflows or pulls away from the fascia, a longer extension will not solve the main problem. The fascia board behind the gutter is part of this system too. When a gutter sags, separates from the fascia, or leaves rust streaks on the board behind it, the fasteners or the fascia itself may be failing. An extension added on top of a loose gutter just moves water through a system that is already pulling apart. CoMo Premium Exteriors reviews gutters, downspouts, fascia, soffit, rooflines, and grading together because a defect higher in the system changes what reaches the ground.
Choose an Extension That Fits the Area
Rigid above-ground extensions provide a clear path and are easy to inspect. They work best where they will not become a trip or mowing hazard.
Hinged extensions can be lifted for lawn work, but they need to be put back down before the next rain.
Flexible extensions can route around landscaping, although low spots and sharp bends can hold debris or water.
Buried drainage can keep a walkway clear, but the pipe needs a suitable outlet, enough slope, and a way to clean it. A buried line that ends in saturated soil can move the problem rather than solve it.
If the existing downspouts and elbows are in good shape, an extension is usually a straightforward add-on. But when the gutter itself has separated fasteners, a sagging run, or visible damage at the connection points, the better first step is to repair or replace the gutter section before spending on a longer extension. A repair can be the right call when only the outlet, elbow, or a short section is damaged. Full gutter replacement becomes the better option when the gutter is pulling away along a long run, the fascia behind it is soft, or the gutter has been patched multiple times and still overflows.
Watch the System During a Real Rain
A dry-day inspection shows loose parts and obvious grading problems. A rain check shows where the water actually goes. From a safe location, watch for overflow at the roofline, leaking elbows, water escaping at a connection, pooling at the end of the extension, and runoff turning back toward the house.
After the rain, look for washed-out mulch, mud splatter, soil erosion, algae, damp basement smells, or a repeated wet strip beside the wall. Take a wide photo showing the downspout and grade, then a closer photo of the discharge point. That context is more useful than a close-up of one puddle.
A few photos from two or three storms give a much clearer picture than one rainy day. If you end up requesting an inspection, those photos help the contractor see the pattern: which downspout overflows, how far water travels before it stops, and whether the problem repeats in the same spot. Photos taken during the storm, from a safe vantage point, are often more useful than a perfectly framed shot taken the next morning when the water has already soaked in.
Common Downspout Extension Mistakes
Ending the extension at a low point where water cannot leave.
Routing water across a walkway, driveway, or property line.
Using a crushed or kinked flexible tube that restricts flow.
Disconnecting an extension for mowing and forgetting to reconnect it.
Assuming the extension is the problem when the gutter is clogged, loose, or incorrectly pitched.
What a Gutter and Downspout Inspection Should Cover
If water keeps collecting near the foundation after you have checked the extension and the grade, a gutter and downspout inspection can identify what is happening higher in the system before you spend money on drainage work that does not solve the real problem. A useful inspection covers more than the extension itself.
Gutter condition and pitch: whether the gutter still slopes toward the outlet, whether it holds standing water, and whether the run is pulling away from the fascia.
Fascia and soffit behind the gutter: whether the board the gutter attaches to is solid or soft, and whether the soffit vents are clear and dry.
Downspout connections: whether each elbow, strap, and outlet is secure, and whether the downspout is crushed, dented, or loose at a joint.
Extension and discharge path: whether the extension reaches a point where water keeps moving away, and whether the ground at the discharge is lower than the foundation.
Photos of the full path: a wide shot from the roofline down, plus a close shot of the discharge point, so the whole system can be reviewed in context.
When the inspection finds damage at multiple points along the same run, a repair in one spot may not hold if the gutter, fascia, and downspout connection are all aging together. In that case, a scoped replacement of the failing section, rather than another patch, is usually the more durable fix.
When the Gutter or Grade Needs Attention
Schedule an exterior review when the same area stays wet after several rains, the gutter is sagging, fascia feels soft, water stains appear on siding or trim, or the extension cannot reach a safe outlet. A gutter contractor can correct the roof-water system, but major yard-grading or foundation-drainage concerns may also require a drainage or foundation specialist.
CoMo Premium Exteriors can inspect the gutter, downspout, fascia, and visible discharge path, then explain whether the next step is a simple adjustment or a larger repair. Call (573) 284-3227 or Request an Inspection.
Are Dented Gutters a Repair Issue or a Replacement Signal?
Key Takeaways:
Not all dents require replacement: Small dents that don’t affect water flow can often be left alone or repaired with paintless dent removal techniques.
Replacement is necessary when function is compromised: Dents that create low spots, block downspouts, or split seams will cause overflows, foundation damage, and fascia rot.
Hail is the most common cause: In Mid-Missouri, hail dents gutters more often than any other damage source. Most hail-dented gutters are claimable under standard homeowners insurance.
Seamless gutters complicate repair: Because seamless gutters are custom-formed on-site, dented sections usually require replacement of the entire run rather than patching.
Match your repair to the gutter’s age: If your gutters are already 15+ years old and dented, replacement makes more sense than repair because you’ll likely replace them within a few years anyway.
The Dented Gutter Dilemma
After a hailstorm rolls through Columbia or Jefferson City, you walk around your house and notice your gutters look like someone took a ball-peen hammer to them. Dents pepper the trough. Maybe a section is slightly misaligned. But the gutters still carry water, right? So do you fix them, replace them, or just live with the dimples?
This is one of the most common questions we hear from Mid-Missouri homeowners after storm season. The answer depends on the dent’s size, location, and whether it’s affecting water flow. Some dented gutters are purely cosmetic. Others are ticking time bombs for water damage, foundation issues, and fascia rot.
As gutter installation and repair specialists serving Columbia, Jefferson City, Lake Ozark, and surrounding areas, we’ve inspected thousands of dented gutters. This guide explains when a dent is harmless, when it’s a warning sign, and how to make the repair-or-replace decision with confidence.
How Gutters Get Dented
Before deciding whether to repair or replace, it helps to understand what caused the damage. Different causes produce different dent patterns and imply different risks.
Hail Damage
Hail is the leading cause of gutter denting in Missouri. Hailstones strike the front-facing surface of the gutter trough, creating round or oval dents. Because gutters are thin aluminum or steel, even 1-inch hail leaves visible marks. Hail also dents downspouts, gutter hangers, and end caps.
The pattern matters. Random dents across the entire gutter run suggest hail. Concentrated damage in one area may indicate a falling branch or ladder impact.
Falling Debris
Tree branches, roof shingles, and satellite dishes can dent gutters when they fall. This damage is usually more severe than hail dents—larger deformations with creases or sharp edges. Debris impacts often bend the gutter away from the fascia board, loosening hangers.
Ladder Damage
Contractors and homeowners rest ladders against gutters while cleaning or inspecting roofs. The pressure from a ladder leg can crush a gutter section. This damage is localized to where the ladder contacted the gutter and often includes bent hangers.
Age-Related Sagging
Older gutters develop sagging between hangers as the metal fatigues. This looks like a long, gradual dent rather than individual impact marks. Sagging gutters hold water instead of draining it, which accelerates corrosion and worsens the sag.
The National Roofing Contractors Association includes gutter systems as part of comprehensive roof inspections and recommends evaluating drainage after every severe weather event.
When Dents Are Harmless
Not every dent needs fixing. You can safely leave gutters alone when:
The dent is shallow and doesn’t create a low spot. Water flows over shallow dents without pooling.
The dent is on the front face only. The back of the gutter (against the fascia) and the bottom trough are undamaged.
No seams are split. The gutter’s joints and end caps remain watertight.
Downspouts are clear. Water exits the system without backup or overflow.
The gutter is securely fastened. Hangers aren’t loose or bent.
Cosmetic dents on gutters are like door dings on a car—annoying to look at but functionally irrelevant. If your gutters are otherwise in good condition and the dents don’t affect water flow, you can leave them as-is. Some homeowners choose to repaint dented gutters to improve appearance without replacing them.
When Dents Signal Replacement Is Needed
Certain dent patterns and locations create functional problems that repair can’t solve:
Low Spots That Hold Water
If a dent creates a depression in the gutter bottom, water pools there instead of flowing toward the downspout. Standing water weighs down the gutter, worsens the sag, and accelerates corrosion. In winter, pooled water freezes and expands, splitting seams and cracking hangers.
Split or Separated Seams
Dents near gutter joints can pop seams apart. Once a seam separates, water leaks behind the gutter and runs down the fascia board. This causes paint peeling, wood rot, and eventually structural damage to the soffit and fascia.
Crushed or Collapsed Sections
Large dents that reduce the gutter’s cross-sectional area restrict water flow. During heavy rain, restricted gutters overflow. In Mid-Missouri, where summer thunderstorms dump 2-3 inches of rain in an hour, crushed gutters can’t handle the volume.
Bent or Detached Hangers
If the dented area has pulled away from the fascia, the gutter is no longer properly supported. Eventually it will sag further, dump water against your foundation, or fall completely.
Downspout Blockage
Dents at downspout entrances can block debris and water, causing backups. A blocked downspout turns your gutter into a water trough that overflows during every rain.
Dent Characteristic
Repair Option
Replacement Needed?
Small shallow dents, no flow disruption
Paint or leave as-is
No
Low spot holding water
May be reshaped if accessible
Often yes
Split seam near dent
Sealant or patch (temporary)
Yes
Crushed section reducing capacity
Section replacement if sectional gutters
Yes for seamless
Bent hanger or pulled fascia
Hanger replacement, fascia repair
Gutter may be salvageable
Downspout entrance blocked
Downspout replacement
Gutter may be salvageable
What CoMo Checks During a Gutter Damage Inspection
When we inspect dented gutters, we do not treat every mark the same. The first question is whether the gutter still drains correctly. We check the slope toward each downspout, look for water-holding low spots, test whether hangers are still tight to the fascia, and inspect seams, end caps, elbows, and downspout openings for leaks or blockage.
That distinction matters because a front-face dent can be cosmetic while a smaller dent on the bottom of the trough can change how water moves. If the damage is tied to clogged outlets, loose fasteners, or early fascia staining, a simple touch-up usually will not solve the problem. If the system is still pitched correctly and securely fastened, replacement may be unnecessary.
The Seamless Gutter Complication
Most Mid-Missouri homes built after 1990 have seamless gutters. These are formed on-site from a continuous roll of aluminum, custom-cut to each roof edge. The advantage is fewer seams and less leaking. The disadvantage is that damaged sections can’t be patched.
If a seamless gutter has a significant dent, the only repair option is to remove the entire run and replace it. This is more expensive than repairing sectional gutters but ensures the new gutter matches the existing profile and color.
For homeowners with sectional gutters (common in older homes), individual 10-foot sections can be replaced. This is cheaper but creates new seams that may eventually leak.
Insurance Coverage for Dented Gutters
Standard Missouri homeowners policies typically cover hail-damaged gutters under dwelling or other structures coverage. However, insurance companies handle gutter claims inconsistently:
Some carriers replace dented gutters automatically as part of a roof claim, reasoning that hail damaged the entire system.
Others require proof of functional damage, such as split seams or blocked flow. Cosmetic dents alone may not be covered.
Age depreciation applies. If your gutters are 20 years old, insurance may only pay a portion of replacement cost based on remaining life expectancy.
If you’re filing a roof claim for hail damage, ask your adjuster specifically about gutter coverage. Point out functional damage like low spots or seam separation. Document everything with photos before cleaning or repairing.
If you want a useful inspection, take photos before moving debris or trying to bend anything back. Get one close-up of each dented area, one wider photo showing the full gutter run, one photo of the nearest downspout, and one photo during or right after rainfall if water is overflowing. Those pictures make it easier to separate cosmetic hail marks from drainage problems that may affect the claim or repair scope.
Galvanized steel: 15-20 years before rust becomes a problem.
Vinyl: 10-15 years in Missouri’s climate; becomes brittle with UV exposure.
Copper: 50+ years but dented copper is usually repaired rather than replaced due to cost.
If your dented gutters are already 15+ years old, replacement is usually the smarter choice. You’ll need new gutters within 5-10 years anyway, and storm damage gives you an opportunity to upgrade sooner with insurance help.
If your gutters are less than 10 years old and only have cosmetic dents, repair or reshaping may be worthwhile. A certified gutter contractor can evaluate whether the dents affect function and recommend the most cost-effective approach.
Frequently Asked Questions
Can dented gutters be reshaped without replacement?
Sometimes. Paintless dent removal techniques used on cars can work on aluminum gutters, but access is limited. For seamless gutters with significant dents, section replacement is usually more reliable than reshaping.
Will insurance pay for gutter replacement if the roof isn’t damaged?
Possibly, if the gutters were damaged by a covered peril like hail. File a separate claim for gutters with documentation of the storm event and damage photos. Some carriers process gutter-only claims; others require them to be bundled with roof damage.
How much does gutter replacement cost in Mid-Missouri?
Seamless aluminum gutter replacement runs $6-$12 per linear foot, depending on width, color, and installation complexity. For a typical 2,000-square-foot home with 150 linear feet of gutters, expect $900-$1,800 for standard replacement. Downspouts, gutter guards, and fascia repair add to the cost.
Should I upgrade to gutter guards while replacing dented gutters?
If you’re already replacing gutters, adding gutter guards is cost-effective because the labor for removal and reinstallation is already covered. Guards prevent debris buildup that causes overflows and reduces gutter lifespan. We recommend mesh or reverse-curve guards for Missouri’s leaf and seed debris.
Can I replace just one section of seamless gutters?
No. Seamless gutters are continuous runs formed on-site. Damaged sections require removal and replacement of the entire run between corners or downspouts. This is why seamless gutter damage often costs more to fix than sectional gutter damage.
How do I know if my dented gutters are causing water damage?
Watch for overflow during rain, water stains on siding, eroded soil near your foundation, or rotted fascia boards behind the gutters. If you see any of these signs, the dents have created functional problems that need immediate attention.
Ready to Get Started?
We’ve been serving Mid-Missouri homeowners for over 25 years with gutter inspection, gutter replacement, and exterior storm-damage repair. If your gutters are dented after a recent storm—or if you’re unsure whether the damage is cosmetic or functional—give us a call. We’ll inspect your entire gutter system, explain your options honestly, and help you make the right decision for your home.
Mesh vs Foam Gutter Guards: Which Actually Works in Mid-Missouri?
Key Takeaways:
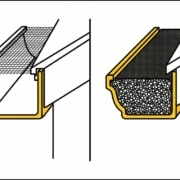
Micro-mesh gutter guards outperform foam inserts in nearly every category — durability, debris filtration, and heavy rain handling.
Foam gutter guards last 1-2 years before shrinking, crumbling, or clogging with trapped sediment and seeds.
Mesh guards carry 25-30 year warranties; foam guards typically have no warranty at all.
Neither option is maintenance-free — but mesh reduces cleaning frequency from twice a year to once every 2-3 years.
Mid-Missouri’s spring storms and humid summers accelerate foam deterioration and make mesh the more practical long-term choice.
Two Very Different Approaches to the Same Problem
If you’ve been shopping for gutter protection in Columbia or Jefferson City, you’ve probably seen two options at opposite ends of the price range: foam gutter inserts that cost a few dollars per foot at the hardware store, and micro-mesh guard systems that run significantly more but promise decades of performance.
The price gap raises a fair question — is the mesh guard actually that much better, or is it just more expensive? The answer comes down to how each product handles water, debris, and time. And in Mid-Missouri, where spring delivers 2-inch rain bursts followed by humid summers that encourage mold growth, those differences matter more than they would in a dry climate.
Let’s walk through what each type actually does, where each one fails, and which makes sense for your home.
How Foam Gutter Guards Work (and Why They Stop Working)
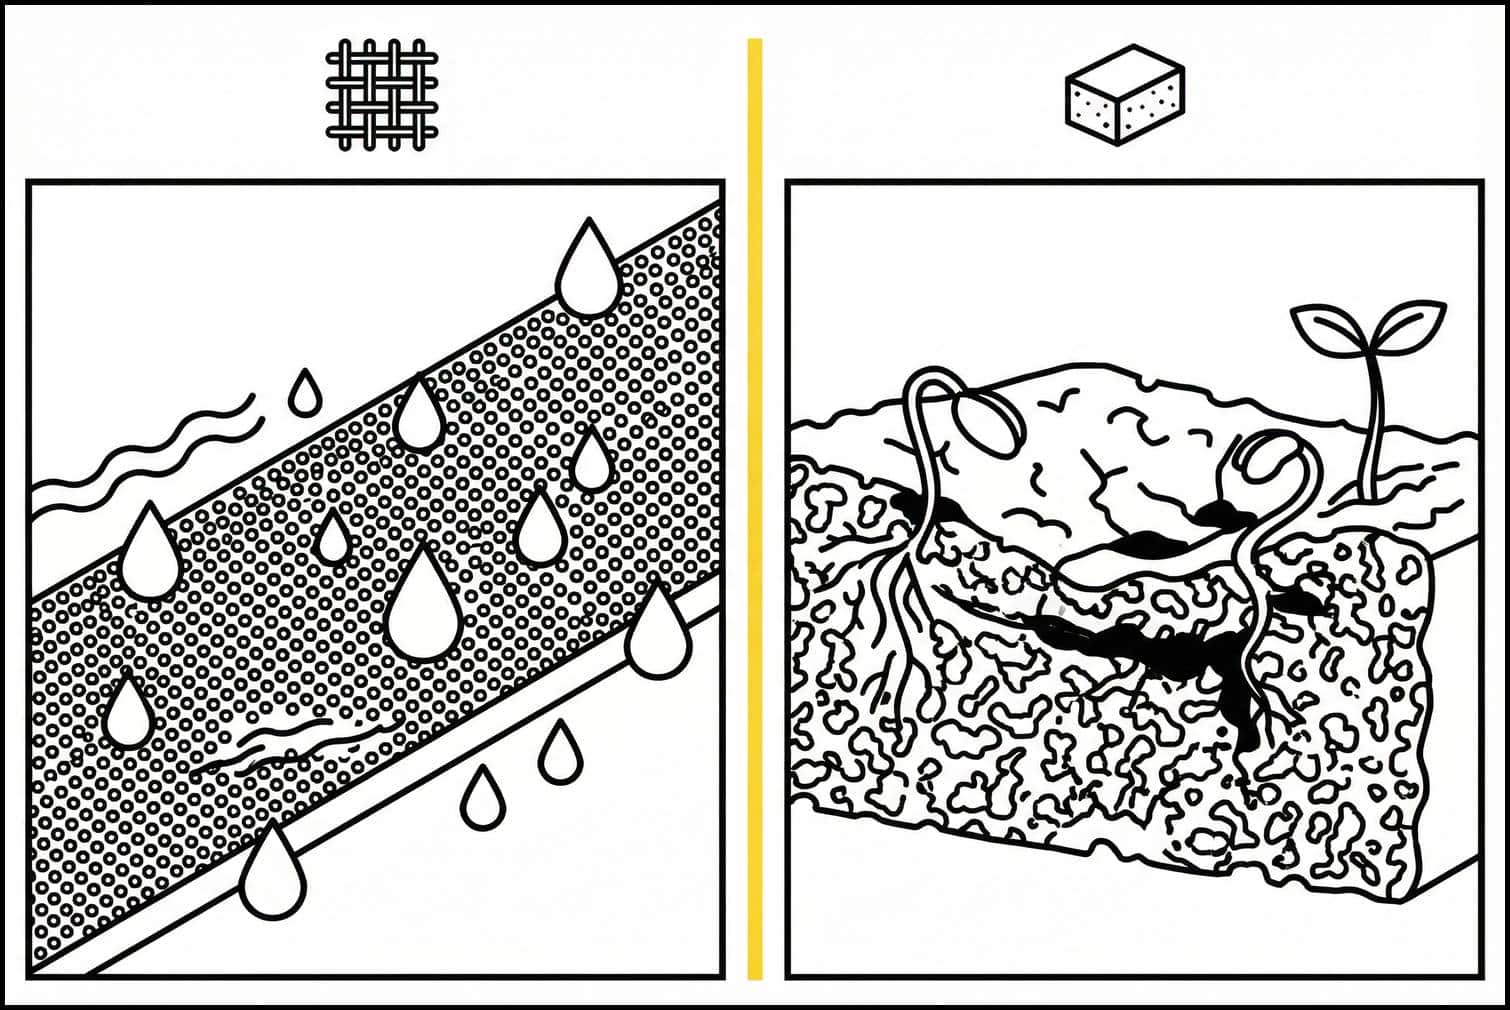
Foam gutter guards are porous polyurethane or polyester inserts that sit inside your gutter channel. The idea is simple: water flows through the foam while leaves and debris sit on top and blow away. At $2-4 per foot, they’re the cheapest gutter protection available and easy to install yourself.
The problem is what happens after the first season. Foam is a sponge. It absorbs and holds water for days after a light rain. In Mid-Missouri’s humid summers, that trapped moisture creates conditions for mold, mildew, and algae to grow inside the foam itself. Seeds that land on top take root in the wet material. Dirt and roof grit work their way into the pores and never come out.
UV exposure from direct sunlight breaks down the foam’s cellular structure. Freeze-thaw cycles — which Columbia sees dozens of times between November and March — accelerate that breakdown further. Industry documentation on foam guard lifespan puts the realistic service life at 1-2 years before the material shrinks, crumbles, or becomes so clogged it actually blocks water flow instead of filtering it.
When foam guards fail, they often cause worse problems than having no guards at all. Water overflows the gutter because it can’t penetrate the clogged foam. The foam itself becomes a saturated weight sitting in your gutter channel, potentially causing sag. And removing degraded foam is messy — pieces break apart and leave residue that needs scrubbing.
How Micro-Mesh Gutter Guards Work
Micro-mesh gutter guards use a fine stainless steel screen — typically with openings between 400 and 600 microns — mounted on an aluminum frame that sits over or clips onto your existing gutter. Water passes through the mesh while debris of virtually any size stays on top.
The key difference from foam is that mesh guards don’t absorb anything. Water flows through and drops into the gutter below. Debris sits on the surface where wind, gravity, and the occasional rinse from your garden hose move it along. There’s no material for seeds to root in, no moisture reservoir for mold to colonize, and no cellular structure for UV or freeze-thaw cycles to destroy.
Quality micro-mesh products use surgical-grade stainless steel with hole sizes around 540 microns — small enough to block pine needles, roof sand grit, and shingle granules. These products meet ANSI/ARCSA standards for rainwater filtration and carry warranties ranging from 25 to 30 years.
The tradeoff is cost. Professional micro-mesh installation runs $15-45 per linear foot depending on the product and your roof configuration. For a typical Mid-Missouri home with 150-200 feet of gutter, that’s $2,250-$9,000 — a meaningful investment compared to $300-800 for DIY foam.
Head-to-Head Comparison
Factor
Foam Inserts
Micro-Mesh Guards
Cost per linear foot
$2-4 (DIY)
$15-45 (installed)
Lifespan
1-2 years
25-30 years
Warranty
None or 1 year
25-30 years
Handles heavy rain
Poor — clogs when saturated
Good — water passes through mesh
Handles pine needles
Poor — needles embed in foam
Excellent — sits on surface
Mold/mildew risk
High — retains moisture
Low — no moisture retention
Maintenance frequency
2x/year minimum + replacement
Once every 2-3 years
Installation
DIY, 30 minutes
Professional, half day
UV/freeze-thaw resistance
Poor — material degrades
Excellent — stainless steel
What Mid-Missouri Weather Does to Each Type
Central Missouri’s climate is particularly hard on foam gutter guards. Here’s why the local conditions matter:
Spring rain intensity: Columbia averages 42 inches of rain per year, with the heaviest downpours arriving in April through June. When 2 inches of rain falls in 30 minutes — not unusual during a spring thunderstorm — foam guards can’t drain fast enough. The foam saturates and water sheets over the gutter edge, defeating the entire purpose. Mesh guards handle high-volume water flow because the screen doesn’t absorb anything.
Humidity and mold: Mid-Missouri summers bring weeks of 80%+ humidity. Foam guards that absorbed water during a Tuesday afternoon storm may still be damp on Friday. That sustained moisture creates ideal conditions for mold colonies inside the foam. Mesh guards dry almost instantly because there’s no absorbent material.
Freeze-thaw cycles: Between November and March, temperatures in Columbia regularly swing above and below freezing — sometimes within the same day. Water trapped in foam expands when it freezes, breaking down the cellular structure from the inside out. After one or two winters, foam inserts often look shredded. Stainless steel mesh is unaffected by freeze-thaw cycles.
Hail and debris: With 79+ hail reports within 10 miles of Columbia in a typical year, shingle granules wash into gutters constantly after storms. Foam traps those granules permanently. Mesh allows granules to wash through with the next rain.
The Real Cost Comparison Over 10 Years
Foam looks cheaper upfront, but the math changes when you account for replacement cycles:
Foam over 10 years: At $3/foot for 175 feet of gutter, that’s $525 per installation. Replacing every 1.5 years means roughly 6-7 replacements over a decade: $3,150-$3,675 in materials alone, plus your time on a ladder each time. If you hire someone for the removal and reinstallation, add $200-400 per visit.
Micro-mesh over 10 years: A one-time professional installation at $25/foot for 175 feet costs $4,375. Over the next decade, maintenance consists of a garden hose rinse once every 2-3 years — maybe 4 times total. The guards are still under warranty at year 10 with decades of life remaining.
By year 5-6, foam has already cost as much as mesh. By year 10, foam has cost more while delivering worse performance the entire time.
When Foam Might Make Sense
To be fair, foam gutter guards aren’t always the wrong choice. They can work as a temporary solution while you budget for a permanent system. If you’re selling a home within the next year and just need clean gutters for inspections, foam covers the gap. And for detached outbuildings like sheds or workshops where gutter performance isn’t critical, foam’s low cost is proportional to the stakes.
But for your primary home’s gutter system — the one protecting your foundation, siding, and landscaping from water damage — foam is a temporary fix that creates long-term problems.
What Home Inspectors Say About Gutter Guards
Home inspection standards from InterNACHI make an important point that applies to both types: covered gutter systems may be effective in reducing debris buildup, but they are not maintenance-free. No gutter guard — mesh, foam, screen, or reverse-curve — eliminates the need for periodic inspection.
NC State Extension recommends inspecting gutters yearly and after major weather events regardless of what protection system you have installed. The difference is what you find during those inspections. With mesh guards, you’re typically brushing off surface debris. With foam, you’re often discovering the guard itself has become the problem.
Frequently Asked Questions
Do foam gutter guards work in heavy rain?
Poorly. Foam absorbs water like a sponge, and once saturated, additional rainfall sheets over the top of the gutter instead of flowing through it. During the intense spring downpours common in Mid-Missouri, foam guards frequently cause overflow rather than prevent it.
How long do micro-mesh gutter guards last?
Quality micro-mesh systems with stainless steel screens typically last 25-30 years. Most manufacturers back this with a warranty covering the same period. The stainless steel mesh resists corrosion, UV degradation, and freeze-thaw damage that destroys other guard types.
Can I install micro-mesh gutter guards myself?
Some products are designed for DIY installation, though most homeowners benefit from professional installation to ensure proper pitch, secure mounting, and correct overlap at joints. Improper installation can create gaps where debris enters or sections where water overshoots the gutter.
Do gutter guards eliminate the need for gutter cleaning?
No gutter guard eliminates maintenance entirely. Mesh guards reduce cleaning frequency from twice a year to roughly once every 2-3 years. Foam guards may actually increase maintenance because the foam itself needs periodic removal, rinsing, and eventual replacement.
Are foam gutter guards bad for my gutters?
They can be. Saturated foam adds weight to your gutter channel, potentially causing sag over time. Trapped moisture accelerates corrosion on aluminum gutters. And decomposing foam leaves residue that’s difficult to clean without removing the guards entirely.
What type of gutter guard works best in Missouri?
For Mid-Missouri’s combination of heavy spring rain, humid summers, and freeze-thaw winters, micro-mesh guards with stainless steel screens deliver the best long-term performance. They handle high water volume without clogging, resist mold growth, and survive decades of temperature swings. Call us at (573) 424-9008 to discuss options for your home.
Ready to Get Started?
We’ve been protecting Mid-Missouri homes for over 25 years with premium exterior solutions — including gutter installation and gutter guard systems throughout Columbia, Jefferson City, and the surrounding area. As GAF Master Elite, OC Platinum Preferred, and James Hardie Elite Preferred contractors, we bring certified expertise to every project.
Gutter Problems: How They Damage Your Home (and What To Do About Them)
Key Takeaways
Clogged, sagging, or leaking gutters in Mid-Missouri can lead to roof leaks, ceiling stains, foundation cracks, and rotted fascia—often before you notice the gutters themselves are failing.
Most gutter damage is preventable with twice-yearly cleaning, proper slope toward downspouts, and periodic professional inspections.
Many insurance policies cover sudden storm damage to gutters but exclude water damage caused by neglected maintenance or chronic clogs.
Catching gutter issues early saves thousands compared to waiting until roof edges, interior ceilings, or foundations need major repairs.
CoMo Premium Exteriors offers gutter inspection, repair, replacement, and storm-damage assistance across Columbia, Jefferson City, Boonville, Moberly, and Lake of the Ozarks.
Why Gutters Matter More Than Most Homeowners Realize
On a typical Columbia or Jefferson City home, gutters do one critical job: they collect rainwater from the roof and move it safely away from your foundation. When that system works, you barely notice it. When it fails, the damage spreads fast.
A properly functioning gutter system channels water through downspouts and deposits it at least 3–4 feet away from your foundation walls. This protects basements, crawlspaces, and concrete slabs from the constant moisture exposure that leads to cracks, settling, and water intrusion. Without this controlled drainage path, every rainstorm sends hundreds of gallons of water cascading directly next to your house.
Mid-Missouri weather puts extra stress on gutters compared to drier climates. Heavy spring storms dump inches of rain in short bursts. Late-fall leaf drop from oak and maple trees clogs troughs just before winter. And our freeze-thaw cycles—where temperatures swing above and below freezing repeatedly—can crack seams, loosen hangers, and accelerate rust in ways that homeowners in more stable climates rarely experience.
Gutters also connect directly to other exterior components we work with at CoMo Premium Exteriors: roofing shingles rely on gutters to carry water away from their edges, fascia boards support the gutter weight, soffits ventilate the eaves behind them, and siding depends on proper water flow to stay dry. When one part of this system fails, the others often follow.
Here’s what catches many homeowners off guard: when gutters fail, the damage often shows up first in the roof edges, ceilings, and foundation—not in the gutters themselves. By the time you notice brown spots on a ceiling or cracks in a basement wall, the gutter problem has been brewing for months or years.
7 Common Gutter Problems We See in Mid-Missouri
These are the issues our crews most often find on inspections across Columbia, Lake of the Ozarks, Jefferson City, and surrounding towns. Some start as minor annoyances—a small seam leak, a slight dip in one section—but can quickly escalate into roof leaks, fascia rot, or foundation erosion if ignored.
The seven key problems include:
Clogged or blocked gutters
Sagging gutters and pulling away from fascia
Leaking gutters and rusted seams
Improper gutter slope (pitch) and standing water
Damaged, dented, or missing sections
Downspout problems and poor drainage
Winter ice, snow, and gutter-related ice dams
As you read through this list, compare it to what you see on your own home. Do gutters overflow like waterfalls during storms? Are there stains on siding below the gutter line? Do sections appear to be pulling away from the house? Any of these signs suggests it’s time for a closer look.
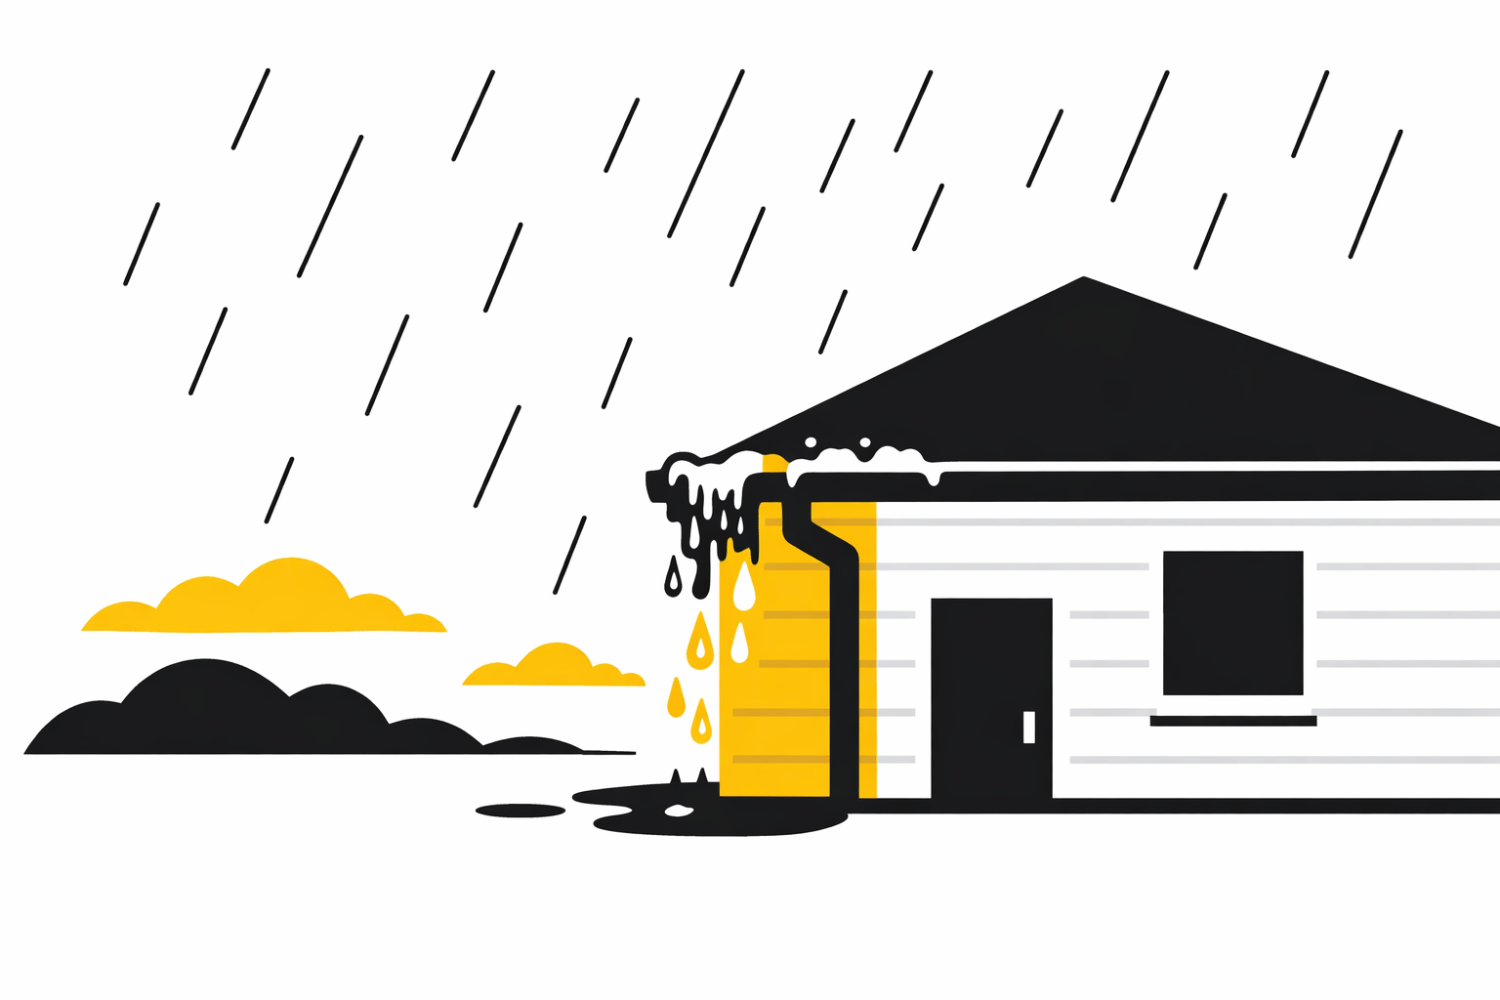
Clogged or Blocked Gutters
Clogged gutters are the most common gutter problem on homes, especially in older tree-lined neighborhoods throughout Columbia and Jefferson City. Leaves, shingle grit, twigs, acorns, and other debris accumulate over months, eventually blocking water flow entirely.
When debris buildup stops proper drainage, rain has nowhere to go. It spills over the front and back of the gutter, soaking fascia boards, siding, and the soil along your foundation. This overflow isn’t just an inconvenience—it’s actively damaging your home every time it rains.
Warning signs of clogged gutters:
Water pouring over gutter edges like a waterfall during moderate storms
Visible plant growth or “gutter gardens” sprouting from debris
Standing water in gutters days after rain stops
Staining or discoloration on siding directly below gutter runs
For most Mid-Missouri homes, cleaning gutters 2–4 times per year keeps clogs under control. Late October through early November catches the bulk of fall leaves, while a spring cleaning removes anything that accumulated over winter. Additional cleanings after major wind or hail events can prevent sudden blockages.
If you’re tired of climbing a ladder every few months or dealing with chronic clogs, seamless aluminum gutters with properly matched gutter guards can dramatically reduce maintenance while improving water flow during heavy rain.
Sagging Gutters and Pulling Away From Fascia
Gutters sag or bow when they stay full of water and debris for extended periods, when hangers are spaced too far apart, or when fasteners pull out of rotted fascia boards. Each gallon of trapped water adds about 8 pounds of extra weight—and a 30-foot gutter run holding several inches of water plus wet leaves can easily exceed 100 pounds.
That weight creates low spots where pooling water collects permanently, which adds even more stress and increases the risk of the entire gutter section tearing away during the next storm. Sagging gutters also misalign the gutter slope needed for proper drainage, making the problem worse over time.
Signs of sagging or separating gutters:
Visible gaps between the back of the gutter and the fascia boards
Gutters tipping forward or tilting away from the house
Sections that visibly bend or bow under their own weight
Water pooling in specific spots rather than draining toward downspouts
Basic repairs involve re-hanging gutters with stronger hangers into solid wood, adding additional brackets every 2 feet, or upgrading from old spike-and-ferrule systems to modern screws that hold twice as effectively. However, if fascia boards have rotted, they’ll need replacement before any gutter work can hold long-term.
Significant sagging should be evaluated by a professional because hidden damage to fascia, roof edges, and even rafter tails is common. What looks like a simple gutter fix often reveals rotten wood that’s been absorbing water for years.
Leaking Gutters and Rusted Seams
Leaky gutters often show up at seams, corners, end caps, and small impact points from hail or falling branches—all common after severe Mid-Missouri storms. Traditional sectional gutters have joints every 10–20 feet, and each joint represents a potential failure point where sealant can crack, rust can develop, or connections can separate.
The tricky part about gutter leaks is their stealth. Slow, steady drips behind the gutter can soak fascia and roof decking for months before homeowners notice interior ceiling stains. By the time water stains appear on an interior ceiling, significant damage may have already occurred to wood components you can’t see.
Simple homeowner checks for leaks:
Run a garden hose in the gutter on a dry day and watch for drips
Look for streaks, staining, or mineral deposits on siding below seams
Check for water marks or erosion on the ground directly below joints
Inspect for rust spots, small holes, or separated connections
For small leaks, cleaning and resealing seams with silicone-based sealant can work. Holes under 1/4 inch can often be patched. But when gutters are badly rusted, full of small holes, or leaking at multiple seams, gutter replacement with seamless aluminum is usually more cost-effective than repeated patching. Seamless systems have no mid-run joints, eliminating the most common leak points entirely.
Improper Gutter Slope (Pitch) and Standing Water
Gutters aren’t installed level—they need a subtle slope (typically about 1/4 inch per 10 feet) toward the nearest downspout to keep water moving. When slope is too flat, too steep, or reversed from poor installation or settling, water pools instead of draining.
Standing water in gutters accelerates rust and corrosion, creates a perfect breeding ground for mosquitoes in warm weather, and dramatically increases winter ice buildup along the roof edge. That pooled water also adds constant weight that stresses hangers and seams even when it’s not raining.
Signs of slope problems:
Water that never fully drains after storms
Mildew smell near eaves and overhangs
Visible puddles in the trough when viewed from a ladder
Mosquitoes concentrated near certain gutter sections
Ice formations in specific spots during winter
Fixing slope usually requires loosening or removing hangers and carefully re-setting the entire run—a process that’s best done by an experienced crew with proper levels and measurement tools. Getting slope right matters: too shallow and water pools, too steep and water overshoots the downspouts during heavy rain.
When we replace gutters at CoMo Premium Exteriors, we check and correct slope across each run rather than just swapping material into the same position. Starting fresh with correct pitch prevents the drainage problems that plagued the old system.
Damaged, Dented, or Missing Gutter Sections
Hail, falling limbs, ladders leaned against gutters, and high winds common in Mid-Missouri can bend, crease, or rip off sections of gutter and downspout. Even moderate dents reduce a gutter’s capacity by 20–30%, and severe damage can completely block water flow or create gaps where water bypasses the system entirely.
Gaps in the gutter system expose roof edges, fascia boards, and siding directly to heavy rainfall. Instead of controlled drainage, you get concentrated streams of water hitting the same spots repeatedly—leading to localized rot, staining, and erosion that wouldn’t occur with an intact system.
Inspection checklist for physical damage:
Crushed or flattened spots that restrict water flow
Sharp bends or kinks in gutter runs
Cracked or separated joints
Missing sections, especially after storms
Damaged shingles near gutter edges from impact or ice
Small, isolated damage may be repairable with section replacement. But older, heavily dented systems with multiple problem areas are often better candidates for full gutter replacement—especially when combined with other storm repairs to roofing, siding, or windows.
Downspout Problems and Poor Drainage Away From the House
Even if gutters are clean and properly pitched, clogged or disconnected downspouts can cause water to back up along the roof line and pour directly next to your foundation. Downspouts are the primary way water exits your gutter system—when they fail, the entire system fails.
Common downspout issues:
Elbows packed with compressed leaves and debris
Underground extensions filled with dirt, roots, or debris
Missing splash blocks or extensions at ground level
Disconnected sections that allow water to pool at the base of walls
Undersized downspouts that can’t handle heavy rain volume
After heavy rain, check each downspout by confirming water exits strongly and flows at least 3–4 feet away from the house. Extensions, splash blocks, or underground drainage lines should direct water toward areas where it can absorb safely—not toward driveways, walkways, or neighboring properties.
Downspout upgrades can significantly reduce foundation and basement moisture problems. Options include larger-capacity downspouts, additional outlets on long gutter runs, or rerouting extensions away from problem areas. In some cases, underground drainage systems may be the best solution for chronic water pooling.
If water regularly pools near foundation walls or seeps into basements in your Columbia, Boonville, or Jefferson City home, a combined gutter and drainage evaluation is worth scheduling. The issue is rarely just one component—it’s usually the whole water path from roof to ground.
Winter Ice, Snow, and Gutter-Related Ice Dams
Standing water in gutters can freeze during Mid-Missouri cold snaps, adding substantial weight and helping form ice dams along the roof edge. While clogged gutters don’t directly cause ice dams (those form from attic heat loss and inadequate insulation), they often make ice dams worse by trapping meltwater at the eave where it can refreeze and creep under shingles.
In cold climates like Mid-Missouri’s winter months, this freeze-thaw pattern repeats constantly. Water melts during sunny afternoons, flows toward gutters clogged with ice and debris, then refreezes overnight. Over weeks, this builds thick ice ridges that can back water up under roofing materials and into your home’s interior.
Warning signs of ice-related gutter problems:
Icicles hanging off gutters for days at a time
Thick ridges of ice along the eaves
Wintertime leaks at ceilings near exterior walls
Gutters pulling away from the house after spring thaw
Water stains appearing on ceilings only during cold months
Prevention starts before the first freeze. Keep gutters clean in late fall, address any sagging or low spots that hold water, and consider improving attic insulation and ventilation to reduce the heat loss that contributes to ice dam formation. For homes with persistent problems, heated cables can prevent ice buildup—though they’re most effective as part of a comprehensive approach.
We can inspect both gutters and roof ventilation to recommend balanced solutions ahead of the late-winter storms that often hit Mid-Missouri in February and March.
How Gutter Problems Damage Roofs, Ceilings, and Foundations
Gutter issues rarely stay “just” gutter issues. Left unaddressed, they spread into roofing materials, wall cavities, and structural components—often causing interior damage and expensive repairs that far exceed the cost of fixing the original gutter problem.
Understanding these connections helps explain why a $200 gutter cleaning or $500 repair can prevent $5,000 in drywall work or $20,000 in foundation repairs. We’ve seen it repeatedly: homeowners who ignored overflowing gutters for a few seasons eventually needed roof edge replacement, ceiling repairs, and fascia rebuilding as water worked its way through multiple systems.
Catching these problems early means addressing one component instead of three. Let’s walk through the specific types of damage gutter failures cause.
Roof and Ceiling Leaks From Failing Gutters
Water backing up at the roof edge can slip under shingles or metal drip edge, saturating roof decking and eventually showing up as ceiling stains inside your home. This is one of the most common ways gutter related roof damage manifests—and one of the most misunderstood.
Typical interior signs:
Brown rings or water stains on ceilings near exterior walls
Peeling paint where ceilings meet walls
Musty smells after heavy rain
Bubbling or warped drywall
Ceiling tiles showing moisture damage or sagging
Many homeowners assume they have a leaking roof problem and call for shingle replacement, only to learn the leak started at the gutter line. When gutters overflow or back up, water doesn’t just fall to the ground—it can travel horizontally under roofing materials, behind drip edges, and into the roof deck. The actual entry point may be 10 feet from where the ceiling leak appears.
When ceiling leaks show up, especially after heavy rain events or storm seasons, have both the roof and gutter system inspected together. Our teams regularly replace both damaged shingles and problem gutters in a single project to address the full water path and prevent future repairs.
Rotting Fascia, Soffit, and Roof Edge Components
Fascia boards are the vertical boards your gutters attach to—usually wood or wood-composite on older Mid-Missouri homes. Soffits are the horizontal panels under the eaves. Both are vulnerable to rotten wood, moisture damage, and decay when gutters overflow, leak, or allow water to run behind them.
Chronic overflow or leaks keep these boards damp, leading to soft, crumbling wood that can’t support gutter weight. As fascia deteriorates, gutters pull away, creating gaps where more water enters—and where pests can access your attic.
Visual checks for fascia and soffit damage:
Dark streaks or staining under gutters
Soft or spongy wood when gently probed
Peeling or bubbling paint on fascia or soffit panels
Small holes or cracks where insects may enter
Visible rot or sections that appear darker than surrounding areas
Fixing this damage properly means removing gutters, replacing affected fascia and soffit sections, inspecting and repairing any damaged roof decking, and then reinstalling correctly sized gutters. Partial fixes that leave rotted wood in place just delay the inevitable.
When replacing fascia and soffit, upgrading to composite or PVC materials—or wrapping existing fascia in color-matched aluminum—provides better long-term performance in Mid-Missouri’s humidity and storm exposure. These materials resist moisture buildup and won’t rot like traditional wood.
Siding, Wall, and Interior Moisture Damage
When clogged gutters overflow, water doesn’t just drop to the ground—it runs down the face of siding, behind siding panels, and into wall cavities. Once inside walls, water wets insulation, soaks framing lumber, and dampens drywall from the inside out. This improper drainage pattern causes problems that may take months or years to become visible.
Symptoms homeowners may notice:
Warped, buckled, or stained siding panels
Blistering or peeling exterior paint
Damp baseboards or moldy smells inside
Visible mold growth on interior walls
Water leaks appearing far from windows or obvious entry points
Water inside walls often travels along framing members, so visible damage may appear several feet away from the actual gutter overflow point. A wet spot on an interior wall doesn’t necessarily mean the closest window or roof edge is leaking—tracing the path often leads back to a gutter problem on an entirely different part of the home’s exterior.
When unexplained wall moisture shows up, a full exterior review—roof, gutters, and siding together—is important rather than treating only interior drywall symptoms. Our experience across roofing, siding, windows, doors, and gutters allows us to trace moisture paths across multiple systems and find the actual source.
Foundation Problems and Wet Basements
Water pouring straight off a roof—or from overflowing gutters—lands right next to your foundation. That concentrated moisture saturates soil, erodes backfill, and increases hydrostatic pressure on basement walls. Over time, this causes foundational damage that far exceeds any gutter repair cost.
Common signs of foundation-related water problems:
Cracks in foundation walls that widen over time
Basement leaks after hard rains
Standing water or saturated soil near the base of the house
Doors and windows that begin sticking
Uneven floors or walls that lean
Many homeowner policies do not cover foundation damage or basement moisture caused by neglected gutter maintenance or poor drainage. This is classified as maintenance-related damage rather than sudden accidental loss—meaning the repair bills fall entirely on the homeowner.
Next time heavy summer thunderstorms roll through, watch how water behaves around your home. If it cascades next to the house, pools near walls, or ponds in areas that don’t drain, your gutter and drainage system needs attention before allowing water to continue saturating your foundation.
In some Mid-Missouri cases, we recommend both gutter improvements and referral to drainage or foundation specialists for long-term stability. The gutter fix stops the water source; foundation work addresses any damage already done.
Mold Growth, Insects, and Other Hidden Side Effects
Constant dampness around roof edges, walls, or basements from bad gutters creates an inviting place for mold growth and insect infestations. These secondary problems often surprise homeowners who thought they were just dealing with water damage.
Typical pest and mold issues from gutter problems:
Mosquitoes breeding in standing water collected in clogged gutters
Ants and termites attracted to wet, rotting wood
Wasps and hornets building nests in rotted eave openings
Mold colonies on framing, insulation, and drywall behind walls
Musty odors that persist despite cleaning
Moisture buildup inside walls or attics creates ideal mold conditions—warm, dark, and consistently damp. You might detect mold first as a musty smell or see it on a basement wall before realizing the moisture source is two stories up at a failing gutter seam.
Addressing the moisture source—often a gutter problem—is essential before mold remediation or pest control will provide lasting results. Treating mold without fixing the water source just means it grows back. Treating termites without addressing the wet wood that attracted them means they’ll return.
During exterior inspections, we frequently find mold evidence or pest entry points and can repair the structural openings where water and insects get in. Fixing these gaps as part of gutter and roof work prevents repeat infestations.
Prevention: How to Avoid Costly Gutter Problems
Simple, regular maintenance and early repairs are far cheaper than waiting until roof leaks, ceiling stains, or foundation cracks appear. A few hours of attention each year can save thousands in future repairs and help keep your insurance coverage intact.
Think of gutter maintenance as part of your existing seasonal routines: spring yard work includes a gutter inspection, and fall leaf cleanup in October or early November should include clearing gutters before winter. Tie these tasks together and they become automatic rather than forgotten.
Keeping basic records of cleanings and inspections also supports insurance claims when storm damage does occur. Adjusters can see that the system has been reasonably maintained, which helps distinguish covered storm damage from excluded neglect.
How Often to Clean and Inspect Your Gutters
Most Mid-Missouri homeowners should plan on cleaning gutters at least twice a year:
Season
Timing
Focus
Late Spring
May–June
Clear spring debris, check for winter damage, ensure downspouts drain properly
Late Fall
Early November
Remove fallen leaves before first freeze, prevent ice-related clogs
Homes under large trees or in heavily wooded lake areas may need cleaning 3–4 times per year due to constant leaf and twig accumulation. If you can see debris piling up in gutters from the ground, it’s time to clean regardless of the schedule.
Pair gutter cleaning with a quick visual inspection of shingles, fascia, and downspouts for early signs of trouble. This takes only a few extra minutes but catches problems before they spread.
For homeowners uncomfortable with ladders or living in two-story homes, professional cleaning and inspection is worth the investment for safety alone. Falls from ladders cause over 12,000 injuries annually, and the roof edge is an especially hazardous work area. We can provide routine inspections as part of broader exterior checkups, especially after major storms.
DIY Checks Homeowners Can Safely Do
You don’t need to climb onto the roof to spot most gutter problems. Ground-level observations during and after rain reveal a surprising amount:
During rainstorms, watch for:
Water overflowing gutter edges
Gutters not draining properly to downspouts
Water cascading in specific spots
Splashing or pooling near foundation walls
After rain clears, look for:
Standing water near foundations
Sagging gutter lines visible from the yard
Stains or streaking on siding below gutter runs
Erosion patterns in landscaping near downspouts
Binoculars or zoom photos from the ground can help you spot debris piles, loose sections, and visible gaps without climbing. On a dry day, run a garden hose into gutters to see if water flows smoothly to downspouts and exits strongly at the bottom.
If you do choose to use a ladder, follow basic safety: work on stable ground, have someone else home, don’t overreach to the side, and never stand on the top two rungs. Even then, leave structural issues like major sagging, rot, or complex leaks to experienced crews with proper safety equipment.
When to Consider Gutter Guards or Upgraded Systems
Gutter guards, screens, and covers can reduce—but not entirely eliminate—the need for cleaning. For homeowners in mature tree areas like parts of Columbia and Lake of the Ozarks, guards make a meaningful difference in maintenance time.
Potential benefits:
Fewer major clogs requiring ladder work
Better performance during heavy fall leaf seasons
Reduced debris entering downspouts
Less standing water between cleanings
Limitations to understand:
Guards still require occasional inspection and rinsing
Top surfaces can clog with fine debris and shingle granules
Low-quality products may cause water to overshoot during heavy rain
Some designs trap debris on top rather than letting it wash away
If you install gutter guards, plan on periodic checks, especially after heavy wind or hail storms that drop small debris. Guards don’t make gutters maintenance-free—they make maintenance less frequent and less time consuming.
For homeowners with older, undersized gutters or frequent clogs, consider upgrading to 5” or 6” seamless aluminum gutters with properly sized downspouts and well-matched guards. For most Mid-Missouri homes, 5-inch gutters handle rainfall just fine and cost less. However, homes with steep pitches or metal roofing—where water flows faster—benefit from 6-inch gutters. On the downspout side, 3×4-inch downspouts move water noticeably better than standard 2×3-inch ones for only a small cost increase. We can recommend guard options that fit your home’s roof pitch, local tree types, and typical Mid-Missouri rainfall patterns.
Insurance, Storm Damage, and When to Call a Professional
Storm damage, hail, and wind are common drivers of gutter problems across Mid-Missouri—and insurance may help cover repairs in many situations. Understanding what’s typically covered versus what falls under maintenance responsibility helps you make better decisions about when and how to file claims.
At CoMo Premium Exteriors, we provide both storm-restoration work and homeowner education on navigating the claim process. We’ve seen how adjusters evaluate gutter and roof damage, what documentation helps, and where homeowners often miss covered damage because they didn’t know to look.
Don’t wait until obvious leaks show before reaching out, especially after large hailstorms or wind events that impact entire neighborhoods. Early inspection often reveals damage that’s covered before it leads to secondary problems that aren’t.
What Damage Is (and Isn’t) Typically Covered
Insurance policies distinguish between sudden storm events and gradual damage from neglect. Understanding this distinction prevents surprises when you file a claim.
Generally covered (when caused by sudden events):
Hail-dented gutters and downspouts
Wind-torn or detached gutter sections
Storm-damaged roof edges and drip edge
Tree limb impact damage
Ice storm damage to gutters and fascia
Often excluded as maintenance-related:
Damage from long-term clogged gutters
Water stains and rot from years of neglect
Foundation problems from improper drainage
Leaks that developed gradually over multiple seasons
Rust and deterioration from normal aging
Homeowners in Mid-Missouri should review their policy’s language on water damage and maintenance exclusions. Keeping basic records of gutter cleanings and inspections—even just photos and dates—can help establish that the system was reasonably maintained when serious problems arise.
When storms hit, document the date, take photos of any visible damage, and call for a professional inspection soon after the event. This creates a timeline that supports legitimate claims and distinguishes storm impacts from pre-existing issues.
How CoMo Premium Exteriors Helps With Gutter and Roof Problems
As a local, triple-certified exterior contractor—the only one in Mid-Missouri holding GAF Master Elite, OC Platinum Preferred, and James Hardie Elite Preferred certifications—we serve Columbia, Jefferson City, Boonville, Moberly, and Lake of the Ozarks with comprehensive exterior services.
When you call for a gutter inspection, our teams can evaluate gutters, roof edges, siding, and related components together. This gives you a complete picture instead of piecemeal opinions from multiple contractors. If roof damage contributed to gutter problems, or if gutter overflow damaged siding, we can address the full scope in one project.
What to expect when you contact us:
Free estimates with no pressure
Clear explanations of what we find and what it means
Long-term-focused recommendations, not quick temporary patches
Honest assessment of what’s worth repairing versus replacing
Insurance claim support when storm damage is involved
When storm damage affects your gutters and roof, we can help communicate with insurance adjusters and ensure repairs are properly documented. Adjusters sometimes miss secondary damage in valleys and flashing—we know what to look for and how to present findings clearly.
If you’ve noticed overflow during recent storms, staining below gutters, or any of the serious problems described in this article, we’re happy to take a look. A quick inspection now can prevent structural damage and expensive repairs later. Give us a call at (573) 424-9008 or request a free estimate to get started.
FAQs
How can I tell if my ceiling leak is from the roof or the gutters?
Many ceiling leaks near exterior walls start at the roof edge where overflowing gutters back water up under shingles. Water can travel horizontally under roofing materials before dropping through to ceilings, making the source hard to pinpoint. We recommend having a professional inspect both the roof system and gutters together to trace the exact water path before starting repairs. Fixing only one component often leaves the actual entry point untreated.
Are seamless gutters really worth the upgrade?
Seamless gutters reduce the number of joints where leaks typically begin—every seam in a sectional gutter is a potential failure point. For long runs and heavy Mid-Missouri rains, seamless systems with proper slope and correctly sized downspouts significantly reduce leak risks. They also tend to look cleaner on the home since there are no visible joints every 10–20 feet. The upfront cost is higher, but reduced maintenance and longer lifespan often make them more cost-effective over time.
Do gutter guards mean I’ll never have to clean my gutters again?
Guards dramatically reduce large debris like leaves and twigs, but they still require occasional inspection and rinsing. Fine materials—shingle granules, pollen, small seeds—can accumulate on or beneath guards over time. After heavy wind or hail storms that drop small debris, a quick check ensures water can still flow. Plan on annual inspections even with guards installed, and more frequent checks in heavily wooded areas.
How long should a quality gutter system last in Mid-Missouri?
Well-installed aluminum gutters typically last 20–30 years with proper maintenance. Copper can last 50+ years. However, lifespan depends heavily on maintenance frequency, tree coverage, storm exposure, and installation quality—especially correct slope and fastening. Homes under heavy tree cover or in areas with frequent hail may see shorter lifespans. Neglected gutters can fail in under 10 years regardless of material quality.
Can I replace my gutters without replacing my roof?
In many cases, yes—gutters can be replaced independently without touching the roof. However, if the roof is near the end of its useful life or if fascia and drip edge are damaged, coordinating gutter replacement with roofing work is often more cost-effective. You avoid paying for labor twice and ensure all components are properly integrated. We can evaluate both systems and help you time projects efficiently, whether that means immediate replacement or planning for coordinated work in a future season.
Need a refresher on whether gutter guards are the right fix? Our Mid-Missouri gutter guard guide compares pros, cons, and local install timing.
Gutter & Soffit Upgrades That Protect Your Home’s Exterior
Key Takeaways
Upgraded gutters and ventilated soffits work together as a unified system to prevent water damage, wood rot, and pest issues around your home’s roofline—problems that often go unnoticed until costly repairs are needed.
In Mid-Missouri’s heavy spring storms and freeze-thaw winters, properly sized seamless gutters, gutter guards, and modern soffit systems significantly extend the life of your roof, siding, and foundation.
Many gutter and soffit upgrades can be completed during a roof or siding project, saving on labor costs and giving your entire exterior a cleaner, updated look.
CoMo Premium Exteriors offers free inspections and estimates across Columbia, Jefferson City, Boonville, Moberly, and the Lake of the Ozarks for gutter and soffit projects.
If your home has sustained hail or wind damage common in Central Missouri, we can help document soffit and gutter damage for insurance claims—ensuring nothing gets overlooked.
How Gutters and Soffits Protect Your Home’s Exterior
Your gutter system and soffits might not be the first things you think about when protecting your house, but they’re quietly doing some of the most important work on your exterior. Gutters channel rainwater away from your roof edge, exterior walls, and foundation, while soffits—the panels covering the underside of your roof’s overhang—ventilate your attic and protect exposed rafters from the elements.
When these components function properly, they prevent a cascade of expensive problems:
Problem Prevented
How Gutters/Soffits Help
Foundation cracks and basement flooding
Gutters direct water away from your home’s foundation
Rotted fascia and structural damage
Properly sloped gutters prevent water from pooling at the roof edge
Peeling paint and water stains
Soffits protect eave areas from moisture infiltration
Sealed soffits block entry points for squirrels, wasps, and birds
Here in Mid-Missouri, repeated heavy rains during April through June and the snow and ice cycles from December through February put extra stress on outdated gutters and unvented or damaged soffit panels. The freeze-thaw patterns we experience can accelerate wear on wood components, leading to rot and structural issues faster than in more temperate climates.
Many exterior issues homeowners notice first—like warped siding at corners or soft spots near the eaves—often trace back to failing gutters and soffits. The good news? Targeted upgrades can dramatically improve both protection and curb appeal without requiring a full exterior remodel.
Signs Your Gutters and Soffits Need an Upgrade
One of the best times to evaluate your gutter and soffit condition is right after a heavy rain. Walk around your home and look for warning signs—many issues that seem minor can indicate bigger problems developing behind the scenes.
Visible Gutter Issues to Watch For
Overflowing during storms: Water cascading over gutter edges means your system can’t handle the water flow
Seams dripping: Sectional gutters develop leaks at joints over time
Gutters pulling away from fascia: Indicates rotted fascia board or failed hangers
Rust spots and corrosion: Common on older steel gutters, leading to holes
Peeling paint below downspouts: A sign of consistent water overflow or splash-back
Standing water near foundation: Failed drainage puts your home’s foundation at risk
Soffit and Fascia Red Flags
Peeling or bubbling paint under the eaves
Soft or crumbling wood when you press on the fascia
Visible signs of gaps or holes in soffit panels
Bird or wasp nesting activity in eave areas
Discolored or sagging soffit panels
Interior Clues You Shouldn’t Ignore
Sometimes the first visible signs show up inside your home:
Musty smell in the attic (indicates moisture problems)
Higher summer cooling bills from poor attic ventilation
Water stains at ceiling edges near exterior walls
Homes in Columbia and surrounding towns built before about 2000 often have undersized 5-inch sectional gutters and minimal soffit ventilation. These older systems simply don’t perform well under today’s more intense storm patterns—research shows that storm frequency in our region has increased roughly 20% since 2000.
If you’re noticing more than one of these issues, especially after a hail or wind event, it’s worth getting a professional assessment. We offer free inspections across Mid-Missouri and can help you understand whether repair or full replacement makes the most sense for your situation.
Seamless Gutter Upgrades That Improve Protection
If you’ve ever looked closely at older gutters, you’ve probably noticed the seams where sections connect. Traditional sectional gutters are assembled from 10- to 20-foot pieces, and every joint is a potential leak point. Seamless gutters, by contrast, are custom-formed on-site from a continuous coil of aluminum—typically with seams only at corners and downspout connections.
The difference in performance is significant. Seamless gutters drastically reduce leak points, protect fascia boards from constant moisture exposure, and create a cleaner roofline appearance. For Mid-Missouri homes, especially those with complex rooflines or steep pitches, we typically recommend upgrading to 6-inch seamless K-style gutters.
Color-matched seamless gutters can be chosen to coordinate with your existing siding, trim, or new roofing. This attention to detail makes a noticeable difference in curb appeal during an exterior remodel.
How the installation process works:
On-site measurement of all gutter runs
Forming gutters from aluminum coil using specialized equipment
Adding hidden hangers for secure, clean attachment
Proper sloping toward downspouts (typically 1/4 inch per 10 feet)
Connecting downspouts with extensions to direct water away from the foundation
One important consideration: if you’re planning gutter replacement, timing it with a roof replacement avoids having to remove new gutters later when working on fascia or drip edge. Bundling these projects often lowers overall labor costs.
Benefits of 6-Inch Gutters in Mid-Missouri
Our local downpours—particularly the intense thunderstorms that roll through along the I-70 corridor in late spring and summer—often overwhelm older 5-inch gutter systems. The math is straightforward: 6-inch gutters handle significantly higher water volume.
Gutter Size
Approximate Capacity
Best For
5-inch K-style
~5,500 gallons/hour
Smaller homes, simple rooflines
6-inch K-style
~8,000+ gallons/hour
Most Mid-Missouri homes, complex rooflines
Larger gutters reduce water overflow that can stain siding, damage landscaping, and soak the soil near your foundation. With proper downspout placement and extensions, 6-inch gutters help keep basements and crawl spaces drier—addressing foundation issues before they start.
Upgrading to 6-inch gutters is especially useful on homes with large or multiple roof planes draining into a single gutter run. These situations create concentrated water flow that can easily exceed what smaller systems can handle.
Gutter Guard Options That Cut Maintenance
In tree-heavy neighborhoods throughout Columbia, Ashland, and Jefferson City, leaves, twigs, and shingle grit constantly accumulate in gutters. Gutter guards offer a practical solution to reduce how often you need to climb a ladder for cleaning.
Common guard styles we see and install:
Guard Type
Pros
Cons
Perforated aluminum covers
Durable, handles heavy rain well
Smaller debris can get through
Fine stainless-steel mesh
Excellent debris blocking
Requires periodic surface cleaning
Surface tension guards (“helmet” style)
Effective for large leaves
Can struggle with oak tassels, higher cost
The right choice depends on your specific situation—the types of trees nearby, your roof pitch, and your budget. Guards significantly reduce the frequency and risk of climbing ladders to clean gutters, which is especially valuable for multi-story homes.
A free inspection can help determine whether your existing gutters are suitable for guard installation or should be upgraded at the same time. Installing new gutters with integrated guards often provides better long-term performance than retrofitting guards onto aging systems.
Soffit Upgrades That Protect and Ventilate Your Roof
The soffit—that horizontal surface under your roof’s overhang—does more than provide a finished look. It’s actually a critical component of your attic’s ventilation system and protects exposed rafters from moisture and pests.
Modern soffit systems use vented panels made from vinyl, aluminum, or fiber cement to allow cool air into the attic. This intake air works with ridge vents or roof vents to create convective flow, removing heat and moisture from the attic space.
Key benefits of proper soffit ventilation:
Reduced risk of ice dams during Central Missouri winters
Lower attic temperatures in July and August (studies show reductions of up to 30°F)
Less condensation that can lead to mold growth and wood rot
Extended shingle life—proper ventilation can add 20-30% to roof longevity
Fewer pest entry points when soffits are sealed and maintained
Upgrading soffits is often ideal when replacing siding, gutters, or fascia because everything at the eave line can be updated together for a uniform look. This coordinated approach also ensures that ventilation, drainage, and materials all work as an integrated system.
Vented vs. Solid Soffit Panels
Balanced attic ventilation matters for several important reasons: shingle manufacturer warranties often require adequate ventilation, energy efficiency improves when hot air can escape, and moisture damage becomes less likely when air circulates properly.
Many older homes around Columbia, built in the 1970s through 1990s, have solid wood soffits with limited vents. These restricted designs trap heat and moisture in the attic—exactly the conditions that cause problems.
Modern vented vinyl or aluminum soffit panels can be configured in several ways:
Fully vented: Every panel has perforations for maximum airflow
Alternating pattern: Solid and vented panels in sequence
Targeted venting: Vented panels concentrated in specific areas based on attic layout
When evaluating a home, we assess existing intake vents, exhaust vents, and insulation levels to recommend the right venting pattern. The goal is achieving the proper ratio—typically 1 square foot of ventilation for every 150 square feet of attic floor space.
Color options allow homeowners to either match existing trim or create contrast for more modern curb appeal. White and almond remain popular, but coordinated colors that complement siding choices can give your home a more intentional, updated appearance.
Durable Soffit Materials for Long-Term Protection
Material choice affects both appearance and how often you’ll need to maintain or repaint your soffits. Here’s how the common options compare:
Material
Durability
Maintenance
Best For
Vinyl
35+ years
Minimal—occasional cleaning
Budget-conscious, low-maintenance priority
Painted Aluminum
40+ years
Less maintenance than wood
Resisting dents, UV stability
Fiber Cement
50+ years
Periodic repainting
Premium siding projects, maximum durability
Wood
10-15 years
Annual painting, rot prevention
Historic homes requiring period-accurate materials
For Mid-Missouri’s climate—with humidity, temperature swings, and intense summer sun—low-maintenance materials like vinyl and aluminum make sense for most homeowners. Factory-finished materials hold color better and reduce peeling and flaking at the eaves.
In shaded or tree-covered areas where wood has historically rotted, aluminum or vinyl options provide significantly better moisture and pest resistance. The upfront cost difference typically pays for itself in avoided repair costs within a few years.
Coordinating Gutters, Soffits, and Fascia for a Complete Exterior Upgrade
Gutters, soffits, and fascia all meet in one of the most vulnerable areas of your home’s exterior: the roof edge. This is where water, ice, pests, and general wear concentrate—making it worth treating these three components as an integrated system rather than separate projects.
Upgrading these elements together offers several advantages:
Better water management: New fascia provides solid attachment points for gutters, and properly installed drip edge channels water directly into the gutter
Stronger attachment points: Fresh fascia board eliminates sagging and pulling away
Cleaner visual line: Coordinated colors and materials create a unified appearance around the entire home
Cost efficiency: Labor costs for accessing the eave area are consolidated into one project
Fascia repair or fascia installation becomes especially important when replacing gutters. If you install new gutters on rotted fascia, you’ll likely see sagging and leaks within a few years. Aluminum-wrapped or composite fascia provides a maintenance-free surface that protects the underlying wood and gives gutters a solid mounting surface.
Color-coordinated gutters, soffits, and fascia can dramatically refresh a 20- to 30-year-old home without changing the brick or primary siding. It’s one of the more cost-effective ways to improve curb appeal and protect your investment.
Example from the Columbia area: A 1998 ranch home we worked on in 2024 had original 5-inch steel gutters (rusting at seams), wood fascia with soft spots, and solid wood soffits with inadequate ventilation. The homeowner was getting a new roof after hail damage. By coordinating the roof replacement with 6-inch seamless gutters, vented aluminum soffits, and wrapped fascia, they got a complete solution that addressed drainage, ventilation, and appearance in one project—at less total cost than doing each separately.
When we replace a roof, we often recommend evaluating drip edge, gutter apron, and fascia condition at the same time. This approach builds a long-term solution rather than a short-term patch that’ll need attention in five years.
Planning Your Gutter and Soffit Project with CoMo Premium Exteriors
Getting started on a gutter and soffit upgrade is straightforward. Here’s how our process typically works:
Initial inspection: We walk around your home with you, examining gutters, soffits, fascia, and related drainage components
Photo documentation: We photograph problem areas and overall conditions for your records and any insurance needs
Written recommendations: You receive clear options explaining what needs attention now versus what can wait
Transparent pricing: Line-item estimates so you understand exactly what you’re paying for
We offer free exterior inspections for homeowners across Columbia, Jefferson City, Boonville, Moberly, and the Lake of the Ozarks. There’s no obligation—just honest advice from a team that’s been working in Mid-Missouri for over 25 years.
If you’re planning multiple projects, we can coordinate gutter and soffit upgrades with roof, siding, or window work. This coordination minimizes disruption to your daily life and often qualifies the combined project for more comprehensive warranty coverage.
Our crews are factory-trained through our certifications with GAF, Owens Corning, and James Hardie. We’re the only contractor in Mid-Missouri holding all three manufacturer elite certifications—a distinction that reflects our commitment to installation quality and ongoing training.
For storm damage situations: Hail, wind, and fallen limbs often damage gutters, soffits, and fascia along with roofing. Insurance adjusters sometimes overlook secondary damage in these areas. We help homeowners document all damage thoroughly and work with insurance carriers to ensure soffit and gutter issues are properly included in claims. This advocacy can mean the difference between partial repairs and a complete solution.
Ready to find out what your home needs? Give us a call at (573) 424-9008 or schedule a free inspection through our website. We’ll walk through your specific situation—no pressure, just the information you need to make informed decisions about protecting your home.
FAQs
How often should gutters and soffits be inspected in Mid-Missouri?
We recommend homeowners visually check their gutters and soffits every spring and fall—looking for the warning signs mentioned earlier. A professional inspection every 2-3 years makes sense for most homes, or immediately after major storms with hail or high winds. Mid-Missouri’s weather puts more stress on these components than many regions, so regular maintenance and inspection helps catch small issues before they become costly repairs.
Can I upgrade gutters and leave my existing soffits in place?
Sometimes, yes. If your soffits are in good condition, properly vented, and the fascia is solid, you can install new gutters without touching the soffits. However, if there are visible signs of rot, pest entry, or poor ventilation, upgrading everything together usually costs less long-term and protects your new gutters from future issues. We’ll assess your specific situation during a free inspection and give you honest recommendations either way.
Do gutter guards mean I never have to clean my gutters again?
High-quality guards greatly reduce debris buildup and eliminate most regular cleaning needs. However, occasional inspection and light cleaning—especially at inside corners and downspouts—is still recommended. Some debris, particularly fine particles like pine needles or roof granules, may still collect on top of guards and need periodic attention. Guards are about reducing maintenance, not eliminating it entirely.
Will soffit and gutter upgrades help with ice dams in winter?
Yes, when combined with proper attic insulation. Ice dams form when heat escapes into the attic, melting snow on the roof that refreezes at the colder eaves. Better attic ventilation from vented soffits—combined with properly sloped, larger gutters and clear downspouts—can significantly reduce ice dam risk. Addressing both ventilation and drainage creates a more complete solution than tackling either issue alone.
What does a typical gutter and soffit upgrade cost?
Costs vary based on several factors: home size, linear feet of gutters and soffits, materials chosen, roof height and accessibility, and whether fascia repair is needed. For accurate local pricing, we recommend requesting a free, no-obligation estimate. We provide detailed line-item proposals so you can compare options and understand exactly what each component costs. This transparency helps you make the decision that fits your budget and priorities.
Top Benefits of Installing a Splash Guard for Gutter Systems
A splash guard for gutter prevents water overflow and protects your home. Discover what they are, when you need them, how to install them, and the best options available in this article.
Key Takeaways
Gutter splash guards prevent water overspill, protecting landscaping and foundations while extending gutter lifespan.
Common signs for needing splash guards include overflowing gutters, roof leaks, foundation damage, and landscape erosion.
Installation can be DIY or professional; choosing the right material (aluminum, vinyl, or copper) is crucial for durability and performance.
What Are Gutter Splash Guards?
An overview of gutter splash guards installed on a house.
Gutter splash guards are designed to prevent water overspill from gutters, ensuring proper drainage and preventing damage to landscaping and foundations caused by overflowing water. Typically installed at roof valleys and corners where water flow is heaviest, gutter valley splash guards can also be placed along straight sections to enhance water management. Made from thin metal or plastic panels, they are easy to attach to the outer edges of gutters.
Installing splash guards is a cost-effective solution to avoid the hefty expenses of repairing water damage or replacing the entire gutter system. They redirect rainwater back into the gutter system, safeguarding your home from the perils of water overspill and maintaining the integrity of the gutter system.
Installing these gutter guards keeps your home’s gutter system running efficiently, preventing damage and extending the life of your gutters.
Signs Your Home Needs Gutter Splash Guards
Signs indicating the need for gutter splash guards on a home.
Recognizing signs that your home needs gutter splash guards aids in proactive maintenance. Common indicators like overflowing gutters, roof leaks, foundation damage, and landscape damage can prompt timely action, preventing costly repairs and preserving your home’s structural integrity.
Regular inspections and cleaning are essential to ensure the effectiveness of your gutter system.
Overflowing Gutters
Overflowing gutters are the primary indicator suggesting a need for splash guards. Debris buildup often clogs the system, causing water to overflow, especially at the corners where the flow is heaviest. This overflow can lead to significant water damage, affecting the structural integrity of your home.
Gutter splash guards and downspout splash guards manage heavy water flow, directing it back into the gutters and preventing overflow and potential damage.
Roof Leaks
Water pooling on the roof can lead to roof leaks, indicating a potential need for splash guards. When water backs up onto the roof, it can seep through the shingles, causing leaks and water damage inside the home.
Splash guards prevent such issues by directing rainwater into the gutters, preserving the roof’s integrity and protecting your home from leaks.
Foundation Damage
Foundation damage can be a sign of improper drainage caused by overflowing gutters. Water that overshoots or overflows from gutters can erode the foundation, leading to shifting, cracking, or even structural failure.
Splash guards mitigate these risks by directing water away from the home’s base, preventing pooling and erosion.
Landscape Damage
Inability of gutters to handle runoff can lead to erosion and water pooling, damaging plant life and soil structure. Splash guards help by directing water away from vulnerable areas in the landscape, reducing the risk of damage.
Splash guards improve growing conditions by preventing excess water accumulation in landscape areas, protecting your yard from runoff and erosion.
How To Install Gutter Splash Guards
A person installing gutter splash guards on a house.
Most homeowners can easily tackle the installation of gutter splash guards. It’s a straightforward DIY project. Whether you are adding them to an existing system or during a new installation, the process is simple and can be completed with basic tools. Check your gutter warranty terms before starting, as improper installation can void it.
Special considerations may be required for copper or half-round gutters, but with the right approach, anyone can enhance their home’s gutter system with splash guards.
Gather Materials
To install gutter splash guards, you will need a few essential tools and materials. An electric screwdriver is crucial for fastening the guards during installation. Additionally, you should have a ladder, gloves, a tool belt, screws, and a bucket to organize your materials, reducing the need for multiple trips up and down the ladder.
Aluminum splash guards, being lightweight, are particularly easy to handle and install.
Find a Sturdy Ladder Location
Safety is paramount when installing gutter splash guards. Ensure that your ladder is placed on a flat, dry area to maintain stability while working. Avoid leaning the ladder on gutter sections to prevent any damage and ensure a secure working position.
Proper ladder placement is critical to ensure your safety and the integrity of your gutters while you install the splash guards.
Apply Caulk and Set Splash Guard
Applying caulk to the bottom edge of the gutters provides both sealing and adhesion for the splash guards. After applying a generous bead of caulk, position the splash guard firmly against it to create a watertight seal.
This step is crucial to ensure that the splash guard stays in place and effectively channels water back into the gutter system, preventing overspill and protecting your home.
Fasten and Seal Edges
Securing the splash guard properly prevents water overflow and protects your home. Use screws to fasten the splash guard to ensure it stays in place during heavy rain. Apply a generous bead of caulk along the edges where the splash guard meets the gutter for a watertight seal.
These steps ensure the splash guard effectively manages water overflow and protects your home from damage.
Professional Installation vs. DIY
Choosing between professional installation and DIY for gutter splash guards requires considering cost, safety, and skill level. While DIY installation can save money and allow for customization, professional installation ensures quality workmanship and minimizes risks.
Homeowners should consider their comfort level with heights and tools, as well as the potential impact on gutter warranties.
When to Hire a Professional
Hiring professionals typically ensures proper installation and functionality of gutter splash guards. Professionals can provide a comprehensive assessment of potential issues, ensuring that splash guards are effectively placed to prevent water overflow.
Hire a professional if you lack the tools or experience to safely install splash guards on high gutters.
Benefits of DIY Installation
Installing gutter splash guards yourself can lead to significant savings on labor costs, making it a cost-effective alternative. Aluminum splash guards are affordable, lightweight, and easy to install.
DIY installation also allows homeowners to customize the guards according to their specific needs and preferences, providing flexibility and control over the project.
Best Materials for Gutter Splash Guards
Various materials used for gutter splash guards.
Choosing the right material for gutter splash guards is essential for durability and performance. Options include aluminum, vinyl, and copper, each with its own advantages and price points. Aluminum and stainless steel are favored for their corrosion resistance and ease of installation. Vinyl is economical but less durable, while copper offers longevity and aesthetic appeal at a higher cost.
Aluminum
Aluminum splash guards are an affordable option for homeowners, known for their excellent corrosion resistance. The product is 21051. It measures 2 x 3 inches. Mill Finish Aluminum Gutter Outlet, for example, is priced at $13.77, making aluminum a cost-effective choice.
Lightweight and easy to install, aluminum splash guards are a practical option for those looking to enhance their gutter system without breaking the bank.
Vinyl
Vinyl splash guards are an affordable option but may have some potential durability issues. While they are easy to install and available in various colors to match home exteriors, vinyl splash guards can become brittle over time and may not last as long as other materials.
Vinyl is a budget-friendly option, though it may need more frequent replacements.
Copper
Copper splash guards are a premium choice for gutter systems, thanks to their longevity and visual elegance. Known for their durability, copper guards can last over 50 years with proper care.
The natural patina that develops on copper not only enhances its appearance but also protects the metal over time, making it a worthwhile investment for homeowners seeking both functionality and aesthetic appeal.
Top Gutter Splash Guard Products
Top gutter splash guard products available in the market.
Selecting the best gutter splash guard products involves considering durability, ease of installation, and cost. Products like the Amerimax Home Products Gusher Guard, LeafFilter Splash Guards, and Eagle 1 Rain Splash Guard stand out for their performance and reliability, making them some of the best gutter splash guards available.
These products not only provide effective water management but also come with features that cater to both DIY enthusiasts and those preferring professional installation.
Amerimax Home Products Gusher Guard
The Amerimax Gusher Guard comes in three pieces per pack, offering a simple and effective solution for preventing water overspill in heavy flow areas. Designed for easy installation, this product is ideal for homeowners looking to enhance their gutter system without extensive modifications.
Its durable construction ensures long-lasting performance, making it a reliable choice for protecting your home from water damage.
LeafFilter Splash Guards
LeafFilter splash guards come with a lifetime transferable warranty, ensuring peace of mind for homeowners. Additionally, LeafFilter provides professional installation services, guaranteeing that the splash guards are installed correctly and function effectively.
This combination of a reliable product and professional service makes LeafFilter a top choice for those seeking long-term protection for their gutter systems.
Eagle 1 Rain Splash Guard
The Eagle 1 Rain Splash Guard is perfect for DIY installation, making it an excellent choice for homeowners looking to tackle gutter projects themselves. The package includes 1/2-inch gutter screws to facilitate easy setup, ensuring a secure fit and effective performance during heavy rain.
Its design and ease of installation make it a practical option for enhancing your home’s gutter system.
Enhancing Gutter Systems with Downspout Splash Blocks
Downspout splash blocks are an essential addition to any gutter system, directing water away from foundations to prevent pooling and damage. By combining splash blocks with gutter downspout extensions, you can significantly enhance drainage efficiency, manage heavy rainfall, and protect both your home and landscape from water damage.
This dual approach ensures comprehensive water management, safeguarding your property from the adverse effects of excessive runoff.
Benefits of Downspout Splash Blocks
Water spilling from gutters can cause erosion and foundation issues. Splash blocks prevent pooling near the foundation, reducing the risk of structural damage.
Splash blocks divert water away from vulnerable areas, protecting your home’s foundation and maintaining landscaping integrity for a healthier yard.
Combining with Downspout Extensions
Using splash guards alongside downspout extensions is essential for effective rainwater management. This combination improves overall drainage efficiency by preventing water from pooling around the foundation and reducing the risk of erosion and basement flooding.
For maximum protection during heavy rainfall, combining splash guards with downspout splash blocks is highly recommended, providing a comprehensive solution to manage water runoff and protect your home.
Maintenance Tips for Gutter Splash Guards
Regular maintenance is crucial to ensure that gutter splash guards function effectively. This includes routine cleaning to remove debris and regular inspections to identify any damage.
By following these maintenance tips, homeowners can prolong the life of their splash guards and maintain their home’s protection against water damage.
Regular Cleaning
Keeping splash guards clear of leaves and debris is crucial for ensuring they can effectively direct water into the gutters. Neglecting to clean splash guards can lead to improper water flow and increases the risk of overflow issues.
Regular cleaning ensures that your home’s gutter system can handle heavy rainfall and reduces the likelihood of gutter system damage to your home.
Inspecting for Damage
Regular inspections ensure splash guards function properly and protect your home from water damage. Look for signs of wear like cracks, warping, or detachment from gutters.
Keeping splash guards free from debris allows for optimal water flow, preventing unforeseen damage. If damage is found, determine whether repairs are possible or if replacement is needed for effective functionality.
Summary
Installing gutter splash guards is a proactive step in protecting your home from water damage. These simple yet effective devices prevent water overflow, protect foundations, and maintain the integrity of your landscaping. Whether you choose to install them yourself or hire a professional, the benefits are clear: improved water management, reduced maintenance, and enhanced home protection.
By using durable materials like aluminum, vinyl, or copper, and maintaining your splash guards through regular cleaning and inspections, you can ensure they provide long-lasting protection. Consider complementing your gutter system with downspout splash blocks and extensions for comprehensive water management. With these tools, you can safeguard your home against the elements and enjoy peace of mind knowing your property is well-protected.
Frequently Asked Questions
What are the main benefits of installing gutter splash guards?
Installing gutter splash guards is essential as they prevent water overspill, protect your foundation, reduce landscape damage, and extend the lifespan of your gutter system. These benefits help maintain a well-preserved home and landscape.
How can I tell if my home needs gutter splash guards?
Your home likely needs gutter splash guards if you notice overflowing gutters, roof leaks, foundation damage, or landscape erosion. Addressing these issues promptly will help prevent further damage to your property.
Is it better to install gutter splash guards myself or hire a professional?
Hiring a professional is often advisable for ensuring correct installation, especially if you’re not comfortable with DIY projects or your gutter system is complex. However, if you have the skills and confidence, installing splash guards yourself can save on labor costs.
What materials are best for gutter splash guards?
The best materials for gutter splash guards are aluminum, vinyl, and copper, as each offers distinct advantages: aluminum is lightweight and corrosion-resistant, vinyl is cost-effective, and copper provides durability with an attractive appearance.
How do I maintain my gutter splash guards?
To maintain your gutter splash guards effectively, regularly clean them to remove debris and conduct periodic inspections for any signs of damage. This proactive approach will ensure they function properly and last longer.
Considering splash guards or full covers? Pair this article with our in-depth gutter guard walkthrough to decide what protects Columbia and Sedalia roofs best.
Effective Strategies to Combat Ice Dam Formation on Your Roof
Ice dams can wreak havoc on your home, and understanding how to tackle them is essential. They form when melted snow refreezes and ice accumulates at the roof’s edge, creating a blockage that can cause interior water damage. In this article, we cover effective strategies for preventing and safely removing ice dam formations, giving homeowners the tools to protect their homes.
Key Takeaways
Ice dams are caused by uneven roof temperatures and heat loss from the home; prevention includes proper roof insulation, ventilation, and professional roof maintenance to address snow removal and repair vulnerabilities.
Homeowners can employ DIY methods to reduce the risk of ice dams, such as regular snow removal, proper attic insulation, and sealing air leaks, but may require professional assistance for severe cases.
Ice dams are ridges of ice that form at the edge of your roof, preventing melting snow from draining off the roof. The water that backs up behind the dam can leak into your home, damaging ceilings, walls, and other parts of your structure. This formation usually occurs when:
Snow melts on a warm roof
The melted snow refreezes near the edge
Water pools behind the ice dam
The water potentially leaks into your home.
Comprehending how ice dams form and the risks they pose is a key step in preventing them. The damages caused by roof ice dams can be extensive, leading to mold, rot, and other forms of water damage in the attic and adjacent walls or ceilings. Thus, gaining knowledge of the scientific process leading to their formation and being alert to common signs of roof ice dam problems is vital for their effective prevention.
The Science Behind Ice Dam Formation
Ice dams form due to a combination of factors – heat loss from your home, uneven roof surface temperatures, and snow cover on your roof edge. When heat escapes from your home into the attic, it can cause the snow on your roof to melt. As the melted snow flows down to the colder eaves, it freezes and forms an ice dam. This process is aggravated by the presence of snow cover on the roof, serving as insulation and leading to uneven temperatures when combined with heat loss from the house.
On a positive note, adequate roof insulation can inhibit their formation. Maintaining an even temperature on the roof surface effectively prevents the melting and refreezing of snow, mitigating heat loss from the home and minimizing variations in roof surface temperatures. This understanding forms the basis of addressing and preventing ice dams.
Ice or water buildup in your gutters or downspouts
But be warned, ice dams can be present even when icicles aren’t visible. In severe cases, you may notice discolored icicles along with other signs of ice damming problems.
Other signs include water stains on ceilings or walls, often in conjunction with a substantial accumulation of snow on the roof. Additionally, damaged roof shingles or gutters may indicate ice dam formation. In such cases, it’s essential to act promptly and seek professional help to prevent further damage.
CoMo Premium Exteriors’ Approach to Ice Dam Prevention
cold, dam, hanging
Our team of experts recommends the following measures to prevent ice dams and maintain the longevity of your roof:
It is advisable to conduct an annual roof inspection to prevent the formation of ice dams.
Insulation and Ventilation Solutions
Our insulation and ventilation recommendations are designed to combat the root causes of ice dam formation. Proper insulation in your attic can prevent heat loss and maintain even roof surface temperatures, reducing the risk of ice dams.
To further enhance the effectiveness of our insulation solutions, we recommend a variety of insulation types such as fiberglass batt insulation, cellulose insulation, and loose-fill insulation. The recommended insulation thickness can vary from 12 to 17 inches, contingent upon the type of insulation utilized.
Appropriate ventilation is equally important in maintaining uniform roof surface temperatures, as it majorly contributes to regulating the temperature within the attic and moisture levels.
DIY Ice Dam Prevention Techniques
Photo of snow removal from a roof
Although severe ice dam issues often warrant professional intervention, homeowners can also employ various DIY techniques to prevent the formation of ice dams. These include regular snow removal from the roof, ensuring proper attic insulation, and sealing air leaks to minimize heat loss.
These methods are not only economical but also straightforward to execute. However, it’s important to note that while these methods can help reduce the risk of ice dams, they might not completely eliminate the ice dam problem. For comprehensive prevention and removal, it’s always best to seek professional help.
Regular Snow Removal
Regular snow removal from the roof is one of the simplest yet most effective methods to prevent ice dam formation. Removing the snow eliminates the main ingredient needed for an ice dam to form, which is the snow that may melt and refreeze at the roof’s edge in cold weather.
Using a roof rake or push broom can aid in efficient snow removal. However, it’s important to exercise caution to avoid damaging the roofing materials or causing injury. It’s recommended to remove snow from the roof after every 6 inches of snowfall.
Proper Attic Insulation
Ensuring your attic has adequate insulation can play a crucial role in preventing ice dams. Correct attic insulation can obstruct heat from reaching the roof, preventing the snow from melting, which could otherwise refreeze and form ice dams.
The recommended insulation method involves not only incorporating adequate insulation material but also ensuring proper airflow with the use of baffles extending from the roof eaves to all areas of the attic, thereby preventing heat transfer leaks from the house.
It’s advisable to inspect and replace attic insulation every 15 years, or sooner if signs of damage or degradation are observed.
Sealing Air Leaks
The final DIY prevention technique involves plugging air leaks to mitigate heat loss. Air leaks contribute to the formation of ice dams by enabling heat loss, which in turn causes the snow on the roof to melt.
Common areas where air leaks are frequently located include:
Sealing these leaks can effectively prevent warm air from escaping and contributing to ice dam formation.
How to Safely Remove Existing Ice Dams
Despite preventive measures, ice dams may still form, especially during heavy winter conditions. In such cases, it’s important to know how to safely remove existing ice dams. The methods for ice dam removal include using a roof rake, applying calcium chloride, or calling a professional if the situation is severe.
These techniques are both effective and easy to put into practice. However, it’s important to remember that safety should always be a priority. Never attempt to remove an ice dam if it puts you at risk of injury. Instead, call a professional like CoMo Premium Exteriors.
Using a Roof Rake
Photo of using a roof rake to remove ice dams
A roof rake proves to be a useful tool in removing snow and ice from your roof. It’s designed to eliminate snow from the roof, mitigating the formation of ice dams by effectively clearing snow from the roof’s edge and the rest of the roof’s surface.
Start from the area nearest to you and then progress upward.
Pull small amounts of snow towards you at a time.
If dealing with a gabled roof, initiate the process at the ridge and proceed towards the eaves.
Remember to exercise caution to avoid damage to the roofing materials or injury.
Applying Calcium Chloride
Administering calcium chloride onto the ice dam can facilitate the snow melting process and create channels for water to drain off the roof. The most effective method for applying it to an ice dam is by filling the leg of a discarded pair of pantyhose with calcium chloride ice melter and laying it across the ice dam and over the gutter.
While effective, it’s important to note that using calcium chloride can result in the corrosion of roofing nails, potential loosening of shingles, and damage to vegetation, roofs, and concrete. Therefore, it’s crucial to exercise caution and proper usage when utilizing it.
When to Call a Professional
While DIY methods can be effective in many cases, there are situations when it’s best to call a professional for ice dam removal. Indications that professional help is needed include:
Professional ice dam removal companies utilize specialized equipment and frequently use steam-based techniques to effectively and safely remove substantial ice dams. At CoMo Premium Exteriors, we ensure safety during ice dam removal by implementing necessary safety measures and proactively removing the ice dam to prevent interior water damage, fire hazards, and expensive repairs.
The Benefits of Choosing CoMo Premium Exteriors for Ice Dam Solutions
Opting for CoMo Premium Exteriors for ice dam solutions brings with it numerous advantages. With our expertise, comprehensive services, and warranties, we ensure your home’s exterior walls are protected from ice dam damage. Our team is dedicated to providing high-quality services that not only address your current ice dam issues but also prevent future problems.
We offer a 5-Year Workmanship Warranty, 1-Year Clean-Up Guarantee, and Manufacturer’s Warranty for peace of mind and protection. So you can rest assured knowing that our work is backed by guarantee and warranty, and that we are committed to providing the best service in the industry.
Expertise and Experience
CoMo Premium Exteriors offers a rich fusion of experience and expertise. We have been offering services pertaining to ice dam prevention and removal since 2010, and our team of experts has a proven track record of adeptly handling ice dam problems.
Our extensive experience with insurance claims, knowledge in installing metal roofs, and sound advice based on years of field experience make us a reliable choice for homeowners seeking ice dam solutions.
Comprehensive Services
CoMo Premium Exteriors provides a wide range of services to tackle ice dam issues. This includes the installation of gutter guards and heated gutter guards, aimed at preventing clogs, ice dams, and water damage. Our professional project management ensures customer satisfaction throughout the project timeline.
We also provide insulation and ventilation services to prevent ice dam formation. Whether it’s upgrading your attic insulation or ensuring proper ventilation, our team has the expertise and experience to provide a comprehensive solution to your ice dam concerns.
Warranties and Guarantees
We recognize that committing to home improvement projects, such as ice dam prevention, is a substantial decision. That’s why we offer a 5-Year Workmanship Warranty for new system installations and a 1-Year Clean-Up Guarantee, which specifically covers clean-up necessitated by ice dam damage during the initial year following installation.
In addition to our workmanship warranty and clean-up guarantee, we also provide a Manufacturer’s Warranty, providing our customers with peace of mind knowing that they are protected against any defects in the materials we use.
Summary
In conclusion, understanding the formation of ice dams and implementing effective prevention techniques can safeguard your home against potential damage. Whether it’s regular roof maintenance, adequate insulation, or sealing air leaks, each measure plays a crucial role in preventing ice dams. However, if you’re facing a severe ice dam issue, it’s always best to call a professional.
At CoMo Premium Exteriors, we provide comprehensive ice dam solutions with a customer-centric approach. With our expertise, comprehensive services, and warranties, we ensure your home is protected from ice dam damage. Don’t let ice dams wreak havoc on your home – reach out to CoMo Premium Exteriors today!
Frequently Asked Questions
Why are ice dams a problem?
Ice dams are a problem because they can lead to water seeping into your attic, damaging insulation and potentially causing structural damage if not addressed. This significantly reduces the insulation’s heat-retaining capacity.
How do you get rid of an ice dam?
To get rid of an ice dam, use calcium chloride pellets to melt away the heavy snow buildup and ice. Avoid using rock salt as it can damage shingles and plants.
Does ice dam mean I need a new roof?
No, ice dams rarely damage the roof itself. It’s the water that causes the damage, usually to walls and ceilings, not the roof. The roof remains intact in most cases, even when removing ice dams.
How can you prevent ice dams?
To prevent ice dams, you can use a roof rake to clear excess snow from your roof after heavy snowfall, which helps stop ice dams from forming. Additionally, consider adding attic insulation, sealing interior airflow leaks, and evaluating the insulation and ventilation in your attic.
What are the common signs of ice dam problems?
If you notice icicles, water stains on ceilings or walls, or damaged shingles or gutters, these could be signs of ice dam problems. Addressing these issues promptly can help prevent further damage.
Seamless gutters are a wildly popular choice among homeowners due to their durability and leak-resistant properties. We’re going to look at what exactly seamless gutters are, how they’re made, and the process of their installation. If you’ve been considering a seamless gutter system for your home, we’ll also point you to a trusted Columbia resource for getting them professionally installed.
What are Seamless Gutters?
Many homeowners that are looking to update or upgrade their gutters have looked at seamless gutters and had some questions, particularly about how they’re made and subsequently installed. Traditional gutter systems are made up of multiple sections of preformed gutter material that are then joined together, which can lead to leaks and even clogs that develop at the seams over the years.
Seamless gutters, on the other hand, are designed as continuous, single-piece gutter systems that largely eliminate seams, meaning a lower potential for leaks and fewer spots for them to happen. Seamless gutters are custom-made to fit the exact dimensions of the individual home, ensuring a perfect fit and an unbeatable aesthetically pleasing appearance.
Frequently they’re made from aluminum, copper, or occasionally, steel. They are also available in a wide range of colors meant to complement any home’s exterior.
How are Seamless Gutters Made?
Seamless gutters are made on-site, to the exact specifications of the home they’re going to be installed on. They are made with a specialized machine known as a gutter forming machine, or simply a seamless gutter machine. This is a piece of equipment that takes the flat metal gutter stock, of the preferred material type and color, and forms it instantly into the desired gutter shape.
Inside the machine, a series of rollers apply directional pressure to the metal as it rolls through, bending it gradually until it has the desired profile shape. The most common shape is the “k-style” of gutter, which looks similar to decorative crown molding. Other styles like half-moon are also common. Once the material has been formed, it’s cut to the exact length needed, eliminating the need for multiple pieces.
How are Seamless Gutters Installed?
The seamless gutter installation process can be broken down into about 5 general steps. Take a look:
Inspection, measurement, and general preparation. This is where a contractor will measure your home and determine how much material is needed.
Fabrication is the next step and is where the contractor will form the gutter into the preferred shape on-site.
Next is the bracket installation. Seamless gutters are held in place with special brackets, which are installed before the gutters.
Gutter installation is next, where the gutters are carefully fitted to the brackets mounted previously. They are then checked to ensure the proper alignment and slope.
The final step is the downspout installation, but it’s one of the most important steps. Without at least one downspout every 40 feet, your gutters won’t function optimally. The downspouts will be attached and customized to match the gutter and home color scheme and fit the home’s unique measurements.
CoMo Premium Exteriors Are Expert Local Gutter Installers
If you’ve noticed that your old gutters are looking a little beaten up, or maybe they’re starting to leak, and you’re considering upgrading to seamless gutters, CoMo Premium Exteriors is ready to be your trusted installation partner. Our team of experienced professionals has been serving this area for years and is committed to giving you the results you want. Reach out today and let us help you protect your home with new seamless gutters.
Time for a Change? Key Indicators When to Replace Gutters
Imagine this: a sudden downpour begins, the sound of rain drumming on your roof is almost deafening, and then… you see it. Water cascading over the edge of your gutters, pooling around your home’s foundation, and turning your lovely landscape into a muddy mess. Your gutters, the unsung heroes of your home, have failed. But how did it come to this, and what can you do about it? Read on to discover the signs that it’s time for a gutter replacement, when to replace gutters, the pros and cons of different gutter materials, and the benefits of professional gutter replacement services.
Key Takeaways
Gutters should be replaced when they show signs of leaking, consistent overflowing, sagging, or storm damage, as well as if they are an outdated style that negatively affects their efficiency.
Maintaining new gutters involves regular cleaning, periodic inspections to identify and mitigate potential issues, and ensuring proper installation to avoid future problems and extend the system’s life.
Recognizing the Signs: When to Replace Your Gutters
Leaking gutter causing water damage to home’s foundation and siding
Gutters are more than just an accessory for your home; they perform the vital role of directing rainwater away from your foundation, preventing water damage and potential structural issues. But like any part of your home, gutters can deteriorate over time. Ignoring these signs can lead to more severe problems, such as basement flooding and damage to your siding.
So how do you know when it’s time to replace your gutters? The answer lies in recognizing the key indicators of a failing gutter system. From leaks and consistent overflowing to outdated styles and storm damage, these are all signs that your gutter system may need a revamp. Additionally, sagging gutters, a clear sign of structural failure, are a telltale sign that you need a gutter replacement.
Regular inspections can help identify these issues early, preventing the need for expensive repairs or replacements later on. We’ll further examine these signals to appreciate their significance in prompting a change.
Leaking Gutters
Leaking gutters are usually the first sign that your gutter system needs attention. Leaks can occur due to many reasons, including cracks, separations, or even corrosion. Leaking gutters not only cause water to drip unattractively from your gutters, but they can also lead to severe damage such as mold and mildew growth, basement flooding, and damage to the fascia and soffit. These issues can be both significant and expensive to fix, emphasizing the importance of addressing leaks as soon as they are spotted.
Common areas where gutters typically leak include sections that have corroded or rusted, issues with improper slope, clogs, damage to the fascia board, and leaks near the downspouts. Regular inspections can help identify these issues early on, and preventive measures such as regular cleaning, ensuring proper slope, checking and tightening any loose parts, considering installing gutter guards if needed, and consistently inspecting and promptly repairing any signs of damage or wear can help prevent them.
Consistent Overflowing
Overflowing gutters leading to soil erosion and basement flooding
Another clear sign of a failing gutter system is consistent overflowing. This is often caused by blockages, improper gutter slope, an inadequate number of gutters and downspouts, or even loose gutters. When gutters overflow, water can lead to soil erosion by washing away the top layer of soil around the house, damaging your landscape, and potentially affecting the stability of your home’s foundation.
Frequent gutter overflow can often be caused by:
Blockages
Improper gutter slope
Inadequate number of gutters and downspouts
Heavy rainfall
Loose gutters
Seamless gutters can help reduce the risk of overflow by eliminating seams that can cause leaks. Regularly cleaning your gutters to remove debris and checking the slope can help prevent overflow.
Outdated Gutter Styles
Outdated gutter style not efficiently directing water away from home
The style of your gutters might seem like a purely aesthetic choice, but did you know that outdated gutter styles could also contribute to your gutter problems? Older gutter styles may not be as efficient in directing water away from your home, making it necessary to replace them with modern designs.
Modern gutter designs, including K-style options, half round gutters, sectional gutters, and decorative downspouts, are designed to prioritize both aesthetics and protection against water damage. These gutters are crafted with versatile and effective designs and are tailored to match the roof’s measurements, ensuring efficient water drainage away from the home.
Besides, replacing outdated gutter styles with modern gutter systems can offer higher efficiency in managing water flow and are created with a focus on enhancing curb appeal and delivering reliable protection against water damage. Gutter services play a crucial role in this process.
Sagging and Pulling Away
Sagging gutters causing structural damage to the home
Sagging and pulling away are two of the most visible signs of gutter problems. Gutters can sag and pull away from the house due to several reasons, including the weight of debris accumulated in the gutters, improper installation, and rotted fascia. This not only looks unsightly but can also lead to structural damage to your home, as gutters that pull away from your house can cause water to run down your walls, leading to rot and other damage.
Fixing sagging and pulling away gutters can be as simple as:
Storm damage can have a negative influence on the functionality of gutters, as it can cause dents, punctures, or cracks that affect their ability to channel water. Overloaded or clogged gutters may result in water pooling and potential damage to the landscape, requiring thorough inspections and repairs.
Gutter Materials: Choosing the Right One for Your Home
Once you’ve decided it’s time for a gutter replacement, the next step is choosing the right gutter material for your new gutters. The material you choose can significantly affect the performance, durability, and cost of your new gutter system. While all gutter materials serve the same basic function, there are key differences between them that can make some types more suited to your needs than others.
From vinyl and aluminum to steel and copper, each material has its unique pros and cons, and understanding these can help you make an informed decision. We’ll examine these materials in detail to understand their advantages and disadvantages.
Vinyl
Vinyl gutters are a popular choice for many homeowners due to their:
Affordability
Easy installation
Lightweight construction
Relatively easy to work with
These qualities make them a great choice for DIY enthusiasts.
However, while vinyl gutters are the most affordable option, they may not be the most durable. They are prone to cracking in certain climates and have a typical lifespan of 10 to 15 years. Therefore, while they may be a good short-term solution, they might not be the best option if you’re looking for gutters that will last you for decades.
Aluminum
Next up are aluminum gutters. These gutters are known for their lightweight and rust-resistant properties, making them a popular choice for homeowners. They are priced between $2 to $15 per linear foot and have a lifespan of up to 20 years.
While aluminum gutters are more resilient than vinyl, they do have their drawbacks. They have low resistance to high temperatures and are susceptible to dents and damage under certain conditions. However, with regular maintenance, these issues can be mitigated.
Steel
If strength and durability are your top priorities, then galvanized steel gutters might be the right choice for you. Known for their exceptional durability and strength, steel gutters can typically last about 20 years when they receive proper care and maintenance.
However, while steel gutters are strong, they can be prone to rust and corrosion. This means they require regular maintenance to prevent such problems. So, if you’re not keen on regular gutter maintenance, steel might not be the best choice for you.
Copper
Lastly, we have copper gutters. While they are the most expensive option, ranging from $15 to $40 per linear foot, their impressive lifespan of 50 years and unique aesthetic appeal often make them worth the investment. It’s important to consider gutter installation costs when making your decision, as well as other gutter installation cost factors.
However, it’s important to note that copper gutters require professional installation, so they might not be the best choice for a DIY project.
Professional Services: Why Choose CoMo Premium Exteriors
When it comes to gutter replacement, the importance of professional services cannot be overstated. CoMo Premium Exteriors, one of the leading gutter installation companies in Missouri, offers top-notch gutter replacement services that include a 5-year workmanship warranty, 1-year clean-up guarantee, and manufacturer’s warranty.
With their team of licensed and insured professionals, free estimates, and financing options, CoMo Premium Exteriors ensures customer satisfaction throughout the project timeline. We’ll further explore what sets CoMo Premium Exteriors apart in the market.
5-Year Workmanship Warranty
One of the key reasons to choose CoMo Premium Exteriors for your gutter replacement needs is their 5-year workmanship warranty. This warranty provides coverage for any defects in the installation or workmanship of their exterior services for a period of five years, ensuring you have confidence in the quality and longevity of your investment.
Having a solid warranty in place gives you peace of mind, knowing that if anything goes wrong due to the workmanship, CoMo Premium Exteriors will take care of it. This warranty stands out as it is considerably longer than the typical one-year warranty offered by most exterior remodeling companies.
Project Management
Another key benefit of CoMo Premium Exteriors is their emphasis on professional project management. They oversee the planning and execution of the entire gutter replacement process, which includes:
Ensuring the replacement stays on schedule
Managing resources effectively
Coordinating with contractors and suppliers to ensure efficient and high-quality gutter replacement.
Whether you’re in a bustling city or a rural area, you can count on CoMo Premium Exteriors for your gutter replacement needs.
Being able to cater to a wide service area is a significant advantage. It allows them to reach more customers and offer their high-quality services to homeowners across Mid-Missouri.
So, no matter where you are in Mid-Missouri, you can rely on CoMo Premium Exteriors to take care of your gutter replacement needs.
Gutter Maintenance Tips
Now that you’ve got your new gutters installed, how do you ensure they last as long as possible? The answer lies in regular maintenance. Maintaining your gutters is crucial in prolonging their lifespan and ensuring efficient operation.
From regular cleaning to periodic inspections and proper installation, these are the key aspects of gutter maintenance that every homeowner should be aware of. We’ll examine each of these aspects in more detail.
Regular Cleaning
One of the most important aspects of gutter maintenance is regular cleaning. Over time, gutters can accumulate debris such as leaves, twigs, and dirt, which can lead to clogs and blockages. Regular cleaning helps prevent these issues and keeps your gutters functioning efficiently.
Gutter cleaning is essential at least once or twice a year, ideally in the spring and fall, to prevent clogging and ensure proper water flow. While cleaning, remember to follow safety measures such as using a stable ladder, wearing eye protection and gloves, and avoiding gutters near electricity lines.
Periodic Inspections
Periodic inspections are another key aspect of gutter maintenance. Inspecting your gutters at least twice a year can help identify potential issues early, preventing costly repairs or replacements down the line.
Common issues that require periodic gutter inspections include:
Sagging gutters
Leaks
Improper sloping
Clogs or blockages
Damaged downspouts
If you notice any of these issues during your inspection, it’s advisable to have your gutters professionally inspected to prevent the issue from escalating into a larger problem.
Proper Installation
Last but not least, proper gutter installation is crucial in maintaining your gutters. Improperly installed gutters can lead to a host of problems, including sagging, pulling away, and even structural damage to your home.
Whether you choose to install your gutters yourself or hire a professional, it’s important to follow the proper installation procedures for installing gutters. These include:
Measuring the area where the gutters will be installed
Cleaning and clearing the area
Installing the gutters by snapping the sections together
We’ve covered a lot of ground in this blog post, but the key takeaway is this: gutters are an essential part of your home. They protect your home from water damage, add to its curb appeal, and can even increase its value. But like any part of your home, gutters require regular maintenance and will eventually need to be replaced.
Whether you’re dealing with leaks, overflow, outdated styles, sagging gutters, or storm damage, recognizing the signs of a failing gutter system is the first step to solving the problem. And when it’s time for a replacement, knowing the pros and cons of different gutter materials, and the benefits of professional services like those offered by CoMo Premium Exteriors, can make the decision process much easier. So, don’t neglect your gutters. Take good care of them, and they’ll take good care of your home.
Frequently Asked Questions
How do you know if gutters need to be replaced?
If you notice large gaps, cracks, standing water, sagging gutters, peeling paint, rust, water damage marks, or mold in your gutters, it’s time to consider replacing them. Look for breaks at the seams, cracks, peeling paint, water damage around the gutters, rust, and sagging or pulling as signs that you need new gutters.
How often should you replace gutters?
You should replace your gutters every 20 years to ensure proper water drainage and protect your roof, siding, landscaping, and foundation. With proper care, they can last even longer.
Is it OK to replace gutters before roof?
It’s better to wait or do both projects at the same time, as replacing gutters before the roof can lead to damage when replacing the roof later.
How much does it cost to replace gutters around house?
On average, replacing gutters around the house can cost between $1,700 and $3,100, with premium materials like copper and zinc costing more. The cost varies depending on the materials used and the size of the house.
What are the pros and cons of different gutter materials?
In conclusion, the pros of different gutter materials include affordability and ease of installation for vinyl, lightweight and rust-resistance for aluminum, strength and durability for steel, and long-lasting and visually appealing for copper. However, vinyl is less durable, steel can rust, and copper is the most expensive option.
Smart homeowners know the importance of cleaning their gutters once in a while. Some, dread the once or twice-a-year cleaning, while others simply hire someone to do it. No matter who does it – cleaning your gutters is essential to keeping water flowing off your roof, down your downspouts, and away from your home’s foundation. For those that ignore this important activity, they can find the foundation repair costs drastically exceed what it would have taken to address their gutter issues. Below we provide you with some advice that is worth the read.
How Often Should You Clean Your Gutters?
You should clean your gutters a minimum of annually. We recommend doing it twice a year, especially if you have lots of trees and foliage nearby. If you keep them clean, then the gutters should last 15 to 20 years.
Why Does Cleaning Your Gutters Matter?
There are many frustrating consequences that arise from not cleaning your gutters often enough.
Leaks – When debris gets stuck in the gutters, it creates leaks and eventually overflows in different areas causing water to get down by the foundation
Mold & Algae – We have enough trouble with humidity in Mid-Missouri, but when the rainy season arrives, you don’t want to add to the problem with clogged gutters. That becomes a breeding ground for toxic mold and other unwanted fungi.
Roof Problems – Clogged gutters can overflow in the summer, but can also cause issues in the winter. When the snow melts and can’t get away from the home and then refreezes it can cause ice damming. This is a problem where on low slope roofs water freezes and refreezes backing up the roof and working in under the shingles causing leaks as it thaws.
More Pests – The main things that get stuck in your gutters are leaves, pine needles, and twigs, which all make great homes for bugs. Cleaning the gutters periodically helps keep water flowing out of your gutters and thus not creating standing water for a pest breeding ground.
Gutter Covers & Gutter Guards
Those are some of the big reasons for cleaning often. Besides that, you might consider installing gutter covers or gutter guards. On houses with a lot of foliage nearby, these are a must-have. There are several different kinds and it is important to select the gutter guard that best fits your need and the slope of the roof.
Cleaning Your Gutters: Call CoMo Premium Exteriors for Roofing, Gutters, Siding, & Other Services
While we don’t do gutter cleaning ourselves, we can put you in contact with a reliable cleaning company. You don’t have to do it yourself, especially if you dread getting onto a ladder. Whatever you do, always play it safe, but make sure you don’t go too long without cleaning the gutters.
Now that you know the importance of cleaning your gutters, don’t forget to contact us the next time you have questions about home exterior maintenance.