Asphalt Roof: A Comprehensive Guide to Materials and Costs
Asphalt Roof: A Comprehensive Guide to Materials and Costs
Considering an asphalt roof? You’re in the right place. This guide will walk you through everything you need to know about asphalt roofs, from the different types of shingles to the installation process, benefits, and costs. Asphalt roofs are a popular choice for their affordability and durability.
Key Takeaways
- Asphalt shingles are popular for residential roofing due to their affordability, durability, and aesthetic versatility, with three main types: strip, dimensional, and luxury shingles, each offering different benefits.
- Proper installation of an asphalt roof involves preparing the roof deck, installing underlayment and leak barriers, and correctly laying down asphalt shingles with attention to alignment and nailing techniques.
- Factors influencing the cost of asphalt roofing include the size and pitch of the roof, type of shingles, and labor costs, with additional expenses like old shingle disposal and deck repairs potentially adding to the overall cost.
Understanding Asphalt Shingles

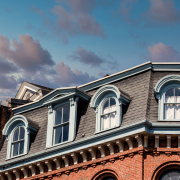
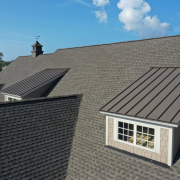
Illustration of different types of asphalt shingles
Asphalt shingles, also known as composite shingles, are a highly popular choice for residential roofing, thanks to their affordability and ease of installation. Modern asphalt shingles are composed of a fiberglass base covered by asphalt and granules, which makes them durable and versatile in terms of aesthetics. They come in various types, styles, and colors, offering homeowners plenty of options to match their preferences and the architecture of their homes with roof shingles.
We’ll delve into the various types of asphalt shingles and their respective benefits in the next sections.
Types of Asphalt Shingles
Asphalt shingles come in three main types: strip shingles, dimensional shingles, and luxury shingles. Each type presents distinct features and advantages, so it’s important to grasp these differences before deciding.
Strip shingles, also known as traditional or 3-tab shingles, are basic asphalt shingles that have the following features:
- Made from a single layer of asphalt
- Flat appearance that resembles slate
- Simple, rectangular shapes
- Cost-effective
- Straightforward design
These shingles are often chosen for their cost-effectiveness and straightforward design.
The most prevalent type of asphalt shingles are dimensional shingles, which are also known as architectural shingles or laminate shingles. They are popular for their durability and aesthetic appeal. They are made with two or more layers of asphalt fused together, which adds visual depth to roofs and creates a thicker, richer, multi-dimensional appearance. Their improved durability and aesthetic appeal contribute significantly to their popularity.
Luxury shingles are the highest-quality laminated shingles, offering premium protection and a differentiated appearance. Designed to mimic the look of traditional materials like cedar shakes and slate tiles, luxury shingles provide a stunning and realistic appearance, making them an excellent choice for homeowners seeking a high-end look for their roofs.
Benefits of Asphalt Shingles
Durability is a key benefit of asphalt shingles. Being able to withstand various weather conditions makes them a dependable choice for many homeowners. Additionally, asphalt shingles require minimal upkeep, allowing homeowners to maintain their roofs without significant effort.
Another significant benefit of asphalt shingles is their aesthetic versatility. Available in a wide range of colors and styles, asphalt shingles can complement any home design, enhancing the overall curb appeal. Whether you prefer a classic look or a modern style, there is an asphalt shingle option to match your taste.
Asphalt Roof Installation Process

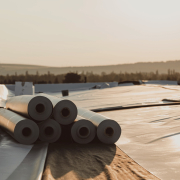
Illustration of asphalt roof installation process
The process of installing an asphalt roof involves numerous key steps, guaranteeing a robust and weather-resistant roofing system. Understanding the physics of a sloped shingle roof, which relies on gravity to shed water, is essential for effective installation. The process includes preparing the roof deck, installing underlayment and leak barriers, and laying down the asphalt shingles. Each of these steps plays a vital role in the overall success of the roofing project.
Preparing Your Roof
Ensuring a smooth, dry, and gap-free roof deck is a prerequisite before installing any roofing materials. The deck should be properly fastened to the roof trusses to provide a stable base for the shingles.
Proper preparation of the roof deck sets the stage for a successful installation, ensuring that the roofing materials will adhere correctly and provide lasting protection.
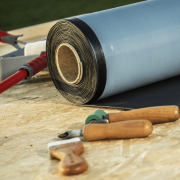
Installing Underlayment and Leak Barriers
Acting as secondary protectors beneath the shingles, underlayment and leak barriers are integral to an asphalt roofing system. and preventing leaks caused by wind-driven rain and ice dams. The installation process begins with the drip edge at the roof’s eave, which protects the lower edge of the roof deck from water damage. Ice and water protection membranes are then installed over the drip edge to prevent ice dams and water damage in colder climates.
Roof underlayment, which can be asphalt-saturated felt or synthetic, is installed starting at the eave, overlapping the ice and water protector. This additional layer of defense enhances the roof’s ability to withstand harsh weather conditions, ensuring that the underlying structure remains dry and intact.
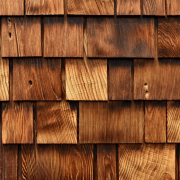
Laying Down Asphalt Shingles

Illustration of proper alignment and nailing techniques for asphalt shingles
The shingle installation commences with a preparatory course of starter shingles at the eave, guaranteeing correct alignment and sealing. Starter shingles provide a sealant adhesion point and water-shedding protection, which are crucial for the overall performance of the roof.
Proper alignment and nailing techniques are essential for the wind resistance and durability of the roofing system. Correct nail placement is crucial for maintaining warranty coverage and ensuring the roof’s longevity. When working with a roofing square, it’s important to follow these guidelines for the best results.
The process concludes with the installation of hip and ridge cap shingles, which straddle the ridge and shed water down either slope, completing the shingle installation.
Cost of Asphalt Roofing
Several factors influence the cost of asphalt roofing, including:
- The size of the roof
- Type of shingles
- Roof pitch
- Choice of roofing contractor
In preparing a roof cost estimate, it’s important to account for specific roof characteristics, your preferences, budget, and geographical location.
The following subsections provide a detailed breakdown of material costs, labor costs, and additional expenses that may arise during the roofing project.
Material Costs
The cost of asphalt roofing materials varies depending on the thickness and type of shingles chosen. Thicker asphalt shingles tend to be more expensive than thinner ones.
To calculate roof costs, multiply the width by the length of the roof to obtain its surface area and then decide on the best roofing material and the roof’s pitch.
Labor Costs
Labor costs for installing an asphalt roof can be influenced by several factors, including the roof pitch, the complexity of the installation, and the geographic location of the project. These factors dictate the difficulty of working on the roof and can significantly impact the overall cost of labor.
Additional Costs
The disposal of old shingles and deck repairs are among the additional expenses that could occur during asphalt roof installation. Discovering more damage to the roof than anticipated can lead to additional expenses. Basic roof repairs typically cost between $150 and $400, while more extensive repairs may average around $950.
The cost of removing and disposing of old shingles typically falls between $1,200 to $1,300 for a 20-yard dumpster.
Asphalt Roof Warranties
Asphalt roof warranties guard against unforeseen issues such as manufacturing defects and workmanship errors. These warranties are typically divided into manufacturer warranties and workmanship warranties, each covering different aspects of the roofing system.
The following subsections will explore these warranties in more detail.
Manufacturer Warranties
Manufacturer warranties cover defects or manufacturing errors in the roofing materials. These warranties do not cover poor workmanship under their standard material warranty.
Manufacturer-backed workmanship warranties, like GAF’s Golden Pledge or CertainTeed’s SureStart, cover installation errors for up to 25 years.
Workmanship Warranties
Workmanship warranties cover all faulty installation errors that cause roofs to leak or fail prematurely. The duration of workmanship warranties provided by contractors typically ranges from 2 to 5 years.
Longevity and Maintenance of Asphalt Roofs
While the average lifespan of an asphalt roof is about 20 years, factors such as:
- installation quality
- attic ventilation
- material quality
- weather conditions
- roof orientation
- regular maintenance
can impact this timeline. Routine inspections and prompt repairs are crucial maintenance practices to extend the life of an asphalt roof.
The following subsections will provide more details on expected lifespans, maintenance tips, and signs it’s time to replace the roof.
Expected Lifespan
3-tab asphalt shingles, though stated by manufacturers to last 25 years, realistically have a lifespan of 15 to 20 years. Architectural asphalt shingles have a manufacturer-stated lifespan of 30 years but typically last around 22 to 25 years in realistic conditions.
Luxury asphalt shingles can last around 30 years or longer under optimal conditions.
Maintenance Tips

Illustration of maintenance tips for asphalt roofs
Consistent maintenance is key to prolonging an asphalt roof’s lifespan. Here are some tips to help you maintain your roof:
- Have your roof professionally inspected every year to spot potential issues early on. Regular inspections can identify potential problems early, preventing costly repairs and extending the roof’s lifespan.
- Additionally, check for damage from the ground using binoculars to spot any issues.
- Inspect your attic for daylight penetration or water stains that might indicate leaks.
By following these maintenance tips, you can ensure that your asphalt roof stays in good condition for years to come.
To maintain the health of your roof, follow these tips:
- Regularly clear off debris, such as leaves and branches, to prevent moisture retention that could damage your roof.
- Clean your gutters at least twice a year to prevent water damage.
- Prune trees that are close to your roof to prevent branches from causing damage during storms.
- Make repairs immediately when you notice any damage to prevent further deterioration and higher repair costs.
Signs It’s Time to Replace
Curling or buckling shingles, extensive damage, and persistent leaks are indications that it might be time to replace your asphalt roof. Recognizing these signs is crucial in preventing extensive damage and ensuring the safety and comfort of your home.
Enhancing Your Asphalt Roof’s Performance
You can boost your asphalt roof’s performance by ensuring proper attic ventilation, using reflective shingles, and choosing algae-resistant shingles. These enhancements can improve the roof’s durability, energy efficiency, and appearance.
The following subsections will provide more details on each of these enhancements.
Attic Ventilation

Illustration of the importance of proper attic ventilation for asphalt shingles
Ensuring proper attic ventilation is crucial as poor ventilation can significantly shorten an asphalt roof’s life by causing heat buildup and deterioration of roofing materials. Proper attic ventilation reduces the attic temperature by exhausting warm air, which extends the roof’s service life.
Additionally, effective attic ventilation helps prevent ice dams from forming on the roof during winter, maintaining a consistent temperature and reducing the risk of moisture buildup.
Reflective Shingles
Reflective shingles offer several benefits:
- They deflect a large portion of the sun’s rays, reducing heat absorption and improving energy efficiency.
- Solar-reflective shingles utilize special granules to reflect some of the sun’s energy, keeping roof temperatures cooler.
- They can potentially lower cooling costs by maintaining cooler indoor temperatures.
This not only enhances the comfort of most homeowners’ properties but also contributes to energy savings.
Algae-Resistant Shingles
Algae-resistant shingles include copper in their mineral granules, which helps control algae growth and prevents roof discoloration. These shingles help maintain the roof’s appearance by preventing dark streaks caused by algae growth and reduce the need for frequent roof cleaning, thus lowering maintenance costs.
Additionally, algae-resistant shingles enhance roof longevity by protecting against algae-related damage.
Choosing the Right Roofing Contractor
Choosing the right roofing contractor is paramount to the success of your roofing project. Hiring a fully licensed roofing contractor ensures compliance with local codes and protects homeowners from liability. In the following subsections, we will explore the importance of certification and experience, customer reviews and references, and obtaining estimates from multiple contractors.
Certification and Experience
Engaging certified and experienced roofing contractors guarantees adherence to industry standards and proper installation. Certified roofing professionals undergo rigorous training with manufacturers and often require ongoing education. This not only ensures the quality of the installation but also provides homeowners with extended non-prorated warranty benefits.
Customer Reviews and References
Reading recent Google reviews and checking the Better Business Bureau can provide insights into the contractor’s reliability. Requesting references from recent jobs helps in assessing the quality of work and customer satisfaction.
Checking a contractor’s record of quality work can give insight into their reliability and craftsmanship.
Getting Estimates
Getting estimates from various licensed and certified contractors is key for a balanced comparison of services and costs. This allows homeowners to make an informed decision based on the value and quality of the services provided.
Summary
In summary, asphalt shingles offer a cost-effective, durable, and aesthetically versatile option for residential roofing. Understanding the types of asphalt shingles, the installation process, costs, warranties, and maintenance tips can help homeowners make informed decisions. By enhancing your asphalt roof’s performance with proper attic ventilation, reflective shingles, and algae-resistant shingles, you can ensure its longevity and efficiency. Choosing the right roofing contractor is essential to ensure a successful roofing project. With this comprehensive guide, you are well-equipped to embark on your asphalt roofing journey confidently.
Frequently Asked Questions
What are the main types of asphalt shingles?
The main types of asphalt shingles are strip shingles, dimensional shingles, and luxury shingles, each offering different cost, durability, and aesthetic options.
How often should I inspect my asphalt roof?
You should have your asphalt roof professionally inspected every year to identify potential issues early and avoid expensive repairs, ultimately prolonging the roof’s lifespan.
What factors affect the cost of installing an asphalt roof?
The size of the roof, type of shingles, roof pitch, geographic location, and choice of roofing contractor all impact the cost of installing an asphalt roof. Consider these factors when planning for the installation.
What do manufacturer warranties cover?
Manufacturer warranties cover defects or manufacturing errors in the roofing materials. They do not cover poor workmanship, but some manufacturer-backed workmanship warranties can cover installation errors for up to 25 years.
How can I enhance the performance of my asphalt roof?
To enhance the performance of your asphalt roof, make sure to focus on proper attic ventilation, use reflective shingles, and opt for algae-resistant shingles to maintain its appearance and prevent discoloration.